AWS IoT Core
In this tutorial we explain you how to build an end-to-end IoT solution to by integrating a NB-IoT device, IoT Creators platform, AWS IoT Core, AWS Timestream database and Grafana.
Introduction
In this tutorial you will implement a first prototype of an integration between IoT Creators' Telekom IoT and AWS IoT Core, AWS Timestream database and Grafana. You will implement your own end-to-end IoT solution for sensor data monitoring. To let the tutorial as concrete as possible I will explain how to integrate a NB-IoT sensor for CO2, Temperature and Humidity from IMBUILDING (https://www.imbuildings.com/nb-iot-comfort-sensor/). It uses raw UDP as IoT protocol and requires - as many other IoT devices in the market - a device specific data decoding to transform it into an ease-to-handle format. Of cause you can use a different device and implement a different device specific data decoding.
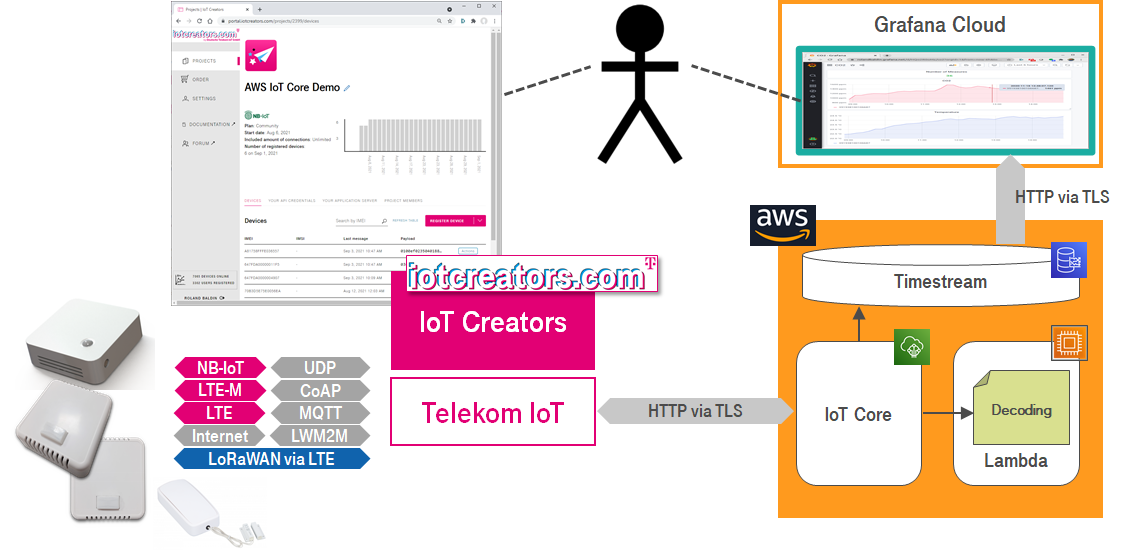
Highlevel architecture.
Since this tutorial concentrates on building a first end-to-end solution we will use the simple custom authentication of IoT Core. We assume that other methods of authentication such as cross account authentication will be used by your-self in the future in case of an productive implementation.
I recommand to prepare your-self with the following to be able to do the tutorial completely.
- IoT Creators account
- Device which you can integrate
- AWS account with access to the AWS console and with full admin permissions for IoT Core, Lambda functions and Timestream database
- Grafana
Additonally it would be very usefull if you can use AWS command line interface aws on your computer
As you can see in the integration architecture below most of the components on which you will work in this tutorial are located in the AWS cloud. During this tutorial you will create all of them step by step.
Detailed architecture to integrate IoT Creators IoT platform with AWS IoT Core, AWS Timestamp and Grafana.
With the following steps we will walk together through this tutorial
Step 1: Integrate device with IoT Creators platform
Step 2: Integrate IoT Creators platform with AWS IoT Core
- Authenticate IoT Creators platform at AWS IoT Core
- Register AWS IoT Core as Application URL in IoT Creators
- Add IoT Access Policy
- Test Device/IoT Creators/AWS IoT Core Integration
Step 3: Integrate AWS IoT Core with AWS Timestream database
- Implement Lambda function MyMessageDecoder to decode "hexed" uplink messages
- Configure IoT Rule DecodeUplinkMessage to trigger MyMessageDecoder
- Create an AWS Timestream database and table to store the uplink messages
- Configure IoT Rule InjectToTimestream to inject messages into AWS Timestream DB
Step 4: Integrate AWS Timestream database with Grafana
- Add Amazon Timestream Plugin to your Grafana
- Add Amazon Timestream Data Source
- Create a simple Dashboard
Step1: Integrate device with IoT Creators platform
In our sample I will integrate a NB-IoT off-the-shelf sensor from IMBUILDING (https://www.imbuildings.com/nb-iot-comfort-sensor/). This sensor is a NB-IoT comfort sensor which measures CO2, temperaturs, humidity and presence. It uses raw UDP as IoT communication protocol.
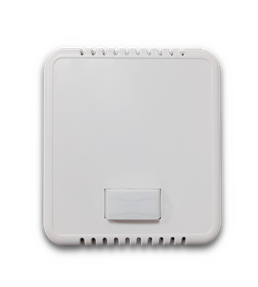
NB-IoT device with CO2, temperature, humidity and presence sensors from IMBUILDING.
To integrate the sensor with IoT Creators platform you simple register the sensor within the IoT Creators project by pushing the REGISTER DEVICE button.
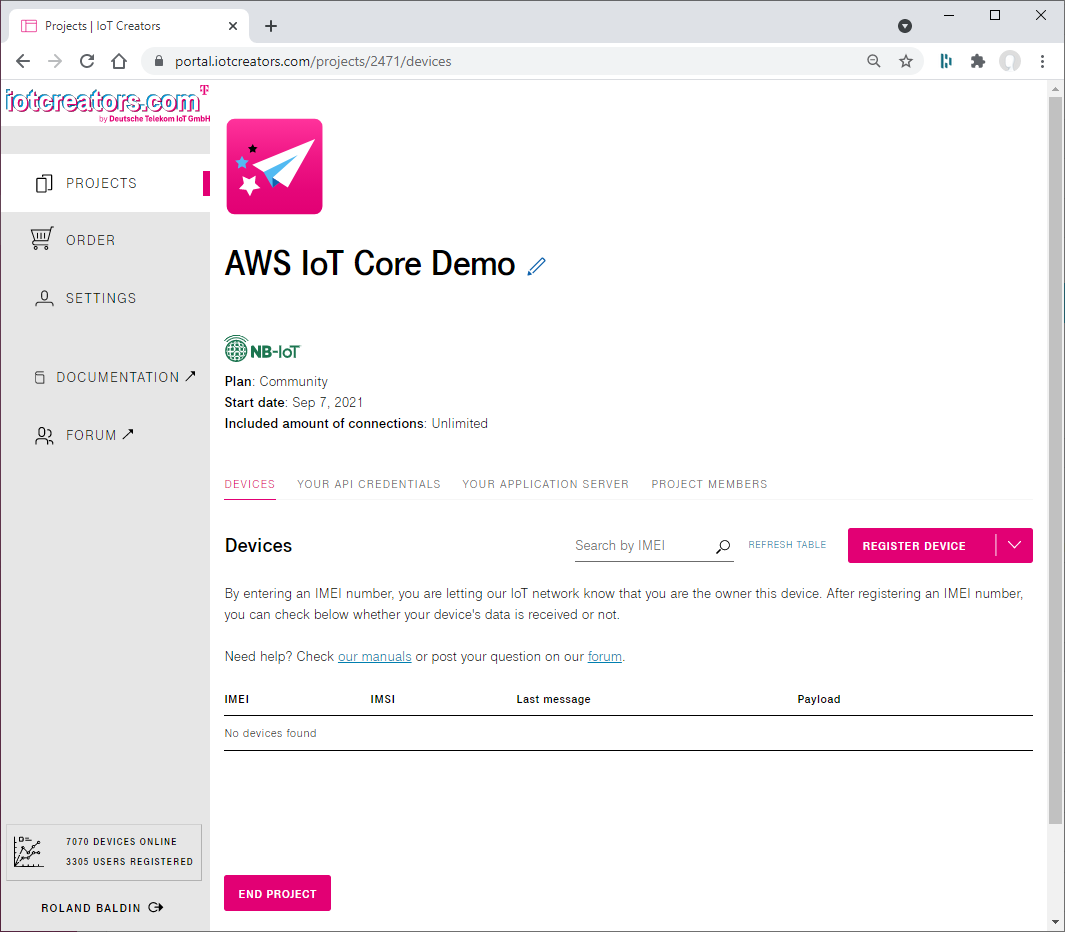
To integrate the device with IoT Creators just register it within the project.
After you pushed the REGISTER DEVICE button the dialog window to register new devices is opened.
Input the IMEI of the device and select UDP as IoT protocol.
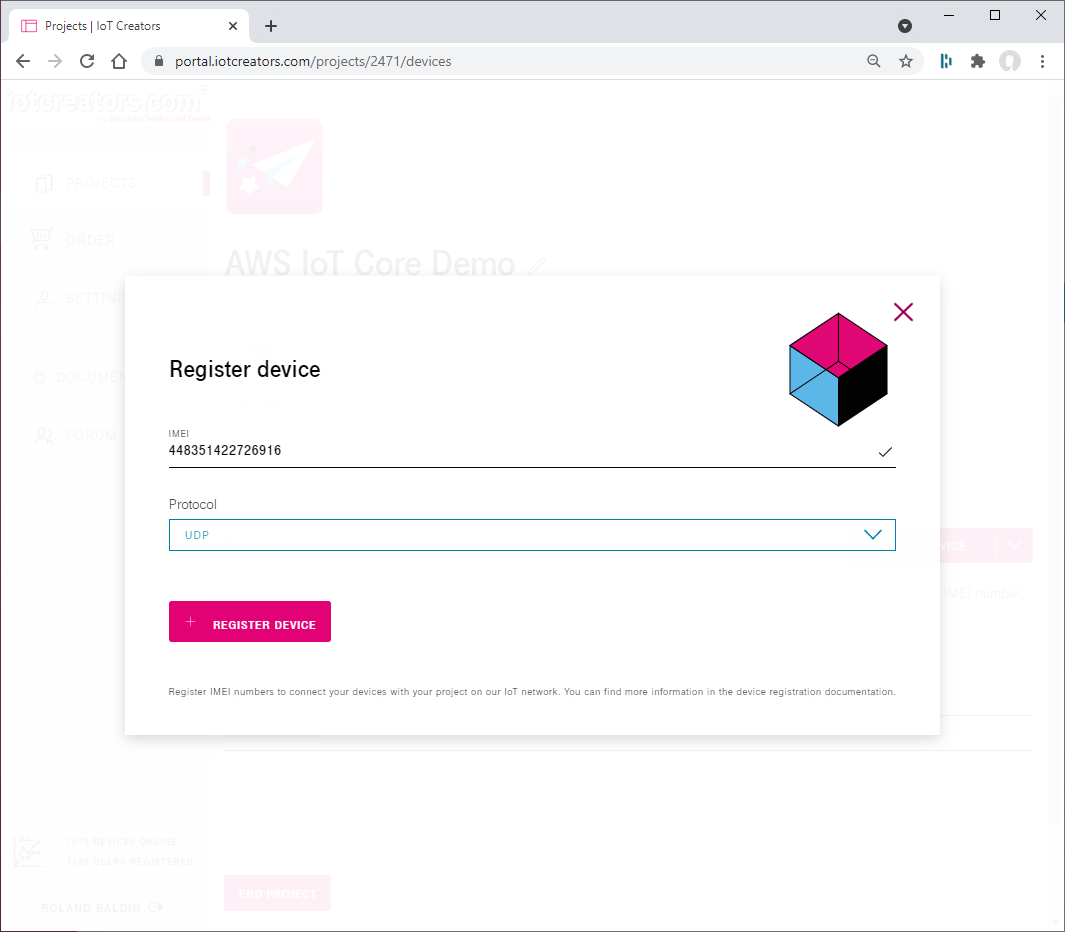
Input IMEI of the device and select UDP as IoT protocol.
Push REGISTER DEVICE to perform the actual device registration.
After this you should see registered device in the device list of the project.
Step 2: Integrate IoT Creators platform with AWS IoT Core
To integrate IoT Creators platform with AWS IoT Core we need to perform the steps:
1. Client Authentication
To authenticate IoT Creators platform at AWS IoT Core we will implement an easy to handle Custom Authenticator for AWS IoT Core with a simple Lambda function. From the security perspective this is not the very best solution but for such a tutorial it is one of the easiest.
2. Register AWS IoT Core as Application URL in IoT Creators
To let IoT Creators platform forward the uplink messages of the previous registered device to your AWS IoT Core we need to register the URL of your AWS IoT Core in the YOUR APPLICATION SERVER section of your IoT Creators project.
3. Add IoT Access Policy
Since the IoT Creators integration service publishes messages to MQTT topics of the AWS IoT Core you need to add a new access policy in which you open the topics for publishing.
4. Test Device/IoT Creators/AWS IoT Core Integration
Bevor we continue to integrate AWS IoT Core with AWS Timestamp database and Grafana with AWS Timestream database we test the integration of the device with IoT Creators and with AWS IoT Core.
In the following we walk through each of those steps.
Authenticate IoT Creators platform at AWS IoT Core
As already mentioned above we will implement the client authentication for IoT Core with a Lambda function by the following steps:
- Create Lambda function IoTCoreCustomAuthorizer
- Create IoT Core Custom Authorizer MyAuthorizer
- Add permissions to enable MyAuthorizer to invoke IoTCoreCustomAuthorizer
- Test MyAuthorizer and IoTCoreCustomerAuthorizer
Create Lambda function IoTCoreCustomAuthorizer
Switch to Lambda service and create a new Python 3.9 Lambda function with the name IoTCoreCustomAuthorizer. Past the following Python code to it.
import json
import logging

log = logging.getLogger("IoTCoreCustomAuthorizer")
log.setLevel(logging.DEBUG)

# Client systems which are allowed to inject data
CLIENTS = {
    "testClient1": {"token":"w9WWwiww04V8VlmYpHdJbRuWLjZZlHrf"}
}

# Buildsthe access policy document
def buildPolicyDocument(effect, action="None", resource="arn:aws:iot:*:*:*"):
    return [
        {
            "Version": "2012-10-17",
            "Statement": [
                {
                    "Action": action,
                    "Effect": effect,
                    "Resource": resource
                }
            ]
        }
    ]

# Lambda's main function
def lambda_handler(event, context):
    log.info("*** START *******************************************************")
    log.info("EVENT: %s" % (json.dumps(event, indent=4, sort_keys=True)))

    try:

        # Extract the auth token from the header
        auth = event["protocolData"]["http"]["headers"]["my-authorizer-token"]
        auth = auth.strip() if auth else ""
        log.info("*** AUTH: %s" % (auth))

        if len(auth) == 0:
            raise Exception("No iotcr-awsiot-authtoken token iotcr-awsiot-authtoken defined in authorziation header.")

        fields = auth.split(":")

        if len(fields) != 2:
            raise Exception("Authorization format of \"%s\" is invalid." % (auth))

        client = fields[0].strip()
        token = fields[1].strip()

        # Verify the auth token. If it doesn't exist or if it wrong raise an exception
        if client not in CLIENTS.keys():
            raise Exception("Unknown client %s (auth=%s)" % (client, auth))

        if token != CLIENTS[client]["token"]:
            raise Exception("Invalid token %s for client %s (auth=%s)" % (token, client, auth))

        # We reach this point only if the authorization is ok.
        returnValue = {
            "isAuthenticated":True,
            "principalId":client,
            "disconnectAfterInSeconds": 86400,
            "refreshAfterInSeconds": 300,
            "policyDocuments": buildPolicyDocument("Allow", action="iot:Publish")
        }

    except ValueError as err:
        print(err)
        returnValue = {"principalId":None, "policyDocuments": buildPolicyDocument("Deny")}

    print("*** RETURN: ***\n%s" % (json.dumps(returnValue, indent=4)))

    return returnValue
Create IoT Core Custom Authorizer
Within the AWS Console switch to AWS IoT service and activate Authorizers within the Secure branch in the left panel.
Push the "Create" button to create a new Custom Authorizer. In the dialog window to the following inputs and push the Create authorizer button.
| Element | Value |
|---|---|
| Name | MyAuthorizer |
| Authorizer function | IoTCoreCustomAuthorizer |
| Enable token signing | off |
| Activate authorizer | on |
In order to keep the authentication as simple as possible, we do not use the token signing. This is good enought to make the first experiance with it. But if you want to go productive you should defently think about using token singing or even cross account authentication.
Add permissions to enable MyAuthorizer to invoke IoTCoreCustomAuthorizer
Switch back to your lambda function IoTCoreCustomAuthorizer, change to the page Configuration and activate section Permissions.
Within Permissions move to the Resource-based policy and push the Add permissions button.
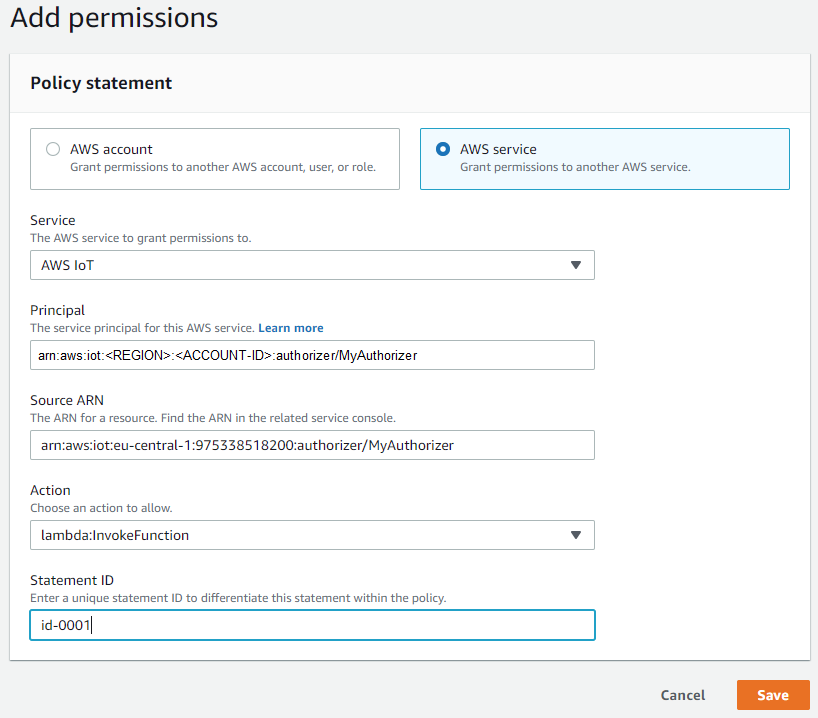
Do the following input for the Add permissions dialog window and push the Save button.
| Element | Value |
|---|---|
| Grand permissions to | AWS service |
| Service | AWS IoT |
| Principal | iot.amazonaws.com |
| Source ARN | arn:aws:iot:REGION:ACCOUNT-ID:authorizer/MyAuthorizer |
| Action | lambda:InvokeFunction |
| Statement ID | id-0001 |
Test MyAuthorizer and IoTCoreCustomerAuthorizer
You can test your Custom Authorizer mit the AWS command line interface aws. To do so execute the following command on your computer:
aws iot test-invoke-authorizer \
  --profile <YOUR PROFILE> \
  --authorizer-name MyAuthorizer \
  --http-context '{"headers":{"my-authorizer-token":"testClient1:w9WWwiww04V8Vlv1VbemYpHdJbRuWLjZZlHrf"}, "queryString": "?token=no"}'
If everything works fine something like the following should be returned
{
    "isAuthenticated": true,
    "principalId": "testClient1",
    "policyDocuments": [
        "{\"Version\":\"2012-10-17\",\"Statement\":[{\"Action\":\"iot:Publish\",\"Effect\":\"Allow\",\"Resource\":\"arn:aws:iot:*:*:*\"}]}"
    ],
    "refreshAfterInSeconds": 300,
    "disconnectAfterInSeconds": 86400
}
👏 Congratulations 👏
If you reached this point you arrived at the first important milestone. You implemented the client authentication for your IoT Creators / AWS IoT Core integration.
Register AWS IoT Core as Application URL in IoT Creators
As shown in the integration architecture above we provide an integration service between IoT Creators, respectively Telekom IoT, and AWS IoT Core.
The major task of the integration service is to
- handle AWS IoT Core authentication,
- split up potential aggregated device messages to single device messages and
- convert the addressing to configurable topics.
Out of this reason we address AWS IoT Core not directly. We address it indirectly via the integration service which we configure in the YOUR APPLICATION SERVER section of the IoT Creators project.
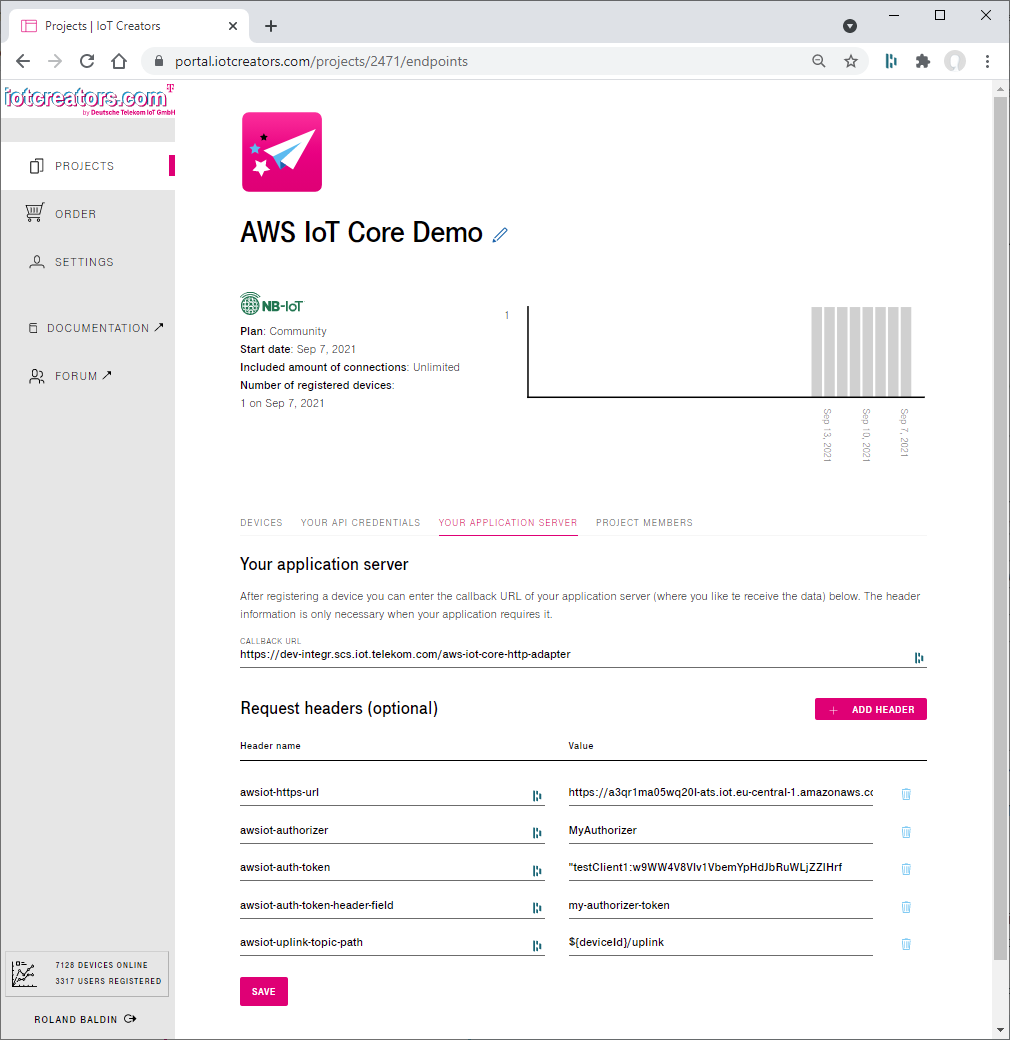
Configuration of the AWS IoT Core integration in the Application section of IoT Creators project.
The following configuration elements need to be input into the YOUR APPLICATION SERVER section of IoT Creators project.
CALLBACK URL
Description:
As mentioned above the device messages are deligated to your AWS IoT Core via IoT Creators integration service. You need to define the URL of IoT Creators integration service as callback url:
Sample:
CALLBACK URL: https://dev-integr.scs.iot.telekom.com/aws-iot-core-http-adapter
Header: awsiot-https-url
Description:
The awsiot-https-url header field defines the https endpoint of your AWS IoT Core instance.
To find out the endpoint URL from your AWS IoT Core execute the following aws command line interface command:
aws iot describe-endpoint --profile <YOUR-PROFILE>
as response you should get
{
  "endpointAddress": "a3qr1ma05wq20l-ats.iot.eu-central-1.amazonaws.com"
}
Sample:
awsiot-https-url: https://a3qr1ma05wq20l-ats.iot.eu-central-1.amazonaws.com:443
Header: awsiot-authorizer
Description:
Name of the Custom Authorizer which have registered in AWS IoT Core previously.
Sample:
awsiot-authorizer: MyAuthorizer
Header: awsiot-auth-token-header-field
Description:
As you know we created the simple Lambda function IoTCoreCustomAuthorizer which we registered as Custom Authorizer in AWS IoT Core. The Lambda function verifies a client token which it reads it from the HTTP header fields.
auth = event["protocolData"]["http"]["headers"]["my-authorizer-token"]
To tell the IoT Creators integration service in which HTTP header field the client token shall be stored it need to be defined in the header field awsiot-auth-token-header-field.
Sample:
awsiot-auth-token-header-field: my-authorizer-token
Header: awsiot-auth-token
Description:
The client token which is verfied by the Custom Authorizer Lambda function. The function IoTCoreCustomAuthorizer defines at the beginning a dictionary which contains all valid client tokens.
# Client systems which are allowed to inject data
CLIENTS = {
    "testClient1": {"token":"w9WWwiww04V8VlmYpHdJbRuWLjZZlHrf"}
}
The token which you define to the header field awsiot-auth-token shall contain the name of the client and its token separated by :
<KEY>:<TOKEN>
Sample:
awsiot-auth-token: testClient1:w9WWwiww04V8VlmYpHdJbRuWLjZZlHrf
Header: awsiot-uplink-topic-path
Description:
AWS IoT Core provides a MQTT broker and its topics to exchange messages between the systems. Since the topic structure is very specific to your needs IoT Creators integration service requires the definition of the topic to which the uplink messages of the devices shall be published.
You can specify the uplink topic as a pattern which contains the deviceId as parameter. To reference the deviceId in your uplink pattern use ${deviceId}.
Sample:
awsiot-uplink-topic-path: %{deviceId}/uplink
Add IoT Access Policy
Since the IoT Creators integration service publishes messages to MQTT topics of the AWS IoT Core you need to add a new access policy in which you open the topics for publishing.
Perform the following steps to create a new access policy in AWS IoT Core with the AWS console.
- Within AWS IoT Core switch to Secure/Policies in the left navigation panel.
- Push the Create button to create a new policy.
- Input IoT Creators as name.
- Push the Advanced mode link to input the following statements.
{
  "Version": "2012-10-17",
  "Statement": [
    {
      "Effect": "Allow",
      "Action": [
        "iot:Publish",
        "iot:Receive",
        "iot:RetainPublish"
      ],
      "Resource": [
        "arn:aws:iot:eu-central-1:975338518200:topic/*"
      ]
    },
    {
      "Effect": "Allow",
      "Action": [
        "iot:Subscribe"
      ],
      "Resource": [
        "arn:aws:iot:eu-central-1:975338518200:topicfilter/*"
      ]
    },
    {
      "Effect": "Allow",
      "Action": [
        "iot:Connect"
      ],
      "Resource": [
        "arn:aws:iot:eu-central-1:975338518200:client/*"
      ]
    }
  ]
}
- Push the Create button.
CAUTION
You just created an open IoT access policy. It is NOT open the public internet, but it is open to everyone who has access to your AWS IoT Core.
WELL DONE !
You just finished all the integration tasks which is related to IoT Creators directly.
The next step is to test if your device data arrives in AWS IoT Core.
Test Device/IoT Creators/AWS IoT Core Integration
In this chapter you will test if the registration of you device at IoT Creators and the integration between IoT Creators and AWS IoT Core will work properly.
To see if the messages of your devices are receiving at AWS IoT Core you need to perform the following steps:
- Switch to AWS IoT Service
- Select Test within the left navigation panal.
- Select Subscribe to a topic page.
- Input
+/uplinkinto Topic filter - Push Subscribe button
- Wait until messages are arriving at your configure integration topic.
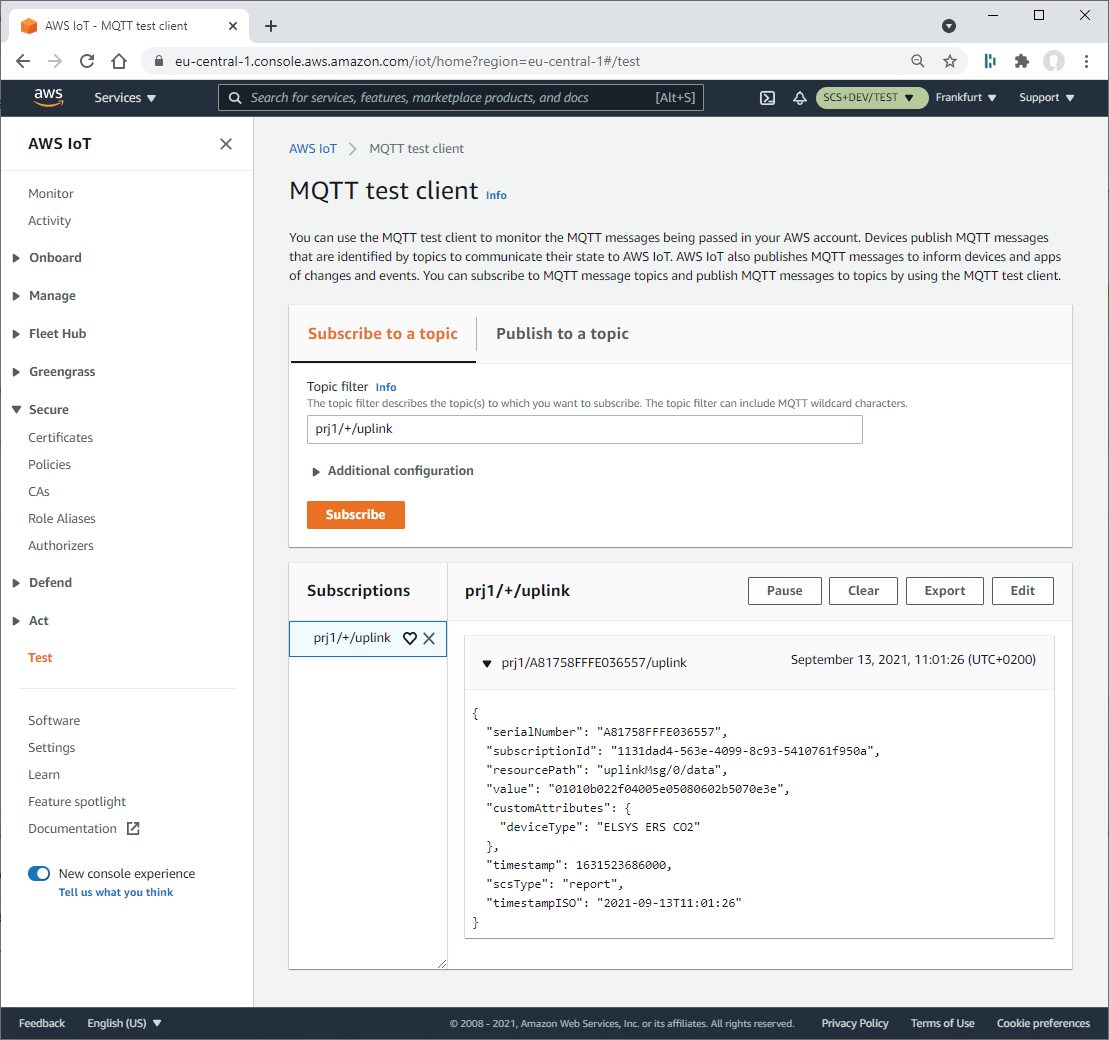
AWS IoT Core MQTT test client
If everything works fine you should see messages which have been forwarded from IoT Creators Telekom IoT via the integration service to your AWS IoT Core instance.
Step 3: Integrate AWS IoT Core with AWS Timestream database
Congratulation ! 👏
If you reach this point it means that you could successfully integrate your device with AWS IoT Core via IoT Creators. This is really great!
As next we jump into the second half of this tutorial. We will integrate the published device messages which are arriving at AWS IoT Core with AWS Timesteam database.Have Fun!
As you saw before we configured the IoT Creators/AWS IoT Core integration to publish uplink device messages to the topic ${deviceId}/uplink. In many cases those uplink messages require an additional step of decoding before they can be injested into next system such as AWS Timestream.
The uplink message of the comfort sensor which we integrate in this tutorial contains values of temperature, humidity, CO2, presense and battery. To keep the message size small the device doesn't publish those information as easy-to-read json or xml format. The device publish it as binary data in hex format such as 01015410ec9ab71400014cab09cd130b03ae01. We need to decode this hex data into a more easy-to-handle JSON format which we can injest into Timestream DB.
To do the messages decoding and the AWS Timestream injestion we will implement and configure as shown in the following diagram
- Implement Lambda function MyMessageDecoder to decode the "hexed" uplink sensor payload into pretty JSON.
- Configure an IoT Rule DecodeUplinkMessage to let decode uplink messages arriving at topic ${deviceId}/uplink from the Lambda function and to re-publish the decoded message to topic timestream/in.
- Create an AWS Timestream database and table to store the uplink messages
- Configure an IoT Rule InjectToTimestream to subscribe topic timestream/in and to inject the messages into your AWS Timestream database.
AWS IoT Rules and Topics to decode devices messages and injest them into AWS Timestream DB.
In the following we will walk through all the steps to setup the architecture above.
Implement Lambda function MyMessageDecoder to decode "hexed" uplink messages
To implement the Lambda function MyMessageDecoder which decode the device payload to a easy-to-use JSON structure perform the following steps:
- Switch to Lambda service and select Functions in the left navigation panel.
- Push the Create function button on the right side of the screen.
- Select Author from scratch
- Input MyMessageDecoder as Function name
- Select latest Python version as Runtime
- Push Create function button
- Replace the source code with the following and push the Deploy button
import json
import logging

log = logging.getLogger("IMBUILDINGMessageDecoder")
log.setLevel(logging.DEBUG)

def decode(hexString):
    '''
    Decoding function for the hex encoded payload of
    IMBUILDING sensors
    '''
    a = bytearray.fromhex(hexString)
    type = a[0]
    version = a[1]

    if type == 1 and version == 1:
        d = {
            "deviceType"  : "IMBUILDING.Comfort",
            "status"      : a[8],
            "BatteryV"    : int.from_bytes(a[9:11], "big") / 100.,
            "Temperature" : int.from_bytes(a[12:14], "big") / 100.,
            "Humidity"    : int.from_bytes(a[14:16], "big") / 100.,
            "CO2"         : int.from_bytes(a[16:18], "big"),
            "Presence"    : 1 if a[18] > 0 else 0
        }
        return d

    else:
        log.warn("Unsupported type %d and version %d" % (type, version))
        return None

def lambda_handler(event, context):
    '''
    Decodes the IoT Creators messages of the following format:
    {
        "scsType"          : "report",
        "serialNumber"     : "A81758FFFE036557",
        "timestamp"        : 1630950424739,
        "timestampISO"     : "2021-09-06T17:47:04",
        "subscriptionId"   : "978bb38e-8cb9-470a-ac61-95a206eff17a",
        "resourcePath"     : "uplinkMsg/0/data",
        "value"            : "0100f602320400020506060248070e3e"
    }
    '''

    log.debug("*** START ***")
    log.debug(json.dumps(event, indent=4))

    # Currently we only support messages of type "report". "report" messages
    # contain payload

    if "scsType" in event.keys() and event["scsType"] != "report":
        raise Exception("scsType %s not supported. Currently only report type is supported." % (event["scsType"]))

    try:
        # Decode the data
        decoded = decode(event["value"])

        if not decoded:
            raise Exception("Could not decode message.")

        # Build the return structure

        out = {
            "scsType"      : event["scsType"],
            "deviceId"     : event["serialNumber"],
            "deviceType"   : decoded["deviceType"]
            "timestamp"    : event["timestamp"],
            "timestampISO" : event["timestampISO"],
            "Data"         : event["value"],
            "decoded"      : decoded
        }

        return out

    except Exception as ex:
        log.error(str(ex))
        raise ex
Configure IoT Rule DecodeUplinkMessage to trigger MyMessageDecoder
We will create an IoT Rule which performs
- Subscribe topics +/uplink and call Lambda function MyMessageDecoder
- Re-publish the outcome of the Lamba function to the topic timestream/in
- Publish decoding errors to topic decodeUplinkMsgErrors
Additionally we need to grant permissions to the IoT Rule to let it call the Lambda function.
- Switch to AWS IoT service and activate the Rules section below the Act brunch on the left side of the navigation bar.
- Push Create button on the right side of the window.
- In the Create a rule screen input DecodeUplinkMessage as Name of the IoT Rule.
- Copy following SQL expression into the Rule query statement field.
SELECT
  aws_lambda("arn:aws:lambda:eu-central-1:975338518200:function:IoTMessageDecoder", *) as out
FROM
  '+/uplink'
- In the Set one or more actions section push Add action button to let re-publish the message to timestream/in topic.
- In the Select action screen select Republish a message to an AWS IoT topic
- Push Configure action button at the botton of this Select action screen.
- In the Configure action screen input timestream/in as Topic
- Push Create Role button
- In the Create a new role screen input IoTCrIoTRule4TimestreamIn as unique name for the role
- Push Create role button
- In the Configure action screen wait for ca. 10 secs to let AWS create the new role.
- Push Add action button.
- In the Create a rule screen an in the section Error action push Add action button
- Perform the same steps to let the rule re-publish the error messages to the topic decodeUplinkMsgErrors
- In the Create a rule screen push Create rule button
If everything went ok you should have a new IoT Rule which looks pretty much like the following.
IoT Rule DecodeUplinkMessage
Make sure that the IoT Rule DecodeUplinkMessages is enabled.
After you created the IoT Rule to trigger the Lambda function to decode the uplink messages successfully you need to add permissions that the IoT Rule is allowed to call the Lambda function.
Switch back to your lambda function MyMessageDecoder, change to the page Configuration and activate section Permissions.
Within Permissions move to the Resource-based policy and push the Add permissions button.
Do the following input for the Add permissions dialog window and push the Save button.
| Element | Value |
|---|---|
| Grand permissions to | AWS service |
| Service | AWS IoT |
| Principal | iot.amazonaws.com |
| Source ARN | arn:aws:iot:REGION:ACCOUNT-ID:rule/DecodeUplinkMessages |
| Action | lambda:InvokeFunction |
| Statement ID | id-0002 |
Great, you did enabled the message decoding. The uplink messages are now provided to the Timestream injestion topic in an easy-to-handle form.
Test your IoT Rule DecodeUplinkMessages and the decoder MyMessageDecoder
To test if your IoT Rule DecodeUplinkMessages and your decoder Lambda function MyMessageDecoder works correct you can switch back Test section of AWS IoT service and subscribe to the topic timestream/in.
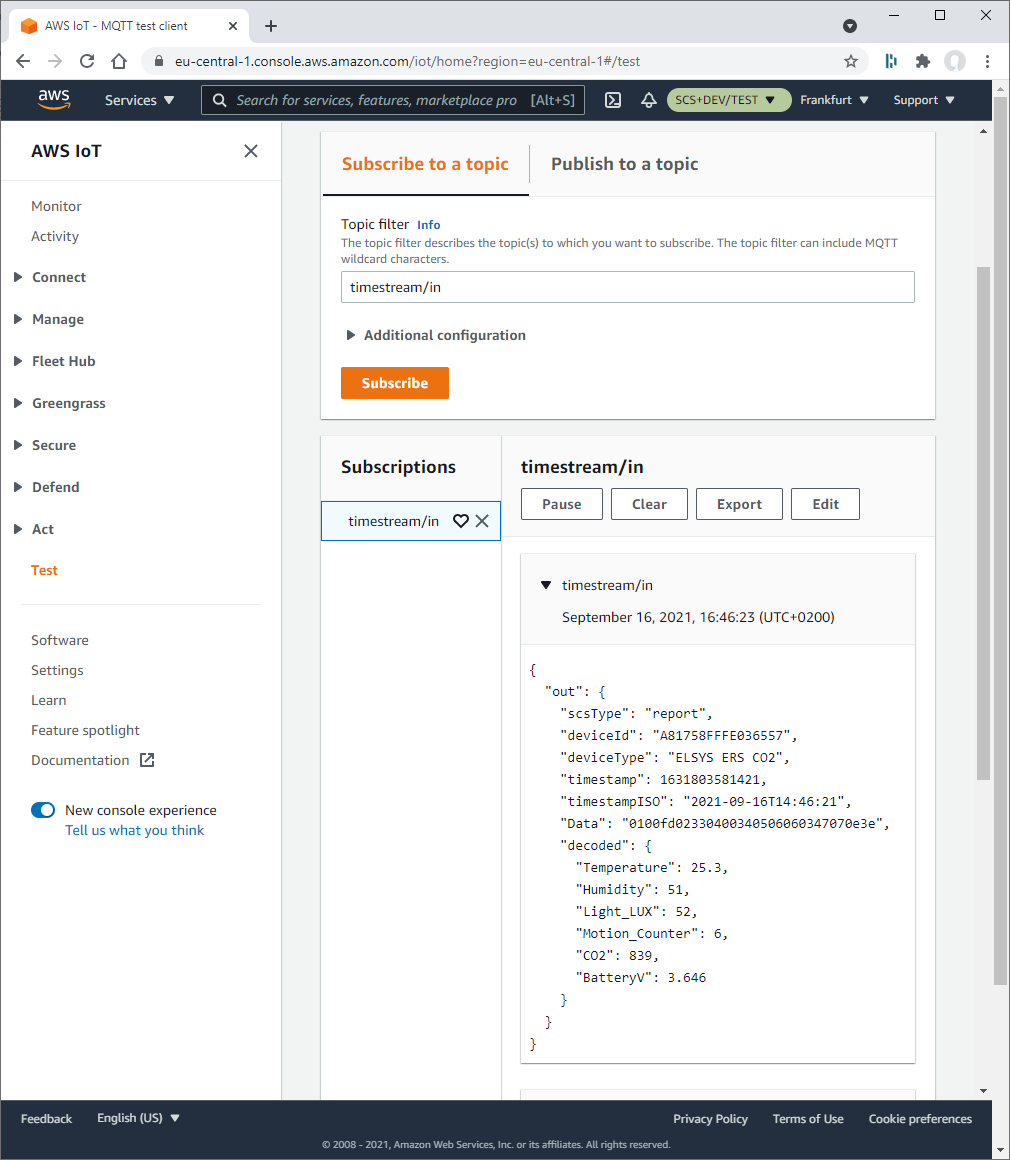
If everything works fine you should see JSON payload such as
{
  "out": {
    "scsType": "report",
    "deviceId": "A81758FFFE036557",
    "deviceType": "ELSYS ERS CO2",
    "timestamp": 1631803881391,
    "timestampISO": "2021-09-16T14:51:21",
    "Data": "0100fc023304002d0507060365070e3e",
    "decoded": {
      "Temperature": 25.2,
      "Humidity": 51,
      "Light_LUX": 45,
      "Motion_Counter": 7,
      "CO2": 869,
      "BatteryV": 3.646
    }
  }
}
The JSON payload contains the output of the Lambda decoding function as out element. The child elements of out are the input elements. Additionally it contains the dictionary decoded. This elements of the decoded dictionary are the decoded values from the Data input element.
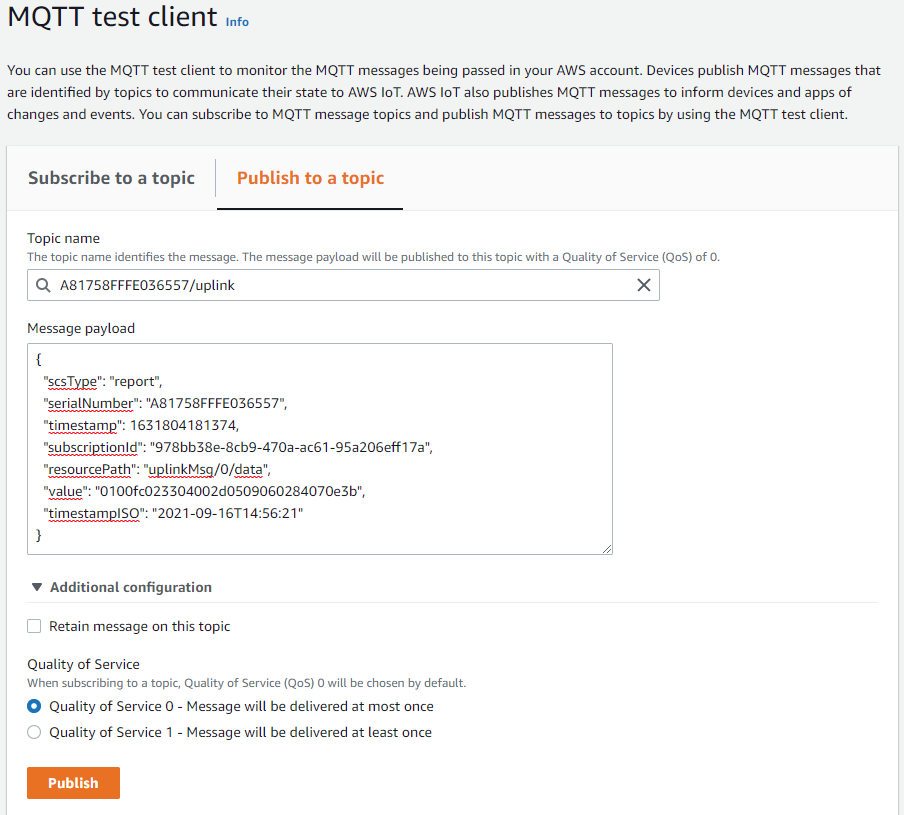
In case your sensor is not sending uplink messages you can also simulate the input of messages by using the Publish to a topic page in the Test section.
Use A81758FFFE036557/uplink as topic name and
{
  "scsType": "report",
  "serialNumber": "A81758FFFE036557",
  "timestamp": 1631804181374,
  "subscriptionId": "978bb38e-8cb9-470a-ac61-95a206eff17a",
  "resourcePath": "uplinkMsg/0/data",
  "value": "0100fc023304002d0509060284070e3b",
  "timestampISO": "2021-09-16T14:56:21"
}
Within the last hours you implemented three major integration steps
- Integration of NB-IoT device with IoT Creators platform.
- Integration of IoT Creators with AWS IoT Core by using your own custom authorizer.
- Decoding of device specific unreadable uplink messages into an easy-to-handle JSON format.
To end-up with a nice graph of sensor measurement values in Grafana the steps
- Injestion of messages into the AWS Timestream database.
- Visulization with Grafana
are remaining. Let us continue .... it is possible to finish today 😃
Create an AWS Timestream database and table to store uplink messages
In this step we create the Timestream DB.
- Search and open Timestream DB service
- Select Databases (on the left side) and push button Create database (on right side)
- Choose a configuration: Standard database
- Name: IoTDB
- Push button Create database (right bottom)
Create Timestream Table
In this step we Timestream table in which the IoT data will be stored.
- Select Tables (on the left side) and push button Create table (on right side)
- Database name: IoTDB
- Table name: IoTTable
- Memory store retention: 1 Week
- Magnetic store retention: *3 Months
- Push button Create table (right bottom)
Configure IoT Rule InjectToTimestream to inject messages into AWS Timestream DB
In the steps before you implemented a Lambda function to decode the uplink messages of the sensor and you configured a IoT Rule to route uplink messages arriving at the /uplink topic to the Lambda function.
Additionally your IoT Rule re-publishes the output of your decoding Lambda function in the topic timestream/in.
Based on the topie timestream/in you will configure now the integration with AWS Timetream database.
As shown in the next diagram the output message of the decoding Lambda function has the characteristics
- all output is placed as value of the element out and
- decoded elements are assigend as dictionary to the element decoded inside of out.
The decoded elements have now a form which makes it easy to injest to AWS Timestream database.
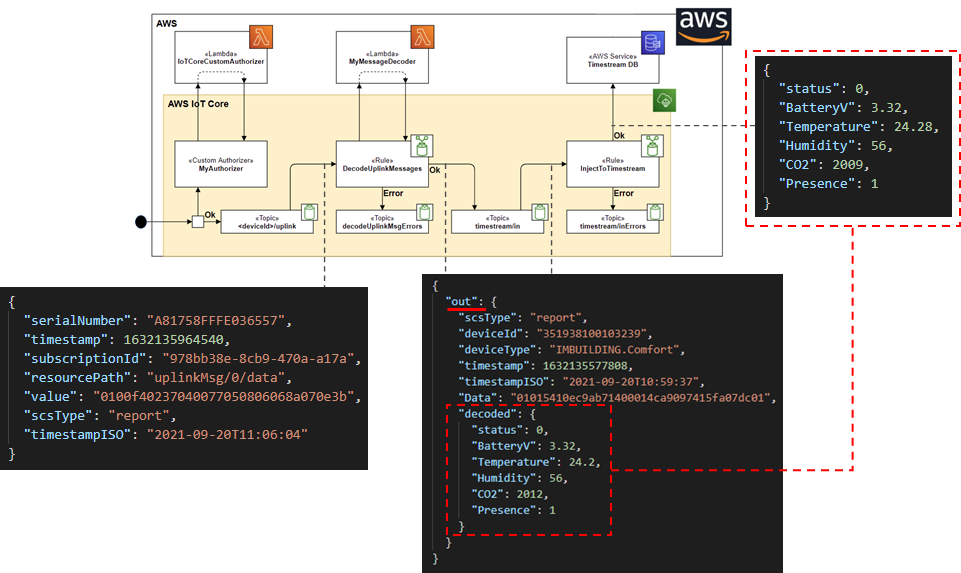
Uplink messages payload travelling along the IoT topics and rules to endup in AWS Timestream database.
To injest the decoded uplink messages arriving in the IoT topic timestream/in to AWS Timestream database you will configure another IoT Rule InjectToTimestream. To do so perform the following steps.
- Reenter the Create a rule dialog in the AWS IoT service .
- Use InjectToTimestream as Name of the IoT Rule.
- Copy following SQL expression into the Rule query statement field.
SELECT out.decoded.* FROM 'timestream/in'
- Push the Add action button.
- In Select an action: Write a message into a Timestream table
- In Select an action: Push Configure action button
- In Configure action: Input IoTDB for Database name
- In Configure action: Input IoTTable for Table name
- In Configure action: Input deviceId and ${out.deviceId} for Dimension Name and Value
- In Configure action: Input deviceType and ${out.deviceType} for Dimension Name and Value
- In Configure action: Input ${timestamp()} and MILLISECONDS for Value and Unit of Timestamp
- In Configure action: Create a new Role with a unquie name.
- In Configure action: Push Add Action button
- Perform the same steps to let the rule re-publish the error messages to the topic timestream/inErrors
- In the Create a rule screen push Create rule button
If everything went ok you should have a new IoT Rule which looks pretty much like the following.
In the image above you can see that there is not only the Timestream and the Error action but also an action to re-publish the message. This action simply re-publishes exactly the payload which input to Timestream on a timestream/debug topic to help you to understand if your SQL statement is able to select the corect information from the timestream/in topic.
As before you should check your Error and Debug topics with the Test function of IoT Core. If everything works fine you should see no output in the topic timestream/inErrors and you see valid output in your timestream/debug topic.
If you reached this point and if you find valid output in your debug topic and no errors in your error topic the possibility is realy realy high, that the data of your uplink messages are stored in the AWS Timestream database.
Let us have a look!
To verify if your uplink messages are stored in the AWS Timetream database perform the following steps:
- Switch to the AWS Timestream service,
- Select Tables in the left navigation bar of the service screen.
- Click on the IoTTable link in the list of tables.
- Click on the Query table button on the right side of the screen
- Input the following SQL statement into the query field:
SELECT *
  FROM "IoTDB"."IoTTable"
  WHERE deviceType = 'IMBUILDING.Comfort'
  ORDER BY time DESC LIMIT 100
- Push the Run button.
If data has been stored in the database you should see something similar to this image...
Step 4: Integrate AWS Timestream database with Grafana
In this step you get explained how to integrate your AWS Timestream DB with Grafana. The descriptions in this step require that you have at least a test account for Grafana Cloud.
You will perform the following steps:
- Add the AWS Timestream Plugin to your Grafana.
- Create a AWS Timestream Datasource for your Timestream DB and table to Grafana
- Create a simple dashboard to visualze the measurements of the sensor
Add Amazon Timestream Plugin to your Grafana
- Open Configuration and click on the tab Plugins
- Click on button Find more plugins on Grafana.com
- Input Timestream into the input field Name/Desription
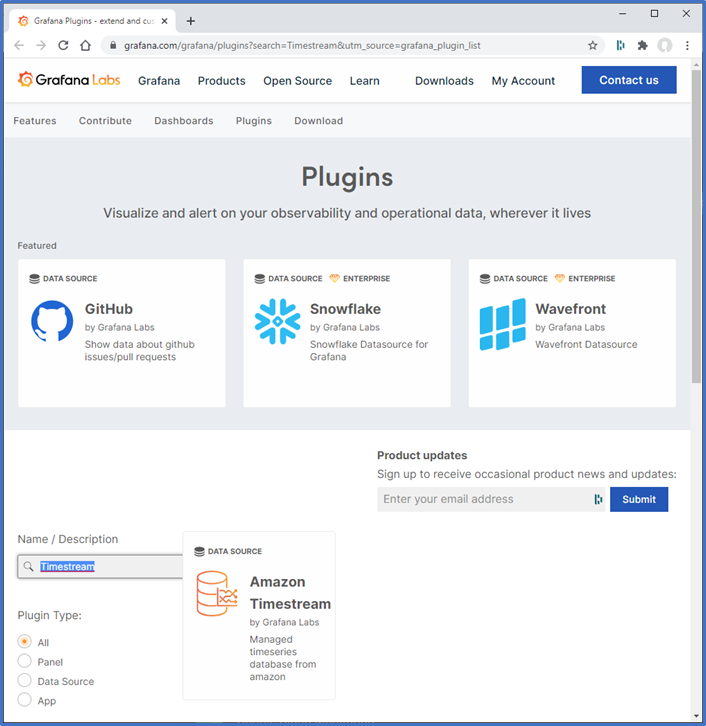
- Click on Amazon Timestream data source
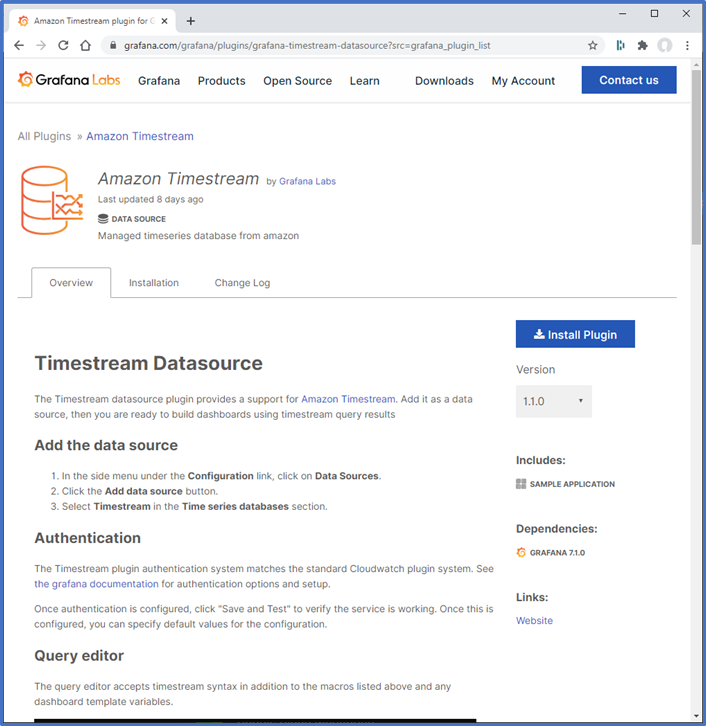
- Click on button Install Plugin (on right side)
- Click on button Install Now

- Go back to Grafana application in your browser and refesh the Plugins browser window
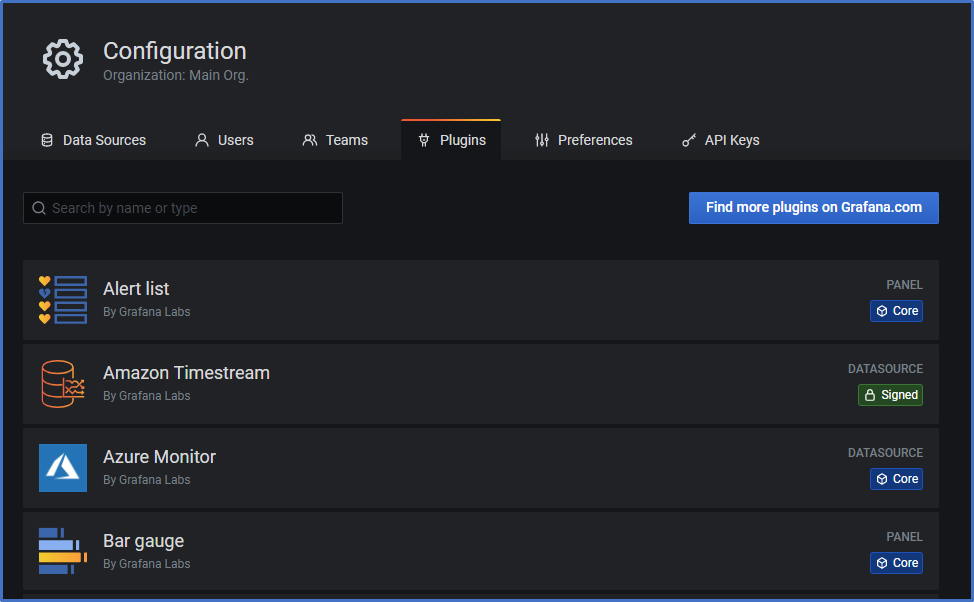
Add Amazon Timestream Data Source
- Open Configuration and click on the tab Data Sources
- Click on button Add data source (on right side)
- Search for Amazon Timestream, point on it with the mouse and click button Select
- Authentication Provider: **Access & secret key
- Secret Key ID: use the ID from the user myGrafanaClient
- Secret Access Key: use the key from the user myGrafanaClient
- Default Region: select AWS region in which you created your Timestream DB
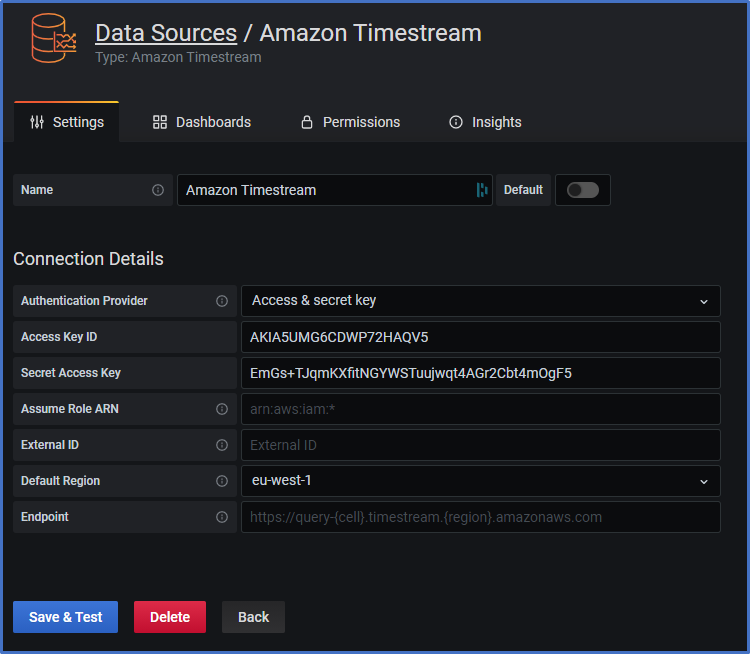
- Click on button Save & Test
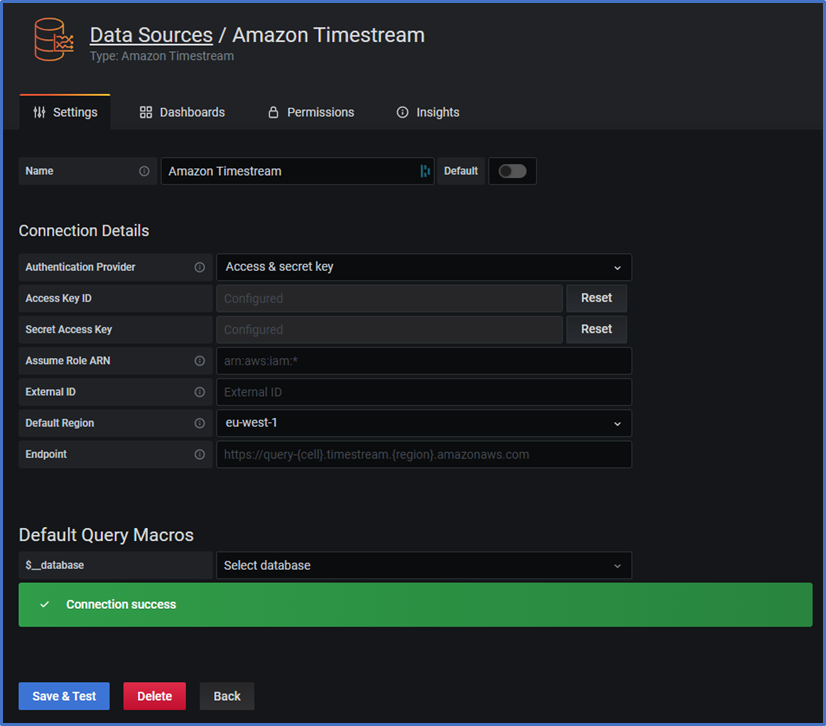
Create a simple Dashboard
- Mouse over + in function bar of the main window (on the left sideI
- Click on Dashboard
- Click on button + Add new panel
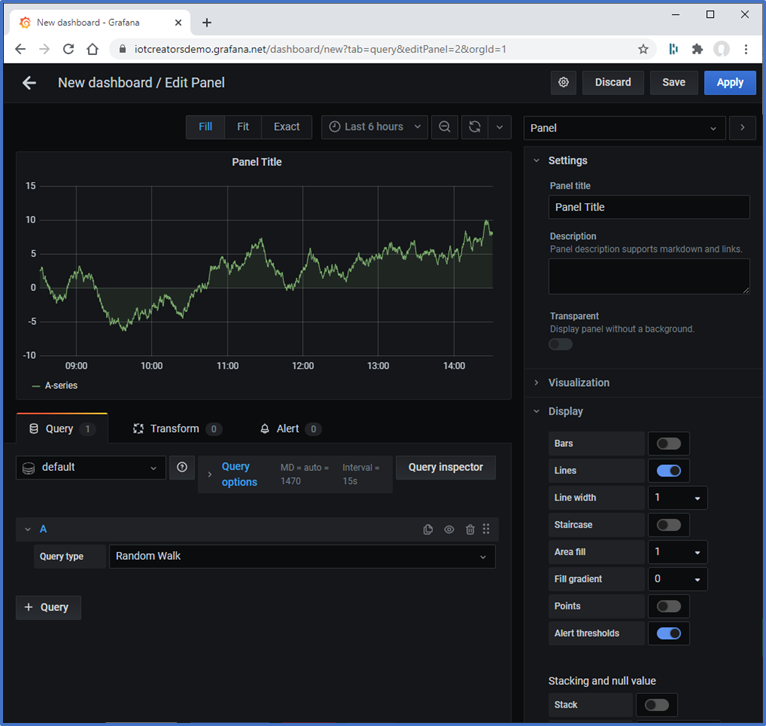
in right Panel: Panel title: DevKit Payload - 867997031341190
- in right Panel: Visualization: Table
- in Query: Select Amazon Timestream
- in Query: Paste the following query into the query editor.
select time, "measure_value::varchar" as Message
from myIoTDB.myIoTTable
where $__timeFilter
  and measure_name = 'Data'
  and deviceId = 'IMEI:867997031341190'
order by
  time desc
Don't forget to replace In the query code above the deviceId IMEI:867997031341190 with id of your device.
Click button refresh Dashboad 🔄 at the top of the window
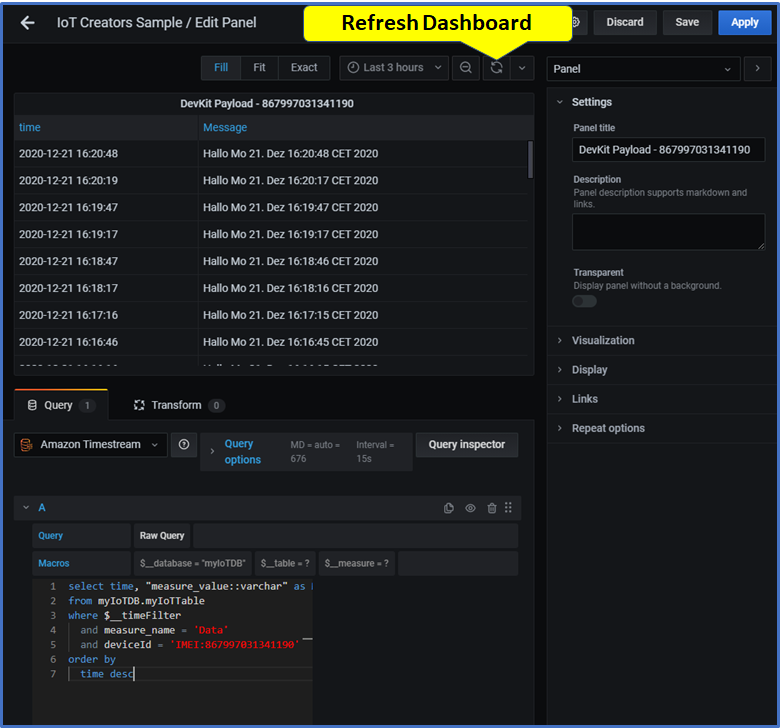
Click button Apply at the right top of the window
Create CO2 diagram for a sensor
- Mouse over + in function bar of the main window (on the left sideI
- Click on Dashboard
- Click on button + Add new panel
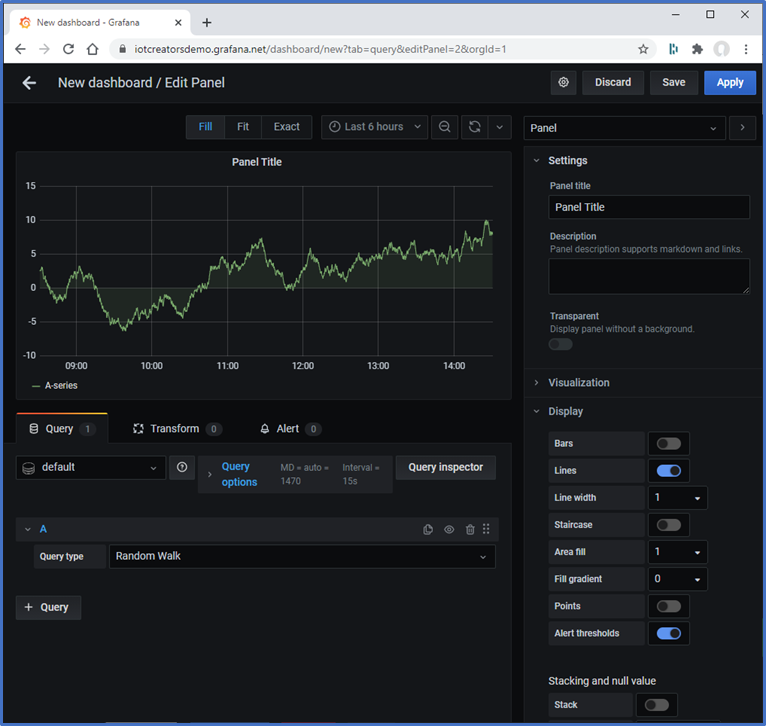
- in right Panel: Panel title: CO2
- in right Panel: Visualization: Graph
- In right Panel: Display: Lines, Points
- in Query: Select Amazon Timestream
- in Query: Paste the following query into the query editor.
select create_time_series(time, measure_value::double) as CO2
from myIoTDB.myIoTTable
where $__timeFilter
  and measure_name = 'CO2'
  and deviceId = 'IMEI:351938100106687'
Don't forget to replace In the query code above the deviceId IMEI:351938100106687 with id of your device.
- Click button refresh Dashboad 🔄 at the top of the window
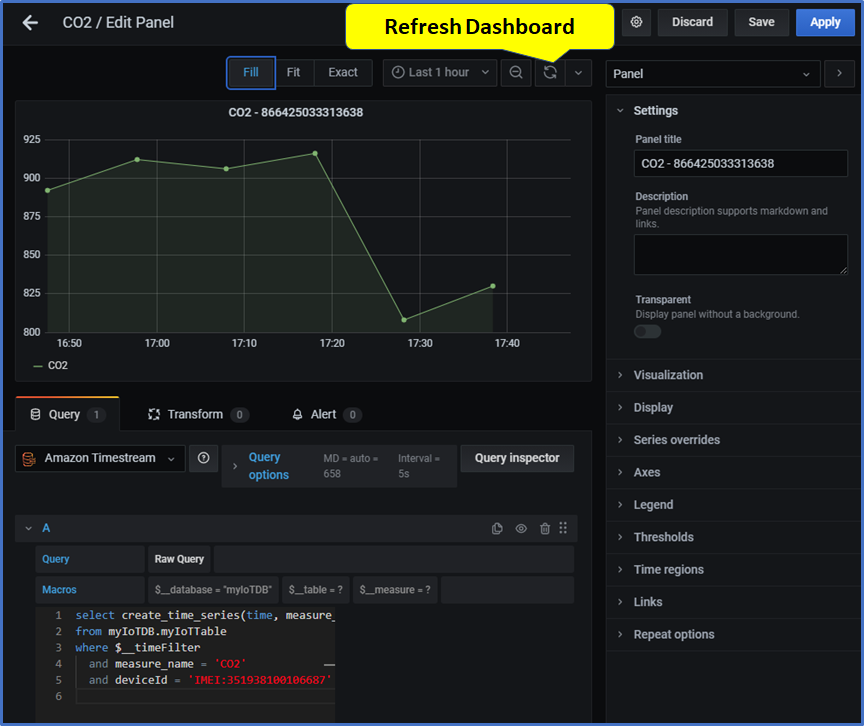
- Click button Apply at the right top of the window
✨ 🌟 👍 👏 Congratulations !!!
If you can see the graph with your values you reached end of this journey. Of cause this is a very simple integration which leaves much space for optmization. But at least it provides you an central theme through an end-to-end IoT solution.
Updated over 4 years ago
