AWS API Gateway & Lambda
In this chapter we describe how to integrate IoT Creators' Telekom IoT with AWS Timestream database via AWS API Gateway and Lambda functions and to visualize the data with Grafana
We show how you can implement your own end-to-end IoT solution for sensor data monitoring within a few hours.
Beside the NB-IoT sensor which sends data via UDP or CoAP/Leul to IoT Creators Data Provisioning service you need to have access to Amazon Web Services to implement your data storage and Grafana Cloud (https://grafana.com/products/cloud/) to implement your dashboards.
Instead of using Grafana Cloud you can intall you own Grafan instance on your own Laptop or in your own cloud environment.
The solution architecture is shown in the next diagram. As you can see you will use AWS Timestream DB to store your IoT data and AWS Lambda function and API gateway to decode the sensor specific data format and inject the data into Amazon Timesteam DB. To create fancy dashboards for your IoT data you will use Grafana with Amazon Timestream plugin to read your IoT data out of Timestream DB.
This solution will already implement client authentication of IoT Creators for your API Gateway.
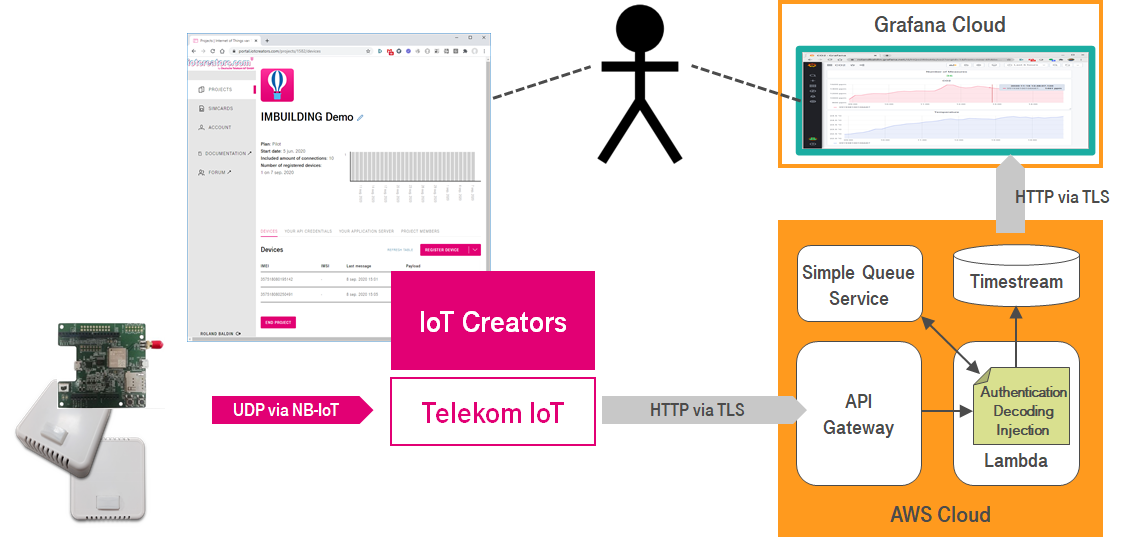
IoT Creators / AWS / Grafana Cloud integration architecture
As you can see in the end-to-end architecture above there is no message queuing integreted. Queuing is required as soon you have to deal with high load of device messages. By this you can decoble the message post requests of the clients from the actual data decoding and injection. From the performance and scalabiltiy perspective this brings you a lot of advantages.
To give you an idea how this can look like with standards AWS capabilities we will integrate AWS SQS (Simple Queue Service) into the solution and cut the Lambda functions which receives the device messages, decodes them and injects them into the Timestream DB into two pieces with an ansynchronous message queue between.
Perequisite
To start with this tutorial you need to fulfill the following prerequisites:
- IoT Creators account and at least a Starterkit SIM card.
- NB-IoT IoT Sensor which sends its payload via UDP to IoT Creator's UDP server (e.g. comfortsensor from IMBUILDING (see device catalog or documentation library). Any other NB-IoT devkit such as Quectel BC66 will work as well.
- Access to AWS with permissions to create users, roles, Timestream DB, Lamdda function, API gateway.
- Grafana or an account for the Grafana Cloud (https://grafana.com/products/cloud/)
Steps
Based on this prerequisites you will implement the architecture above with the following steps:
- Step 10: Integrate AWS Simple Queue Service
Step 1: Register and activate sensor device
First register than activate !
It is important that you first register your device in a project of IoT Creates and than you take the device into operation.
If the device sends messages to IoT Creators before your registered it will be put on the blacklist. After this you can not register it without support from IoT Creators support.
In case this happened to your send an email to [email protected].
Register device in IoT Creators
To register your device perform the following steps:
- Login into IoT Creators portal https://portal.iotcreators.com/auth/login
- Select PROJECTS on the left side and click Details button of the project for which you want to register your device.
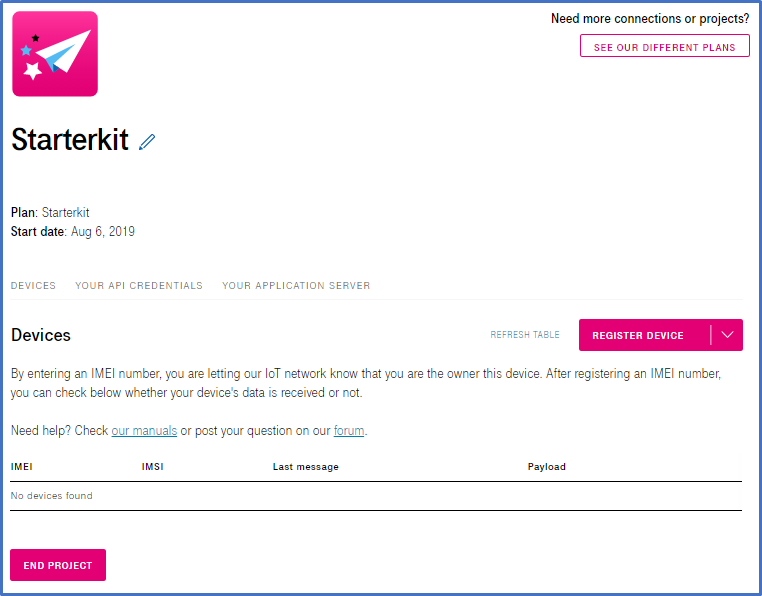
- Click the button REGISTER DEVICE
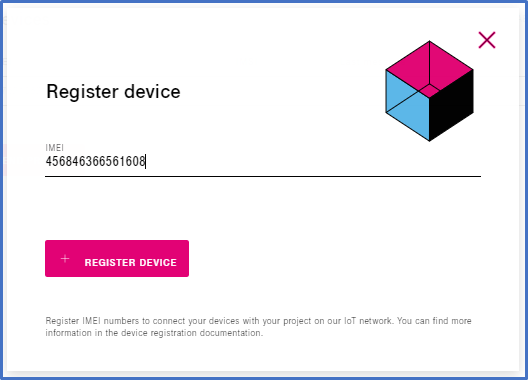
- IMEI: input the IMEI of your device
- Click button REGISTER DEVICE
Activate IMBUILDING Comfort Sensor
If you received a IMBUILDING comfort sensor which is already Ready for IoT Creators you just need to open the device on the bagside and input the 3.6V batteries. As soon you put it under power the devices attaches to the mobile network and starts to send data.
Step 2: AWS: create user and role with IAM
Create Role for Lambda Function
In this step we create a role for the lambda function to provide permissions to it to executed and to write data into the Timestream DB
- Search and open IAM service
- Select Roles (on the left side) and push button Create role
- Select type of trusted entity: AWS services
- Choose a use case: Lambda
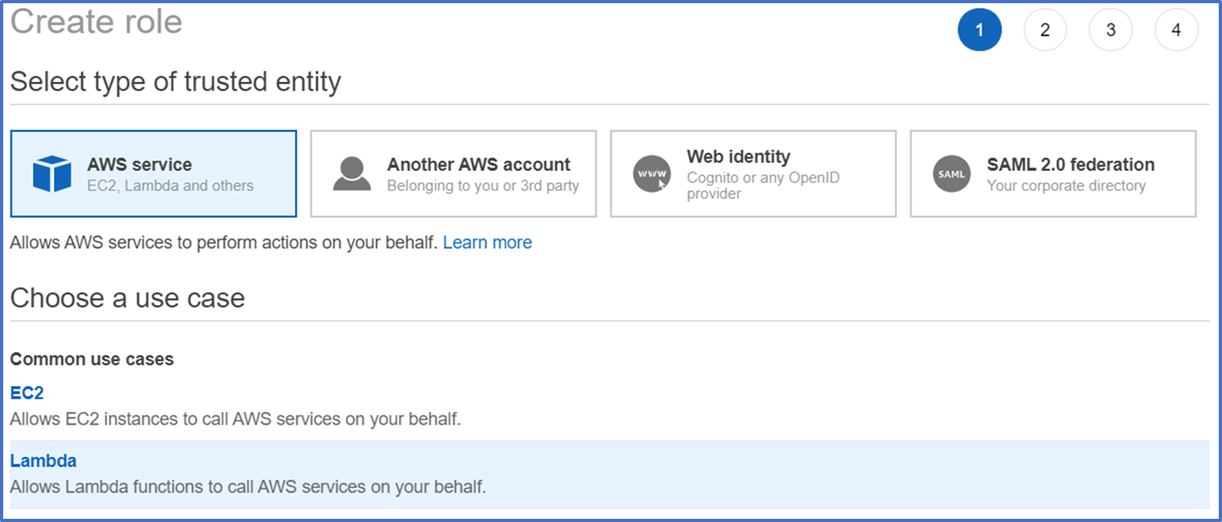
- Push button Next: Permissions (right bottom)
- Select policy AWSLambdaBasicExecutionRole
- Select policy AmazonTimestreamFullAccess
- Push button Next: Tags (right bottom)
- Push button Next: Review (right bottom)
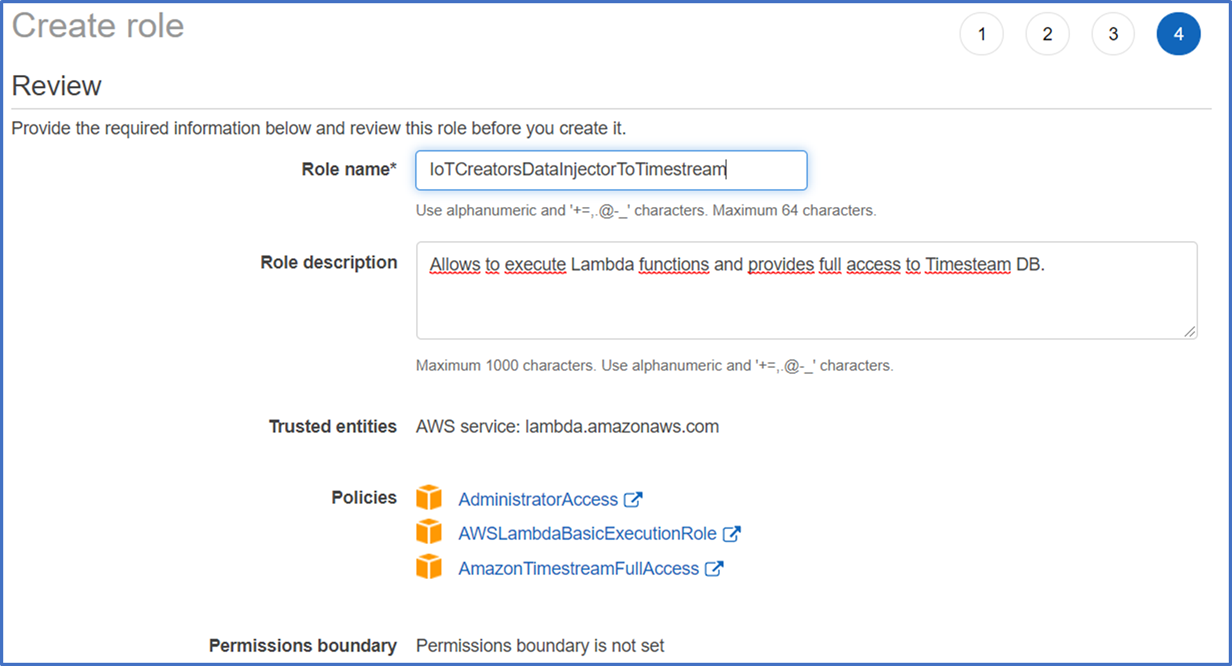
- Push button Create role (right bottom)
Create User for Grafana Client
In this step we create a user for Grafan client to let it read data from the Timestream DB.
- Search and open IAM service
- Select Users (on the left side) and push button Add user
- User name: myGrafanaClient
- Access type: Programmatic access
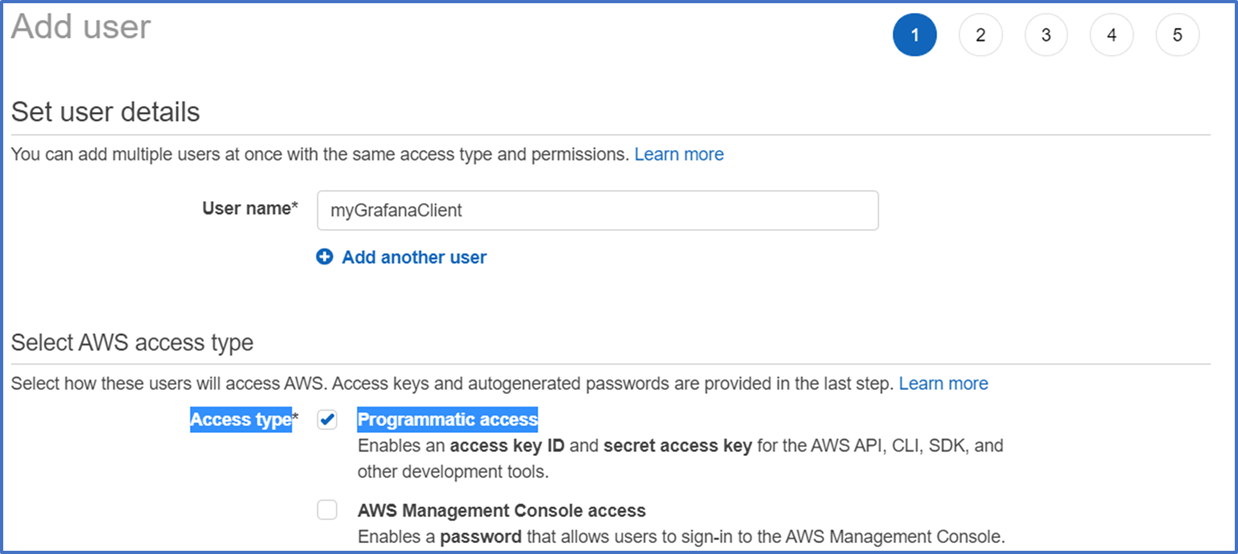
- Push button Next: Permissions (right bottom)
- Set permissions Attach existing policies directly
- Select AmazonTimestreamReadOnlyAccess
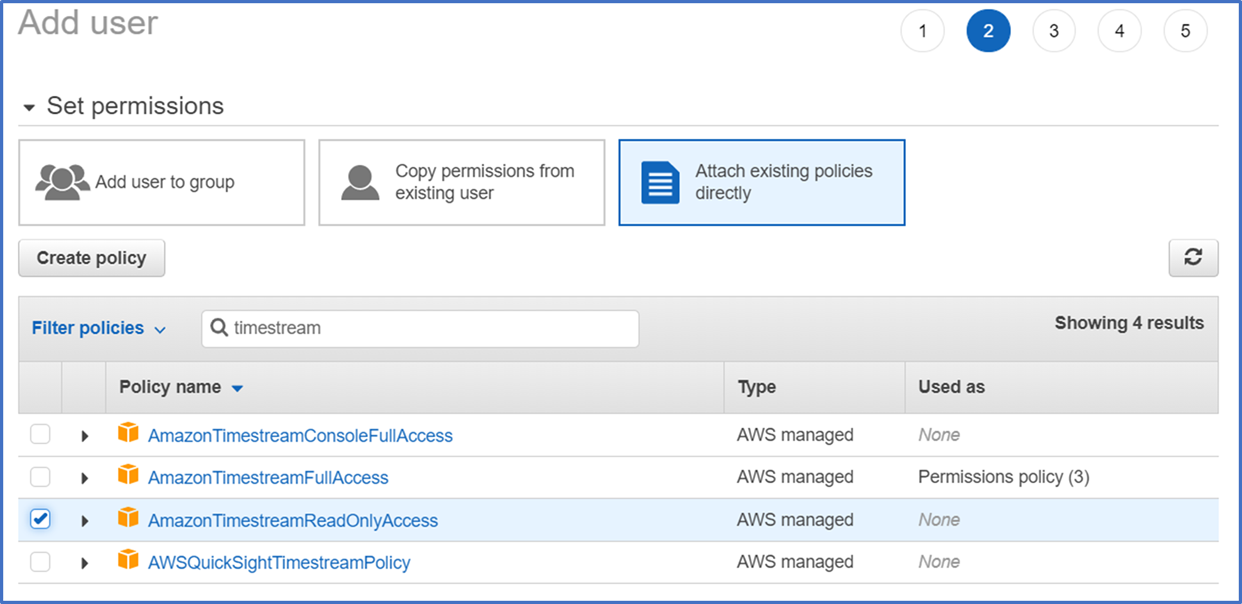
- Push button Next: Tags (right bottom)
- Push button Next: Review (right bottom)
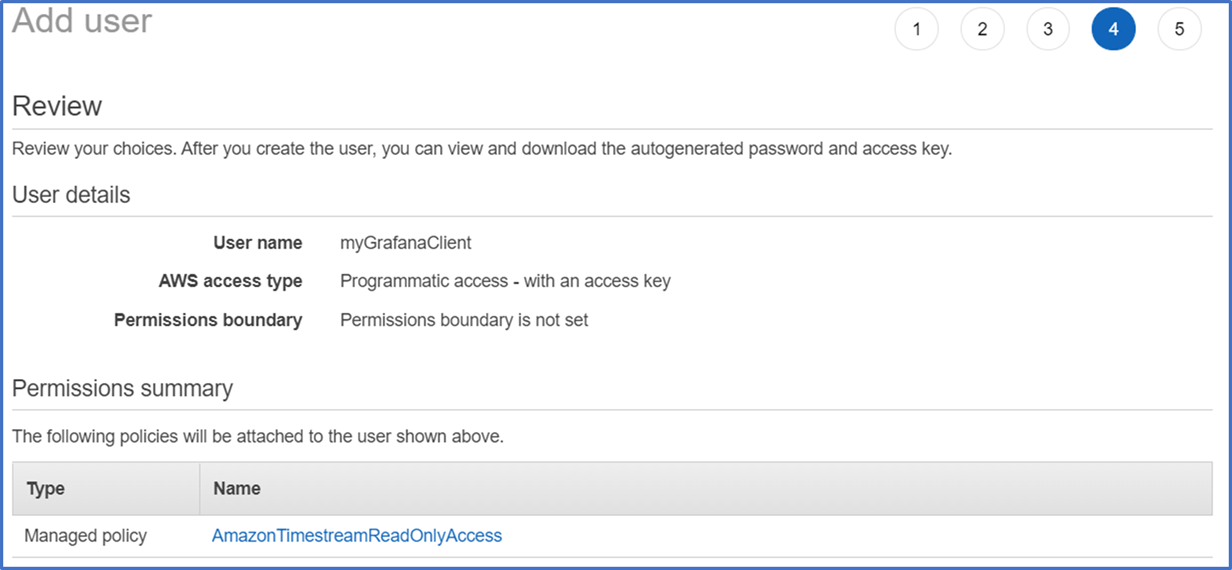
- Push button Create user (right bottom)
- Store Secret access key by donwnload CSV file or copy and post it.
Step 3: AWS: create Timesteam DB
Create Timestream DB
In this step we create the Timestream DB.
- Search and open Timestream DB service
- Select Databases (on the left side) and push button Create database (on right side)
- Choose a configuration: Standard database
- Name: myIoTDB
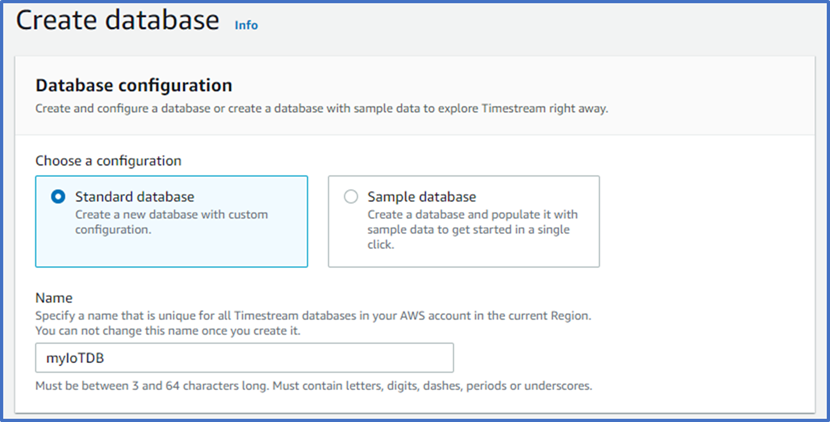
- Push button Create database (right bottom)
Create Timestream Table
In this step we Timestream table in which the IoT data will be stored.
- Select Tables (on the left side) and push button Create table (on right side)
- Database name: myIoTDB
- Table name: myIoTTable
- Memory store retention: 1 Week
- Magnetic store retention: *3 Months
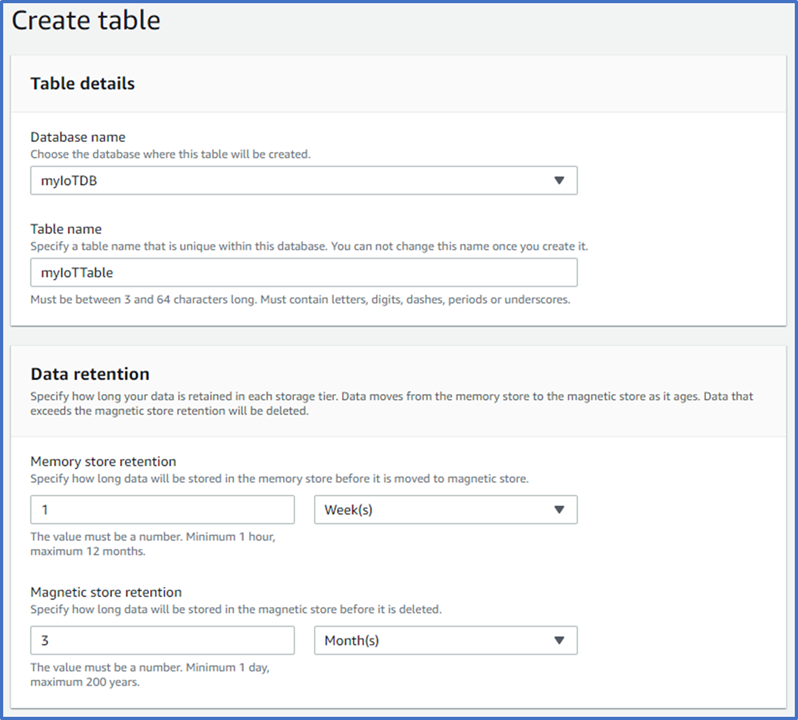
- Push button Create table (right bottom)
Step 4: AWS: create Lambda function for data decoding and injection
Create Lambda function
In this step we create the Lambda function which receives the sensor data from IoT Creates, decodes it into a simple JSON format and injects it into the table of the Timestream DB.
By default Lambda functions are NOT accessable from the internet. To make it accessable from the internet we need to create an AWS API Gateway, bind the Lambda function to it and implement a static token authorizier in one of the later steps. After we made this Lambda function accessable from the internet it will act as the endpoint which we will configure as application URL in the IoT Creators project.
In the follwoing steps we concentrate to create the Lambda function it-self and to the Python source code which performs the decoding or transformation of the received message into a simple JSON format and to write it to the previous created table of Timestream DB.
- Search and open Lambda service
- Select Functions (on the left side) and push button Create function (on right side)
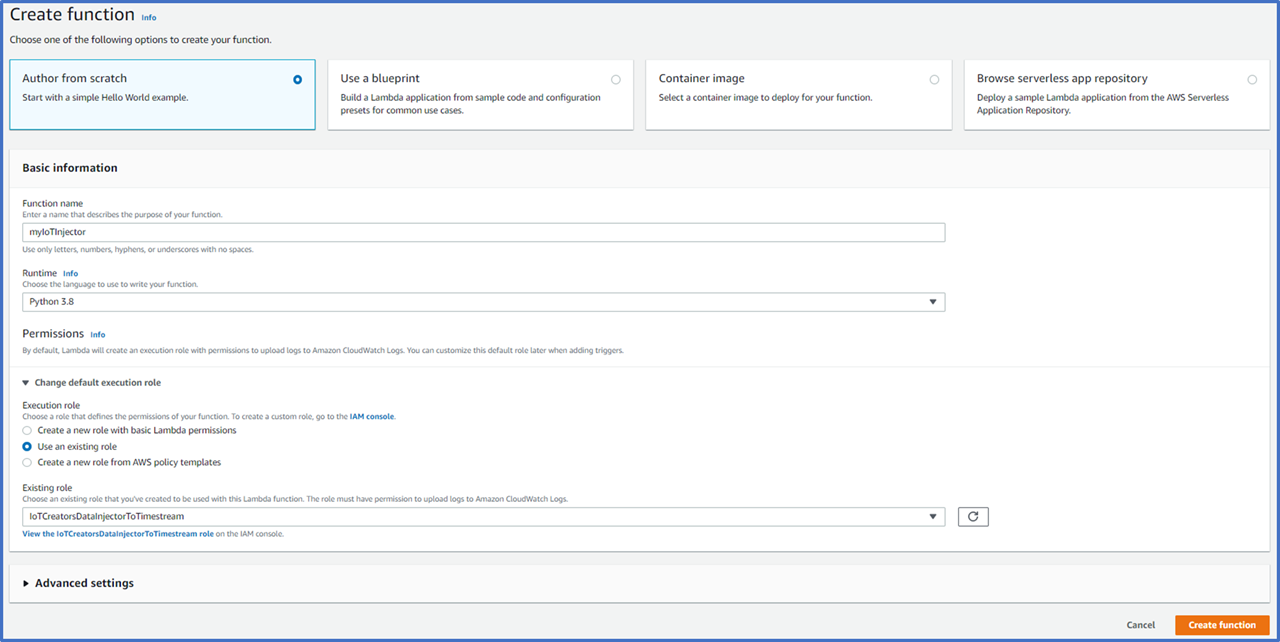
- Choose Autor from scratch
- Function name: myIoTInjector
- Runtime: Python 3.8
- Open Change default execution role
- Activate: Use an existing role
- Select Existing role: IoTCreatorsDataInjectorToTimestream
- Push button Create function (right bottom)
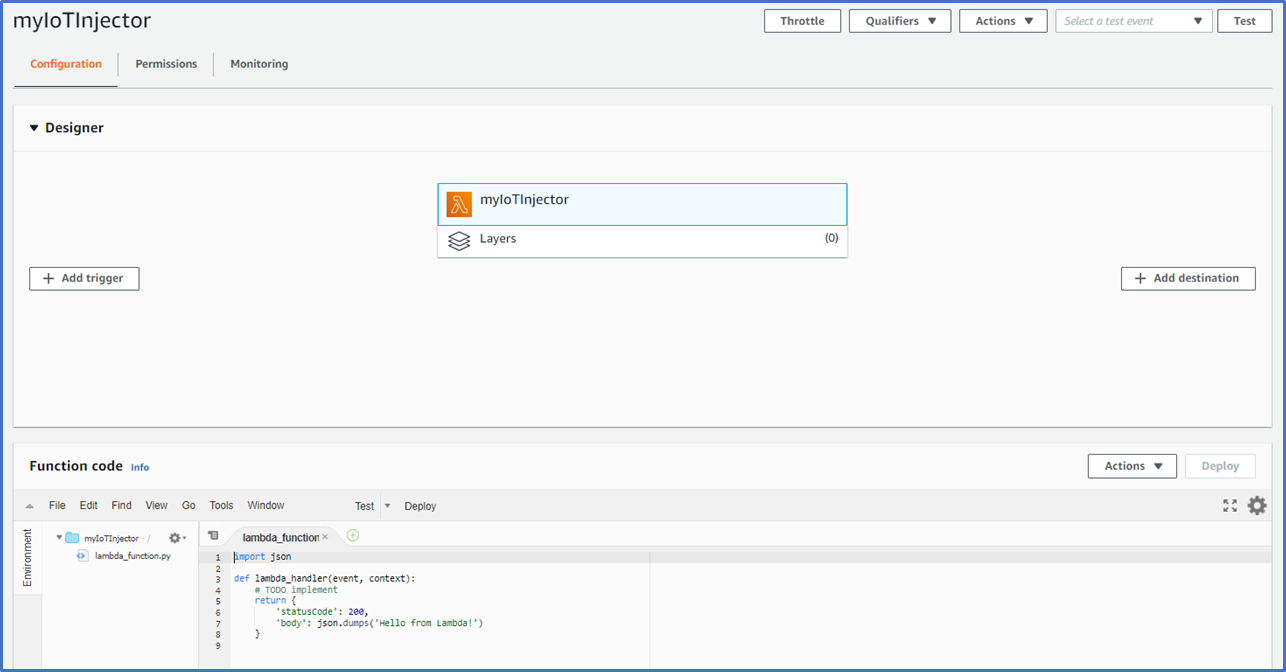
As next you need to replace the 10 lines of initial code in the Lambda function by the following one.
LAMFUNC_NAME="myIoTInjector"
DATABASE = "myIoTDB"
TABLE = "myIoTTable"
DEFAULT_DEVICE_TYPE = "Data"

import traceback
import time
import json

import logging
log = logging.getLogger(LAMFUNC_NAME)
log.setLevel(logging.DEBUG)

import boto3
from botocore.config import Config

def decodeData(dataStr):
    '''
    Generic decoding function for devices which data shall be stored
    as string and which doesn't require any decoding.
    '''
    d = {
        "deviceType" : "Generic.Data",
        "Data": dataStr
    }
    return d

def decodeHexData(hexString):
    '''
    Generic decoding function for devices which data is a
    hex coded string.
    '''
    s = bytes.fromhex(hexString).decode("utf-8")

    log.debug("PAYLOAD: as str: %s" % (s))

    d = {
        "deviceType" : "Generic.HexData",
        "Data": s
    }
    return d


def decodePikkertonXBS200(hexString):
    '''
    Decoding function for the hex encoded payload
    of XBS200 device from Pikkerton.
    '''
    s = bytes.fromhex(hexString).decode("utf-8")

    log.debug("PAYLOAD: %s" % (s))

    d = {
        "deviceType" : "Pikkerton.XBS200"
    }

    for e in json.loads(s):
        # Temperature
        if "/3303/0/5700" == e["n"]:
            d["Temperature"] = float(e["v"])

        # Humidity
        elif "/3304/0/5700" == e["n"]:
            d["Humidity"] = float(e["v"])

        # CO2
        elif "/3325/2/5700" == e["n"]:
            d["CO2"] = float(e["v"])

    return d


def decodeSDI(hexString):
    '''
    Decoding function for the hex encoded payload
    of comfort sensor from IMBUILDING.
    '''
    a = bytearray.fromhex(hexString)
    type = a[0]
    version = a[1]

    if type == 1 and version == 1:
        d = {
            "deviceType"  : "IMBUILDING.Comfort",
            "status"      : a[8],
            "BatteryV"    : int.from_bytes(a[9:11], "big") / 100.,
            "Temperature" : int.from_bytes(a[12:14], "big") / 100.,
            "Humidity"    : int.from_bytes(a[14:16], "big") / 100.,
            "CO2"         : int.from_bytes(a[16:18], "big"),
            "Presence"    : "true" if a[18] > 0 else "false"
        }
        return d

    elif type == 2 and version == 4:
        d = {
            "deviceType"  : "IMBUILDING.PeopleCount",
            "status"      : a[8],
            "BatteryV"    : int.from_bytes(a[9:11], "big") / 100.,
            "CounterA"    : int.from_bytes(a[12:14], "big"),
            "CounterB"    : int.from_bytes(a[14:16], "big")
        }
        return d

    else:
        log.warn("Unsupported type %d and version %d" % (type, version))
        return None

def writeRecordToDB(client, deviceId, timestamp, data):
    '''
    Builds the records and writes them into the Timestream DB.
    '''
    records = []

    dimensions = [
        {'Name': 'deviceId', 'Value': deviceId},
        {'Name': 'deviceType', 'Value': data["deviceType"]}
    ]

    for e in [  ["CO2", "DOUBLE"], ["Temperature", "DOUBLE"], ["Humidity", "DOUBLE"],
                ["Presence", "BOOLEAN"],["BatteryV", "DOUBLE"], ["CounterA", "BIGINT"],
                ["CounterB", "BIGINT"], ["Data", "VARCHAR"]]:
        n = e[0]
        t = e[1]

        if n in data.keys():
            r = {
                'Dimensions': dimensions,
                'MeasureName': n,
                'MeasureValue': str(data[n]),
                'MeasureValueType': t,
                'Time': str(timestamp)
            }
            records.append(r)

    log.debug("writting records for device %s to Timestream DB ..." % (deviceId))
    result = client.write_records(DatabaseName=DATABASE, TableName=TABLE, Records=records, CommonAttributes={})

def lambda_handler(event, context):
    '''
    Lambda functions main entry point.
    '''
    log.info("=> %s" % (LAMFUNC_NAME))

    log.debug(json.dumps(event, sort_keys=True, indent=4))

    try:
        ###
        # Get the device type from the header. With the device
        # type the decoding function can be selected.

        devType = DEFAULT_DEVICE_TYPE

        if "DeviceType" in event["headers"].keys():
            devType = event["headers"]["DeviceType"]
            devType = devType.strip() if devType else DEFAULT_DEVICE_TYPE

        log.debug("DeviceType: %s" % (devType))

        decodeFuncName = "decode%s" % devType
        if decodeFuncName not in globals().keys():
            log.warn("Decoding function %s does not exist!" % (decodeFuncName))
            decodeFuncName = decodeData

        decodeFunc = globals()[decodeFuncName]

        ###
        # Get the Impact reports from the request body

        s = event["body"] if "body" in event.keys() else "{}"

        # If not body don't do anything
        if not s or len(s) == 0:
            return {'statusCode': 204, 'body': "OK"}

        log.debug("BODY = %s" % (str(s)))

        body = json.loads(s)

        if not "reports" in body.keys():
            return {'statusCode': 200, 'body': "no reports"}


        ###
        # Create Timestream session

        session = boto3.Session()
        cfg = Config(read_timeout=20, max_pool_connections=5000, retries={'max_attempts': 10})
        client = session.client('timestream-write', config=cfg)

        ###
        # Process each report record

        for rep in body["reports"]:
            log.debug("PAYLOAD: %s" % (rep["value"]))

            data = decodeFunc(rep["value"])

            if data:
                writeRecordToDB(client, rep["serialNumber"], rep["timestamp"], data)

        return {'statusCode': 204, 'body': "OK"}

    except Exception as ex:
        log.error("%s" % (str(ex)))
        traceback.print_exc()
        return {'statusCode': 400, 'body': "ERROR: %s" % (str(ex))}
This code contains functions
- lambda_handler: Implements the HTTP POST to receive one or multiple data message from IoT Creators SCS and process each of them.
- writeRecordToDB: Creates out of the simple JSON message format a write request to the Timeseries DB.
- decodeSDI: Decodes the payload of the Comfort sensor and People Couter from IMBUILDING to the simple JSON format.
- decodePikkertonXBS200: Decodes the payload of the XBS200 sensor from Pikkerton to the simple JSON format.
- decodeHexData: Decodes the hex encoded payload to a single "Data" element in the simple JSON format.
- decodeData: Copies the payload to a single "Data" element in the simple JSON format.
Use DeviceType Header field to select the decoding function in your POST request
To control which decoding function shall be used you can use in your POST request the header field DeviceType. To "tell" the myIoTInjector.py Lambda function to decode the device payload with the function decodePikkertonXBS200 just add
DeviceType: PikkertonXBS200If you don't define DeviceType header field in the POST request the function decodeData is used and the payload is copied without any decoding to simple JSON message.
Create up-to-date boto3 Library Layer and bind it to myIoTInjector Lambda function
As you can see the previous created myIoTInjector Lambda function imports the AWS Python library boto3 to get access to the Timestream DB. Because AWS Timestream DB service is quite new the boto3 library which is made available to Python Lambda functions by default does not contain support for it. Out of this reason we need to create an updated version of boto3 library locally and import it as an library Layer into the Lambda function.
In the following I will describe how to
- Create an updated boto3 library which can be uploaded into Lambda as library Layer. The description of it assumes that you are working with a Linux box. If you don't have it available or if you don't like to create the updated version by your self you can also download it from
https://github.com/iotcreators/doclib-downloads/raw/master/iot-platform-integration/integrate-iotcreators-with-grafana-via-AWS/Python-Boto3-with-Timestream.zip
- Create a Lambda Layer for the updated boto3 library.
- Add the new Lambda Layer to our previous created myIoTInjector Lambda function
Create updated boto3 library with Timestream support
As already mentioned above: you can download the updated boto3 library for Python from https://github.com/iotcreators/doclib-downloads/raw/master/iot-platform-integration/integrate-iotcreators-with-grafana-via-AWS/Python-Boto3-with-Timestream.zip
.
On your Linux box perform the following steps (maybe it works on windows as well. I never tried it 😄)
We created the previous Python Lambda function for rumtime 3.8. Out of this reason you should create the local boto3 library also with a Python 3.8 version. By this you reduce potential problems.
Create a directory for the project
$ mkdir -p boto3-layer/python

Install the boto3 package into the boto3-layer/python directory
$ pip install boto3 -t boto3-layer/python

Zip the contents of boto3-layer into a an archive
$ cd boto3-layer $ zip -r aws-boto-layer.zip python
This description I copied from https://www.stefreitag.de/wp/2019/11/21/creating-an-aws-lambda-layer-for-boto3/. Many thanks to Stefan Freitag who published it 👍
Create a Lambda Layer for the updated boto3 library.
- Search and open Lambda service
- Select Layers (on the left side) and push button Create layer (on right side)
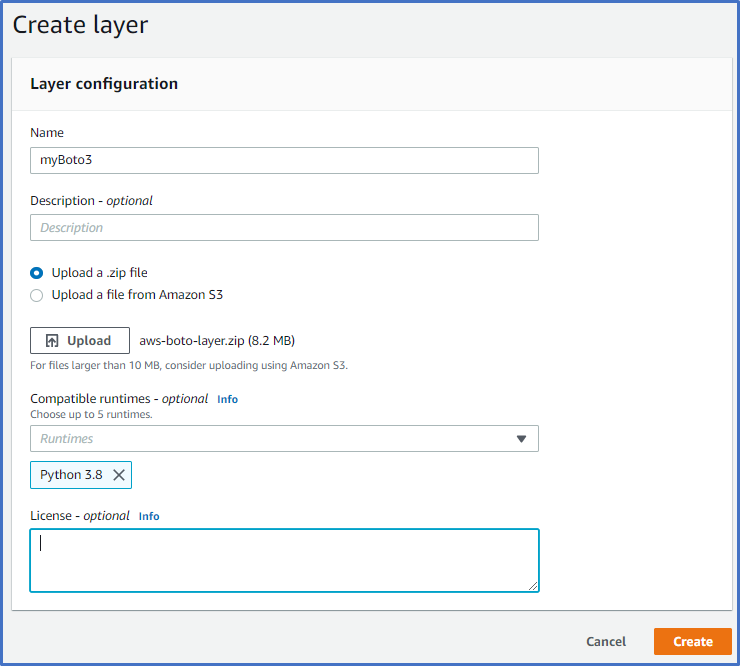
- Name: myBoto3
- Select Upload a zip file and upload your previous created boto3 zip file
- Choose Compatible runtimes: Python 3.8
- Push button Create (on the right side)
Assign the updated boto3 library to myIoTInjector Lambda function
- Search and open Lambda service
- Select Functions (on the left side) and push Lambda function myIoTInjector
- Push on Layers
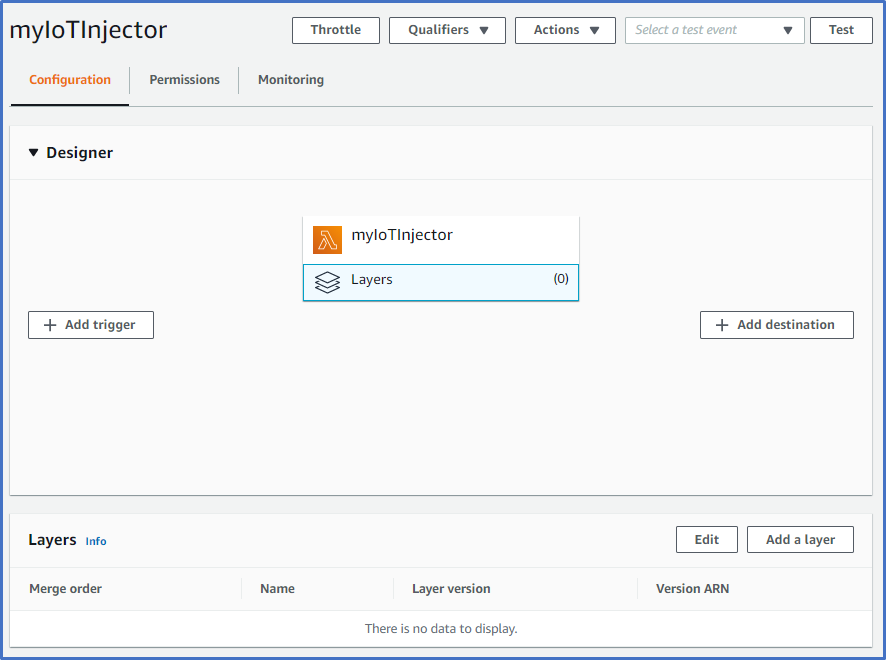
- Push on Add a layer (at the button on the right side)
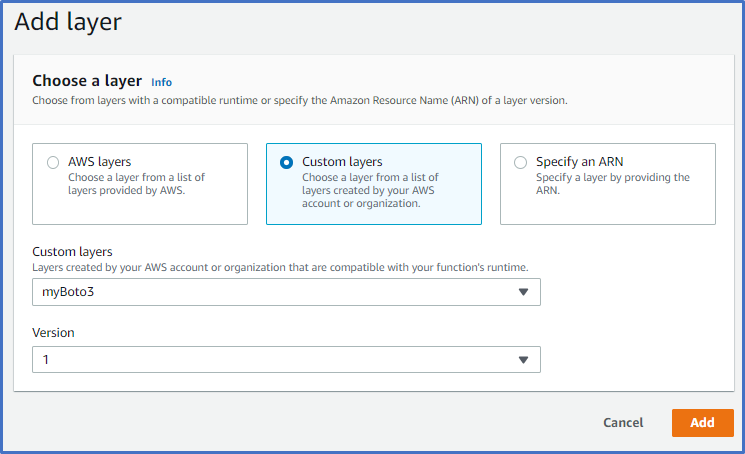
- Select Custom layers
- As Customer layer select myBoto3
- Version: 1
- Push on Add (at the button on the right side)
Step 5: AWS: publish Lambda function to internet
To make your Lambda function as HTTP REST service callable from the internet you need to bring an API Gateway into place and publish your Lambda function on it.
In this chapter you will
- Create an API Gateway.
- Bind your previous created Lambda function to decode sensor data and inject it to Timestream.
- Test if you can call the Lambda function from the internet and if data ends up in Timestream.
Create API Gateway
With the following steps you can create your API Gateway.
- Search and open API Gateway service
- Push button Create API (on the right side)
- In HTTP API: Push button Build
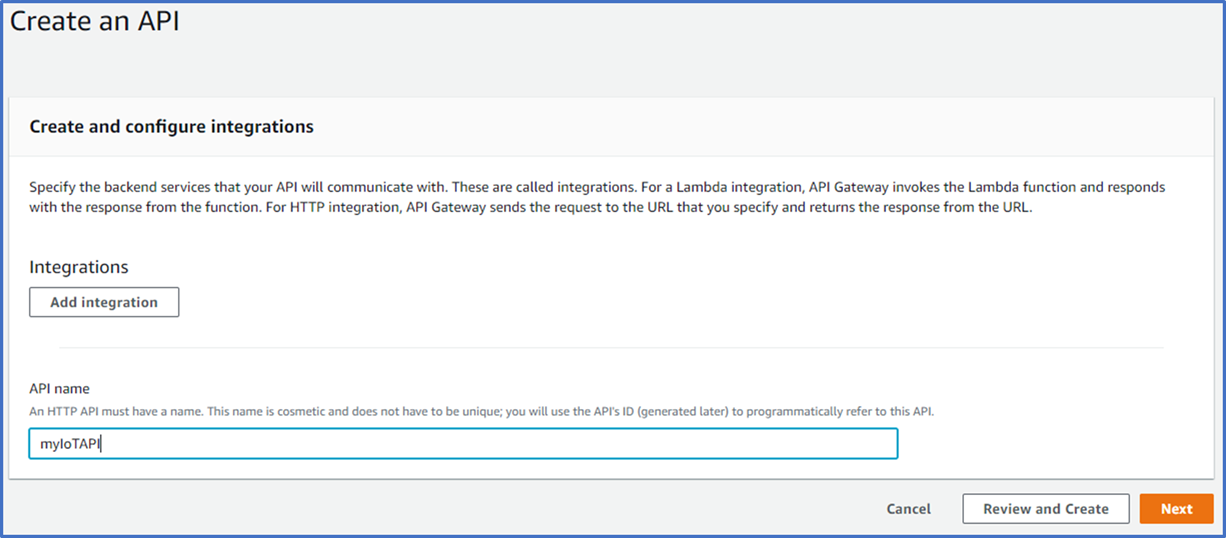
- API name: myIoTAPI
- Push button Next
- In Configure routes: Push button Next
- In Configure stages: Push button Next
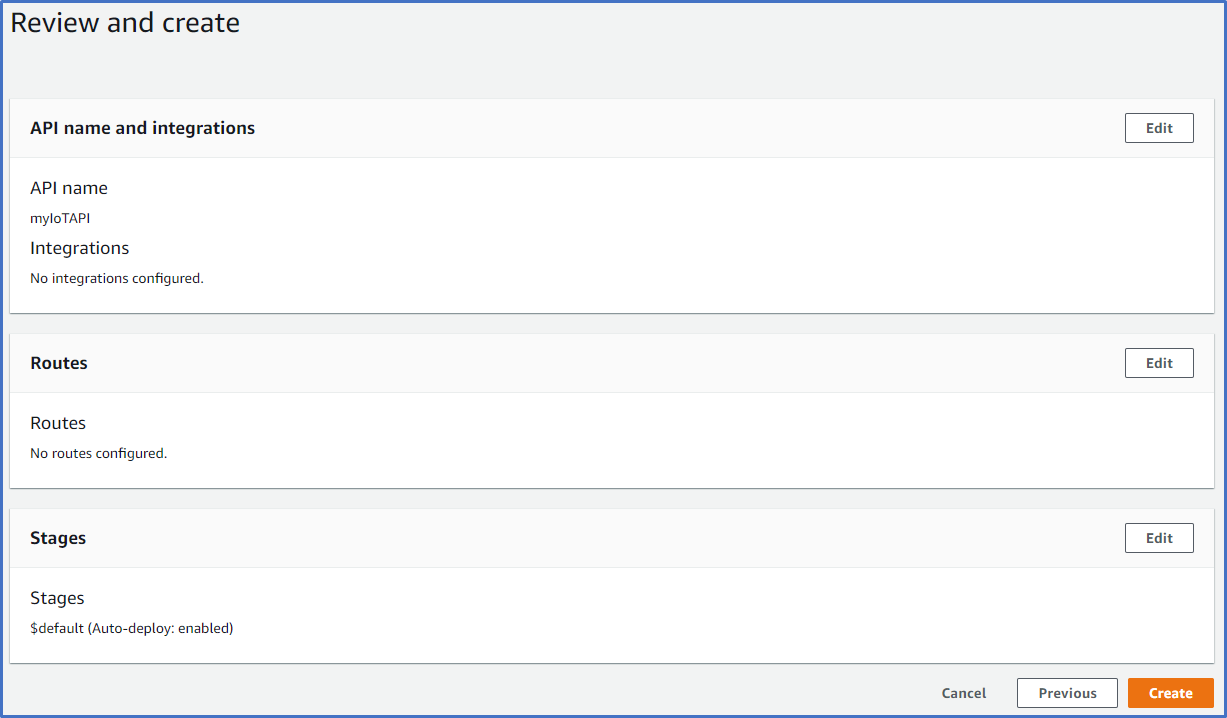
- Push button Create
Bind Your Lambda Function to API Gateway
With the following steps you can bind your Lambda function to the API Gateway.
- Search and open Lambda service
- Select Functions (on the left side) and push Lambda function myIoTInjector
- Push on + Add trigger
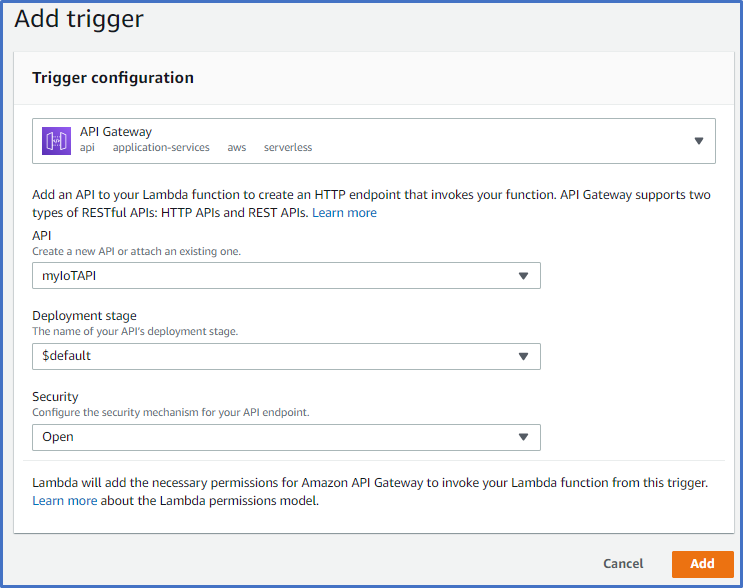
- Select API Gateway
- API: myIoTAPI
- Deployment stage: $default
- Security: Open
- Push button Add (on the right side)
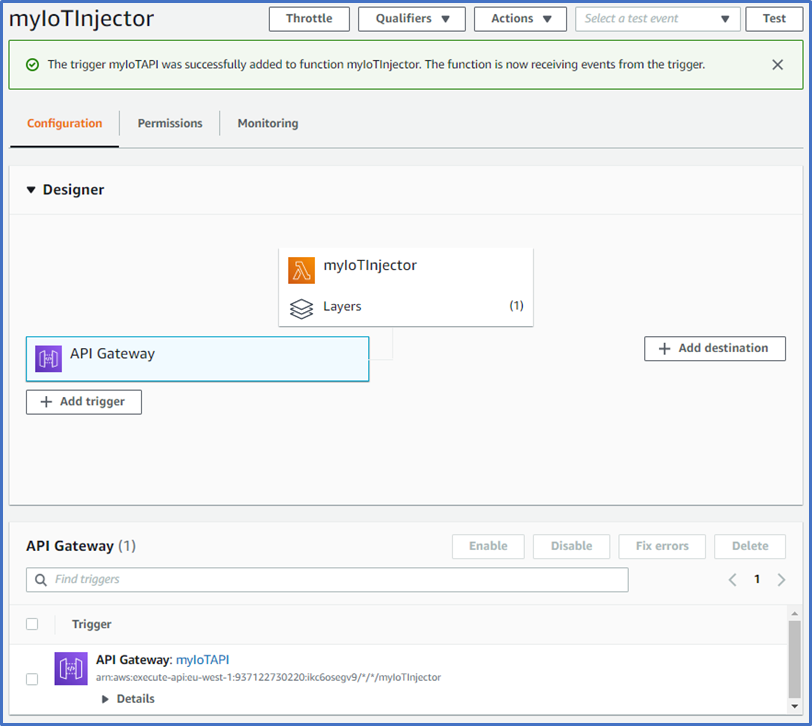
Test your Lambda function and verify if data has been written to Timestream
To test your Lambda function and if it is accessable via the internet we use the tool Postman. With Postman you can build your HTTP request interactivly and send it to URLs to inspect the results. To get Postman go to https://www.postman.com/downloads/.
We will perform the following steps to post a request to your Lambda function and to verify if data has been written to your Timestream DB:
- Get public URL of your Lambda function
- Perform a POST request to your Lamba function with Postman
- Check if the data has been written to your Timestream DB
Get public URL of your Lambda function
As first you need to get the public URL of your Lambda function.
- Search and open Lambda service
- Select Functions (on the left side) and click Lambda function myIoTInjector
- Click on API Gateway
- Open the Details of the API Gateway (at the botton)
- Copy the API endpoint URL.
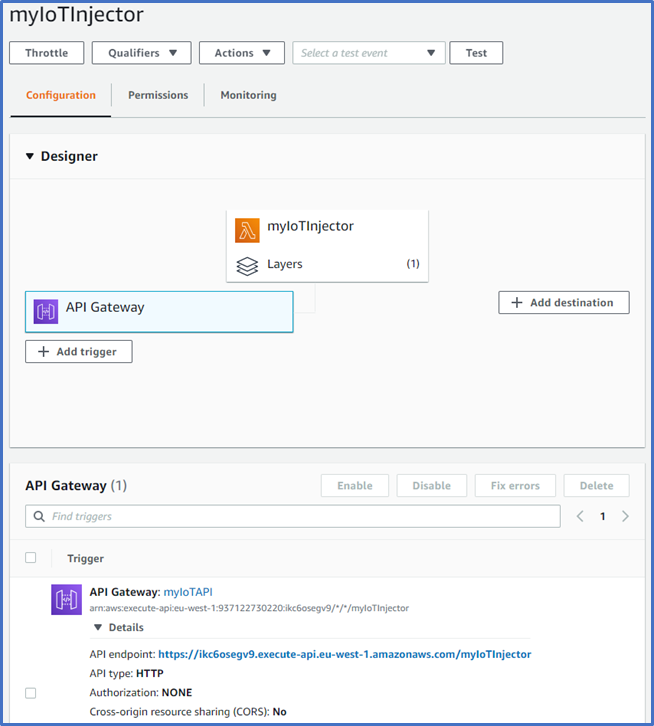
Perform a POST request to your Lamba function with Postman
- Start Postman and create a new POST request by selecting action type in the list top left.
- Past the previous copied URL of your Lambda function into the URL field
- Select the Body page and click the radio button raw
- Add the JSON payload (see below the image) to the body input.
- Click button Send
If the request has been executed successfully you should see 204 No Content in the response.
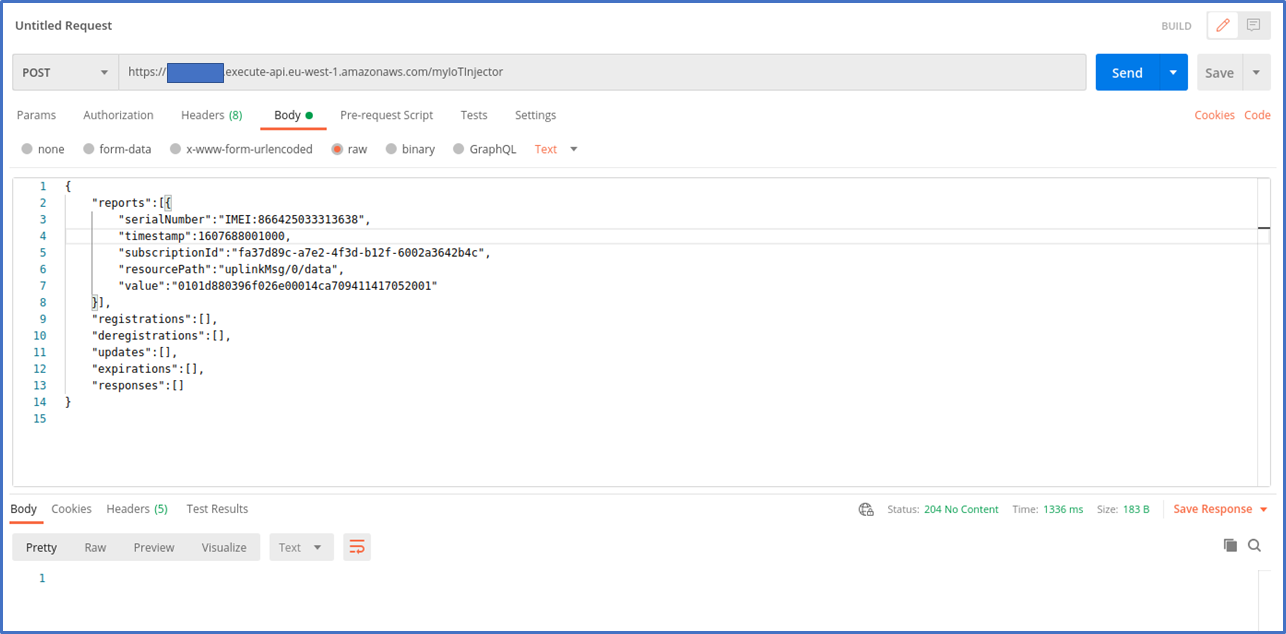
How to create new timestamps
For a device you can use a timestamp only once. Timestamp DB will return with an error if you try to send the body twice.
To create a new timestamp goto https://www.epochconverter.com/ and create with Human date to Timestamp a timestamp in milliseconds.
{
    "reports":[{
        "serialNumber":"IMEI:866425033313638",
        "timestamp":1607688000000,
        "subscriptionId":"fa37d89c-a7e2-4f3d-b12f-6002a3642b4c",
        "resourcePath":"uplinkMsg/0/data",
        "value":"0101d880396f026e00014ca709411417052001"
    }],
    "registrations":[],
    "deregistrations":[],
    "updates":[],
    "expirations":[],
    "responses":[]
}
The value in this JSON nessage sample is the sensor payload of the IMBUILDING comfort sensor which contains CO2, temperaturs, humidity, body sense and battery.
Check if the data has been written to your Timestream DB
- Search and open Timestream service
- Select Databases (on the left side) and click database myIoTDB
- Select Tables tab and click table myIoTTable
- Click button Query table (on the top left side)
- Click button Run
If everything worked find you should see multiple rows returned.
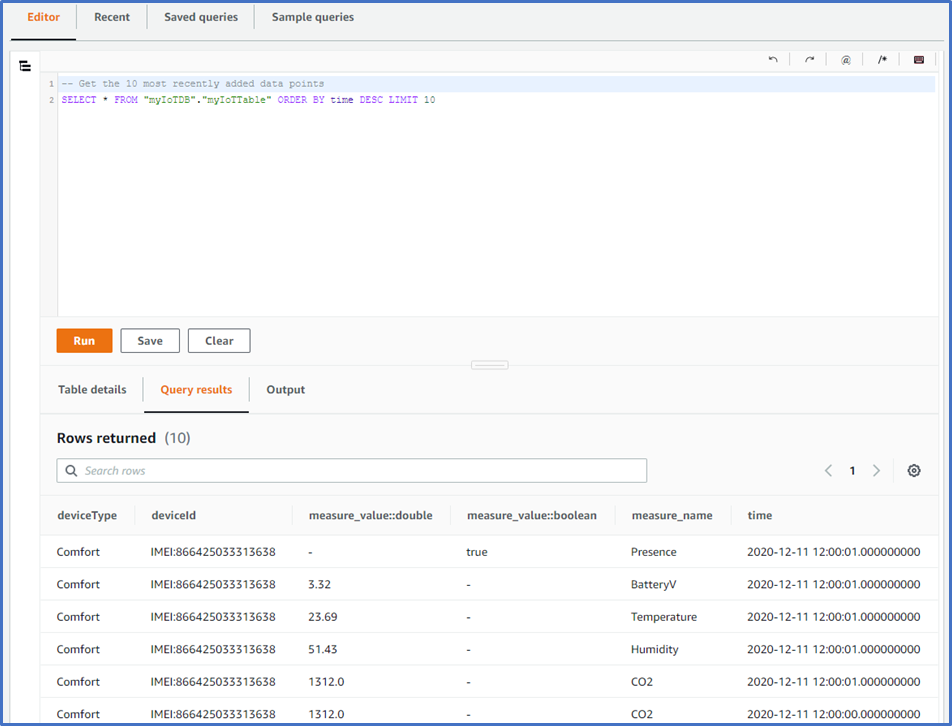
Step 6: AWS: add static token authentication to Lambda function
I guess you recognized, that your Lambda function which you just triggered from the internet successfully didn't have any kind of authorization. This means that everyone of the world can trigger your function and post data to it. Of cause you don't want to have an entry to your Timestream DB which is open for the rest of the world. Out of this reason we will add the capability to your Lambda function that it can be only called if the calling clients perform a proper authentication before.
There are different methods to enable authentication for Lambda functions. A nice method is to have a programmatic user account for each calling client system in IAM and use AWS HTTP signatures to authenticate the client againt it. This method requires that the fields in the HTTP header which have to passed along with the POST request contains a more or less current timestamp which needs to be generated for each request. Because IoT Creators SCS doesn't support this kind of dynamics and also doesn't support the automatic generation of AWS signatures we have to use a more static method for authentication.
You will implement an additional Lambda function which will act as an authorizer and be bound to your API Gateway.
Your Lambda authorizer will require that the HTTP request with IoT data contains the header field Authorization with colon separated name of your client and its security token.
Authorization: iotCreators.Starterkit:d86zGcbpRcDiiWb8UQEBChrI1WYxDXRrJDVwfdsd
To enable such static client specific token authorization you will perform the following steps:
- Create a new Lambda function myIoTAuthorizer
- Bind myIoTAuthorizer as Lambda authorizer to your API Gateway and Lambda function for which you like to enable the authorization.
- Test if the token authorization works.
Create new Lambda function myIoTAuthorizer
- Search and open Lambda service
- Select Functions (on the left side) and push button Create function (on right side)
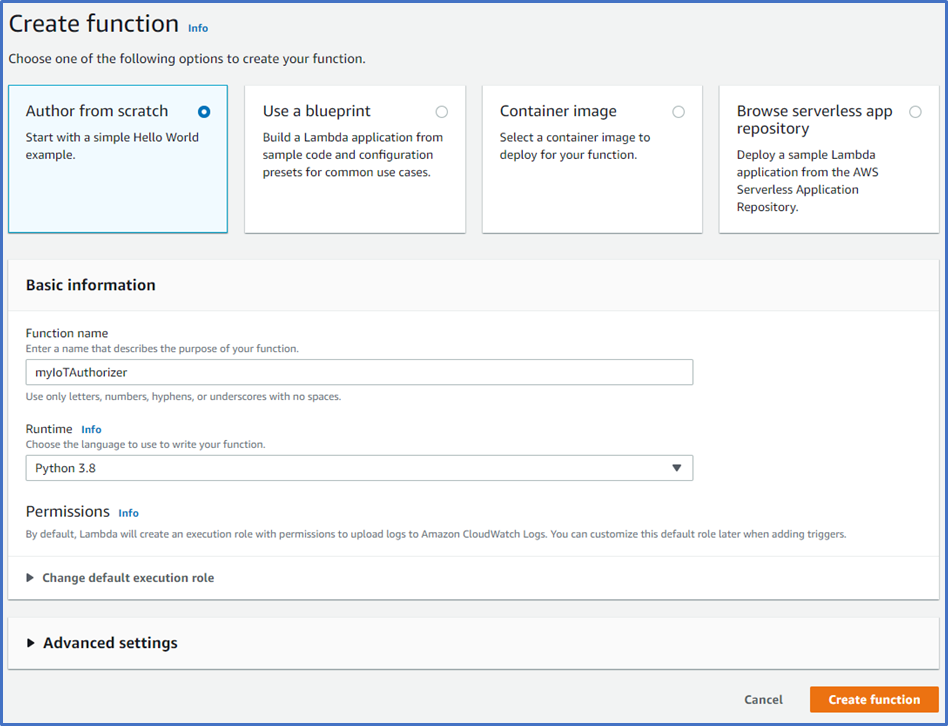
- Choose Autor from scratch
- Function name: myIoTAuthorizer
- Runtime: Python 3.8
- Push button Create function (right bottom)
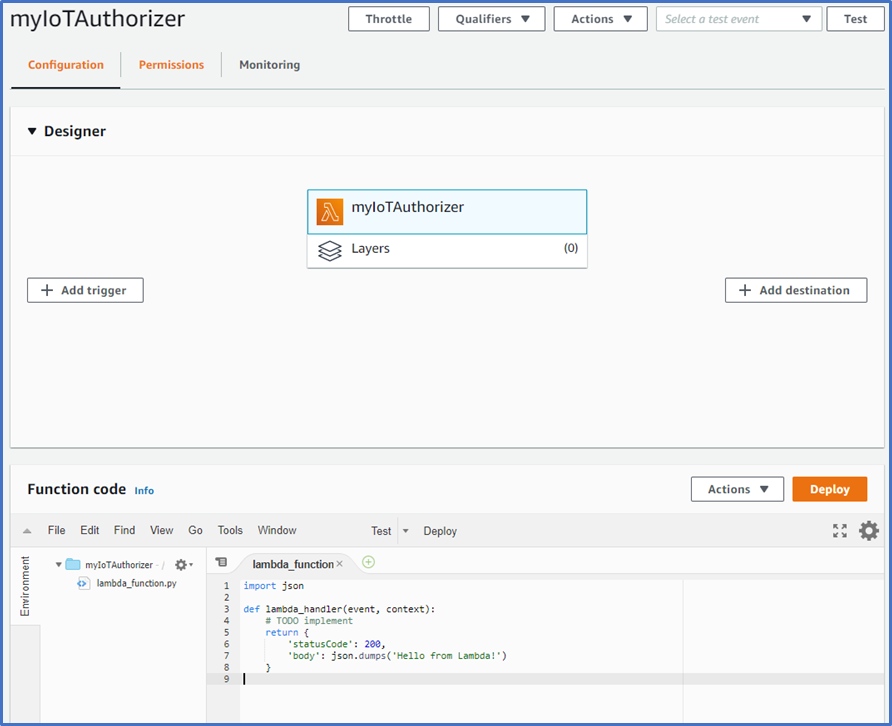
As next you need to replace the 10 lines of initial code in the Lambda function by the following one.
import json

# Client systems which are allowed to access the injection lambda
CLIENTS = {
    "iotCreators.Starterkit": {"token":"d86zGcbpRcDiiWb8UQEBChrI1WYxDXRrJDVwfdsd"}
}

def buildPolicyDocument(effect, resource="arn:aws:execute-api:*:*:*"):
    return {
        "Version": "2012-10-17",
        "Statement": [
            {
                "Action": "execute-api:Invoke",
                "Effect": effect,
                "Resource": resource
            }
        ]
    }

def lambda_handler(event, context):
    global CLIENTS
    returnValue = None

    try:
        auth = event["headers"]["authorization"]
        auth = auth.strip() if auth else ""
        print("*** AUTH: %s" % (auth))

        if len(auth) == 0:
            raise Exception("No authorization token defined in authorziation header.")

        fields = auth.split(":")

        if len(fields) != 2:
            raise Exception("Authorization format of \"%s\" is invalid." % (auth))

        client = fields[0].strip()
        token = fields[1].strip()

        if client not in CLIENTS.keys():
            raise Exception("Unknown client %s (auth=%s)" % (client, auth))

        if token != CLIENTS[client]["token"]:
            raise Exception("Invalid token %s for client %s (auth=%s)" % (token, client, auth))

        # Get the the addressed route
        routeArn = event["routeArn"] if "routeArn" in event.keys() else "arn:aws:execute-api:*:*:*"
        print("*** ROUTEARN: %s" % (routeArn))

        returnValue = {"principalId":client, "policyDocument": buildPolicyDocument("Allow", routeArn)}

    except ValueError as err:
        print(err)
        returnValue = {"principalId":None, "policyDocument": buildPolicyDocument("Deny")}

    print("*** RETURN: ***\n%s" % (json.dumps(returnValue, indent=4)))

    return returnValue
This code contains the following elements
- CLIENTS: global dictionary in which you can register all your IoT data provider clients with a name and a token of your choice.
- lambda_handler: Main entry point of the Lambda function which is called by API Gateway to verify the authorization of the HTTP POST request. This function reads the Authorization header fields and verifies it against the CLIENTS registration dictionary, builds a policy document and returns it calling API Gateway.
- buildPolicyDocument: Function to generate the policy document to allow or deny the access to the posted Lambda function.
Bind myIoTAuthorizer to your API Gateway
In the next steps you will configure the previously created function as Lambda Authorizer for your API Gateway myIoTAPI.
- Search and open API Gateway service
- Select API (on the left side) and click myIoTAPI (on right side)
- Click on Routes (on the left side below Develop)
- Click on ANY below /myIoTInjector in the list of Routes
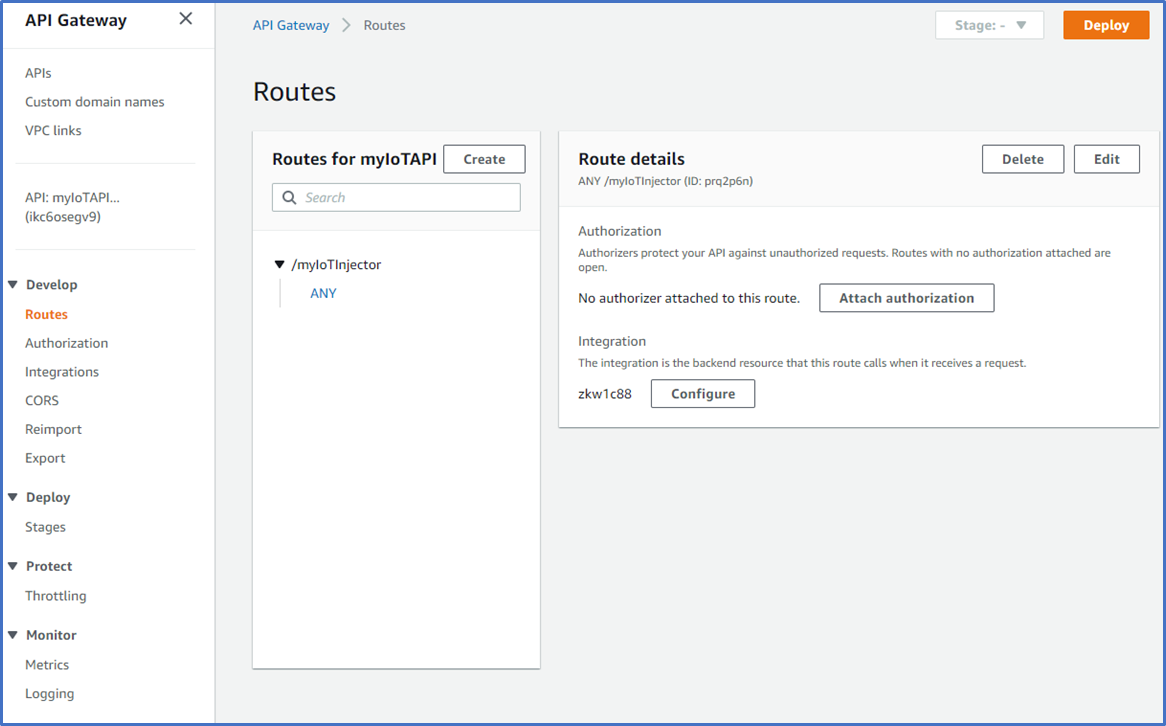
- Click on Attach authorization

- Click Create and attach an authorizer
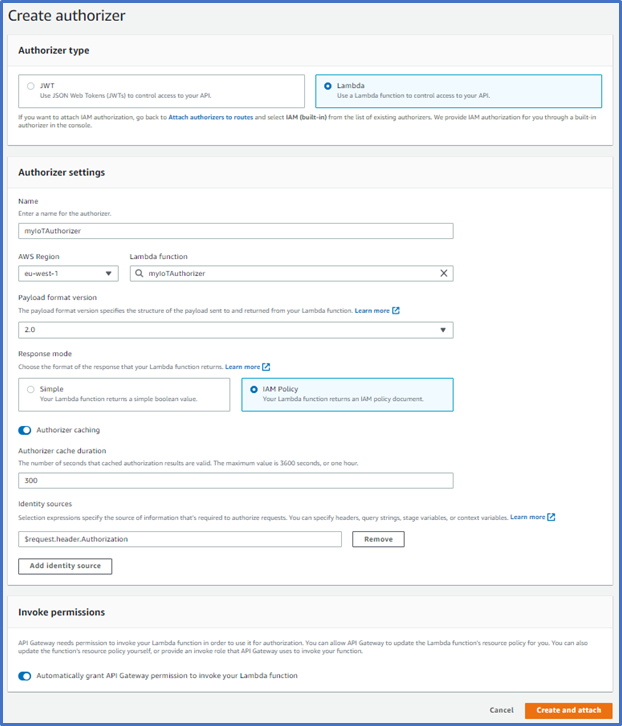
- Authorizer type: Lambda
- Name: myIoTAuthorizer
- AWS Region: select your region.
- Lambda function: myIoTAuthorizer
- Response mode: IAM Policy
- Click Create and attach (right bottom)
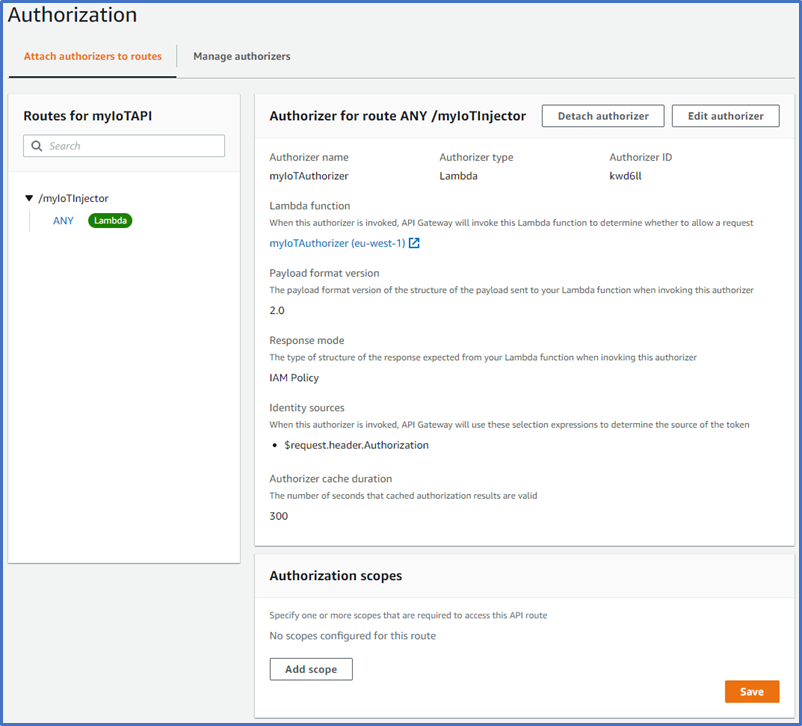
Test if the token authorization works
To test if the token authorization works you only need to add the Authorization header field to your Postman test request from before:
Authorization: iotCreators.Starterkit:d86zGcbpRcDiiWb8UQEBChrI1WYxDXRrJDVwfdsd
If everything works fine you should see a 204 No Content in the Status and an empty body.

Step 7: Integrate IoT Creators with AWS Timestream DB
Register your AWS Lambda function as application callback in your IoT Creators project
To integrate IoT Creators with AWS Timestream DB via Lambda function and API Gateway you simple need to configure the public URL of your Lambda function with its Authorization header field to the application server of the IoT Creators project.
To do so perform the following steps:
- Login into IoT Creators portal https://portal.iotcreators.com/auth/login
- Select PROJECTS on the left side and click Details button of the project for which you want to register your device.
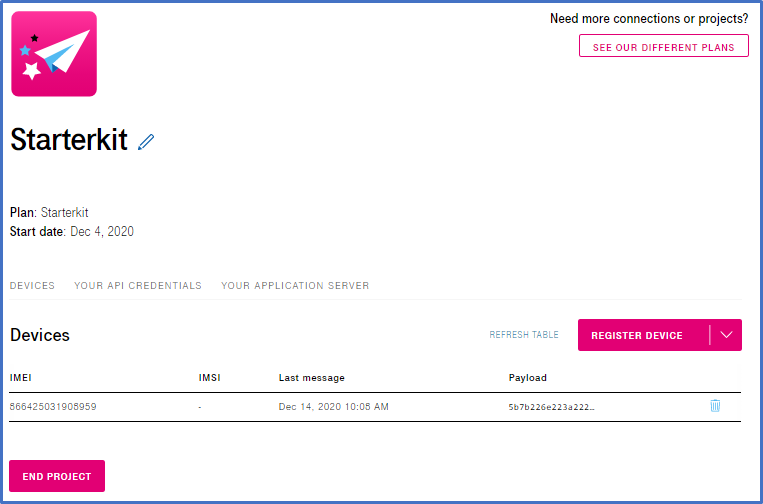
- Click on YOUR APPLICATION SERVER
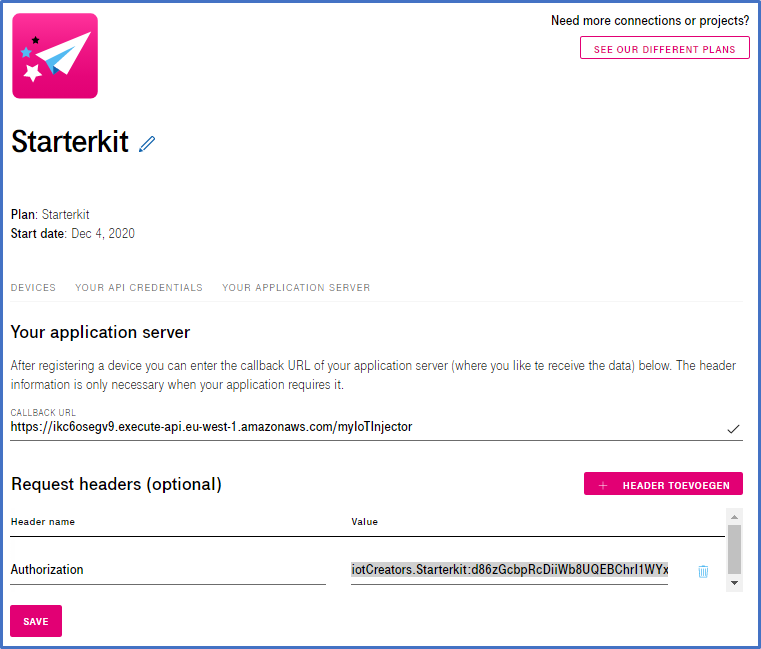
- CALLBACK URL: https://ikc6osegv9.execute-api.eu-west-1.amazonaws.com/myIoTInjector
- Click on button ADD HEADER
- Header name: Authorization
- Value: iotCreators.Starterkit:d86zGcbpRcDiiWb8UQEBChrI1WYxDXRrJDVwfdsd
- Click button Save
Test the integration
To verify if your integration between IoT Creators and your Lambda function works probably you just need to check the table in your Timestream DB as you did it already before when you checked if your Lambda function is able to write data into your Timestream DB.
If everything work fine you should see new records in the table of your Timestream DB.
Step 8: Integrate Grafana with AWS Timestream
In this step you get explained how to integrate your AWS Timestream DB with Grafana. The descriptions in this step require that you have at least a test account for Grafana Cloud.
Add Amazon Timestream Plugin to your Grafana
- Open Configuration and click on the tab Plugins
- Click on button Find more plugins on Grafana.com
- Input Timestream into the input field Name/Desription
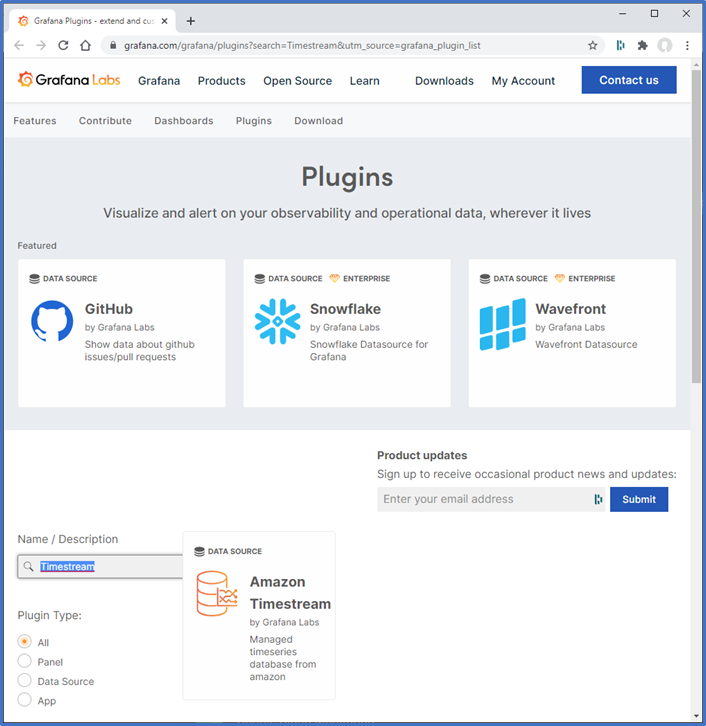
- Click on Amazon Timestream data source
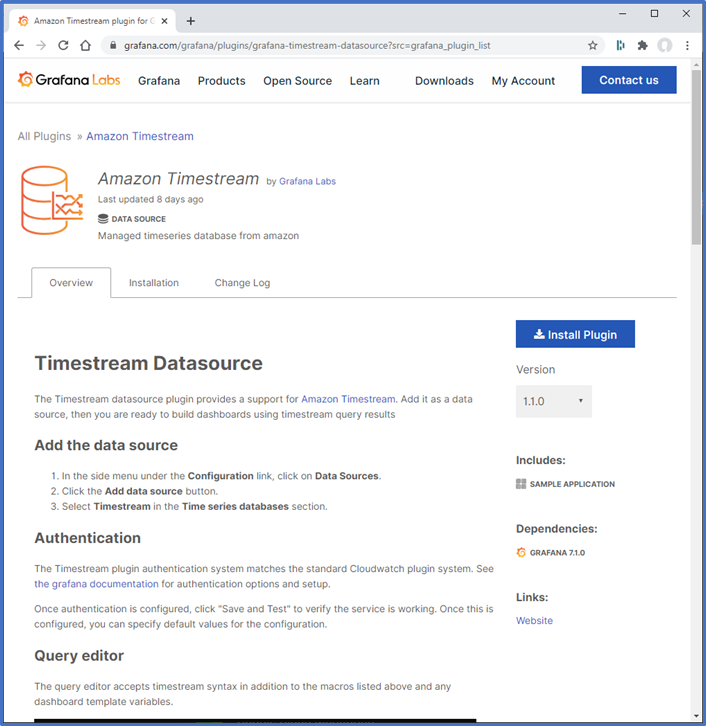
- Click on button Install Plugin (on right side)
- Click on button Install Now

- Go back to Grafana application in your browser and refesh the Plugins browser window
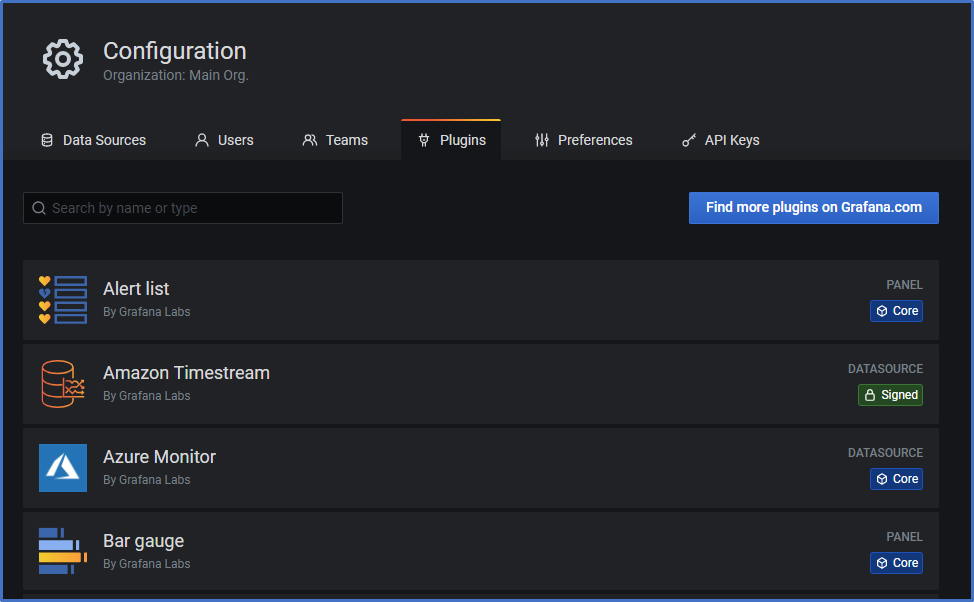
Add Amazon Timestream Data Source
- Open Configuration and click on the tab Data Sources
- Click on button Add data source (on right side)
- Search for Amazon Timestream, point on it with the mouse and click button Select
- Authentication Provider: **Access & secret key
- Secret Key ID: use the ID from the user myGrafanaClient
- Secret Access Key: use the key from the user myGrafanaClient
- Default Region: select AWS region in which you created your Timestream DB
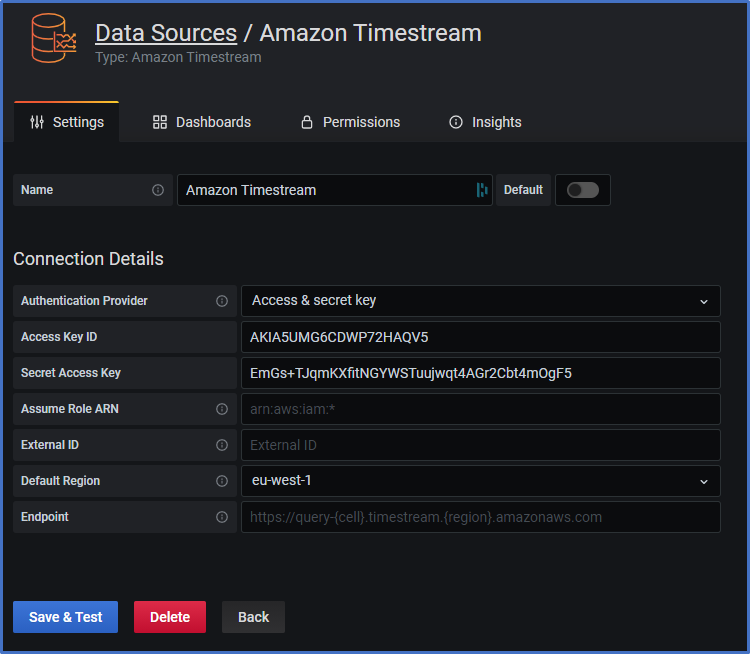
- Click on button Save & Test
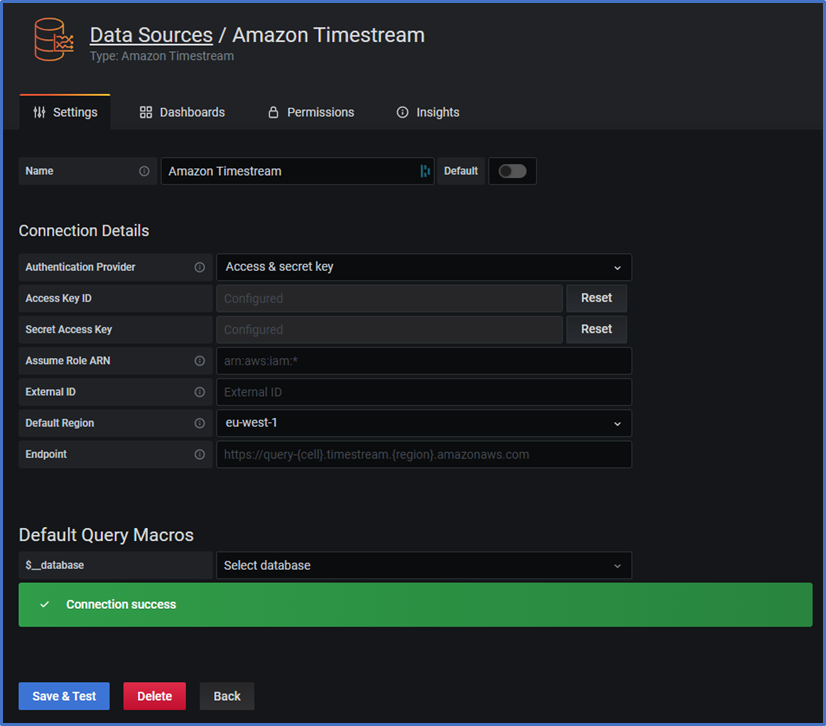
Step 9: Create an IoT Dashboard in Grafana
Create DevKit payload as data table
- Mouse over + in function bar of the main window (on the left sideI
- Click on Dashboard
- Click on button + Add new panel
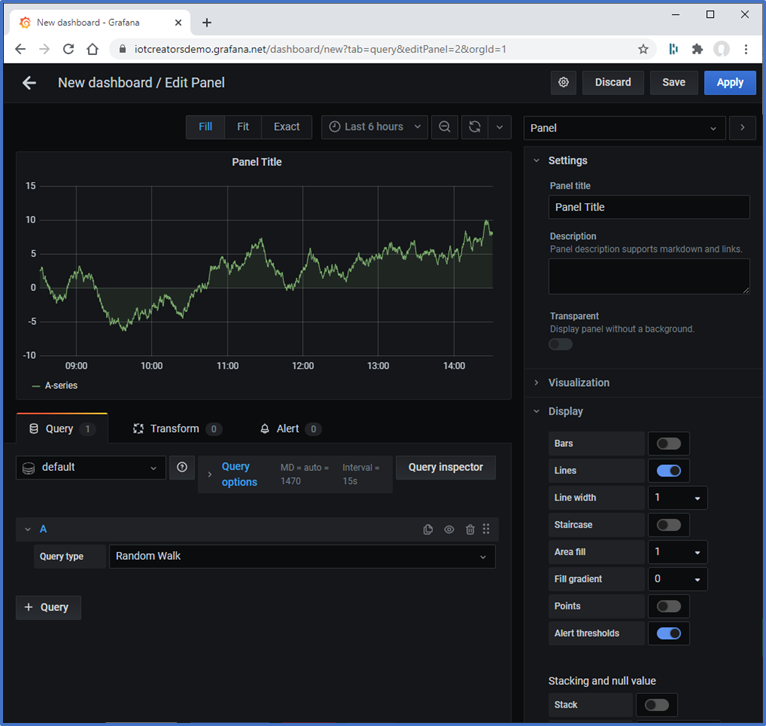
in right Panel: Panel title: DevKit Payload - 867997031341190
- in right Panel: Visualization: Table
- in Query: Select Amazon Timestream
- in Query: Paste the following query into the query editor.
select time, "measure_value::varchar" as Message
from myIoTDB.myIoTTable
where $__timeFilter
  and measure_name = 'Data'
  and deviceId = 'IMEI:867997031341190'
order by
  time desc
Don't forget to replace In the query code above the deviceId IMEI:867997031341190 with id of your device.
Click button refresh Dashboad 🔄 at the top of the window
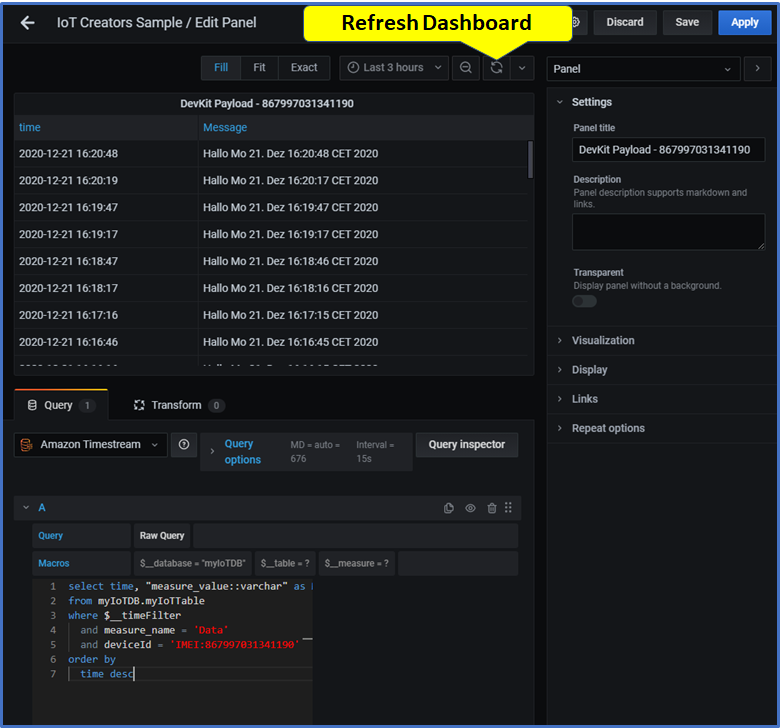
Click button Apply at the right top of the window
Create CO2 diagram for a sensor
- Mouse over + in function bar of the main window (on the left sideI
- Click on Dashboard
- Click on button + Add new panel
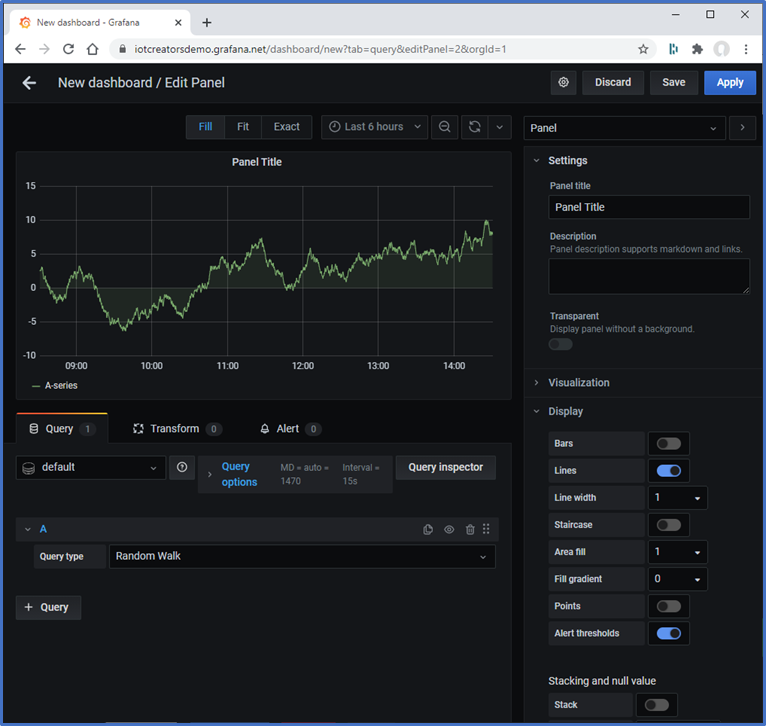
- in right Panel: Panel title: CO2
- in right Panel: Visualization: Graph
- In right Panel: Display: Lines, Points
- in Query: Select Amazon Timestream
- in Query: Paste the following query into the query editor.
select create_time_series(time, measure_value::double) as CO2
from myIoTDB.myIoTTable
where $__timeFilter
  and measure_name = 'CO2'
  and deviceId = 'IMEI:351938100106687'
Don't forget to replace In the query code above the deviceId IMEI:351938100106687 with id of your device.
- Click button refresh Dashboad 🔄 at the top of the window
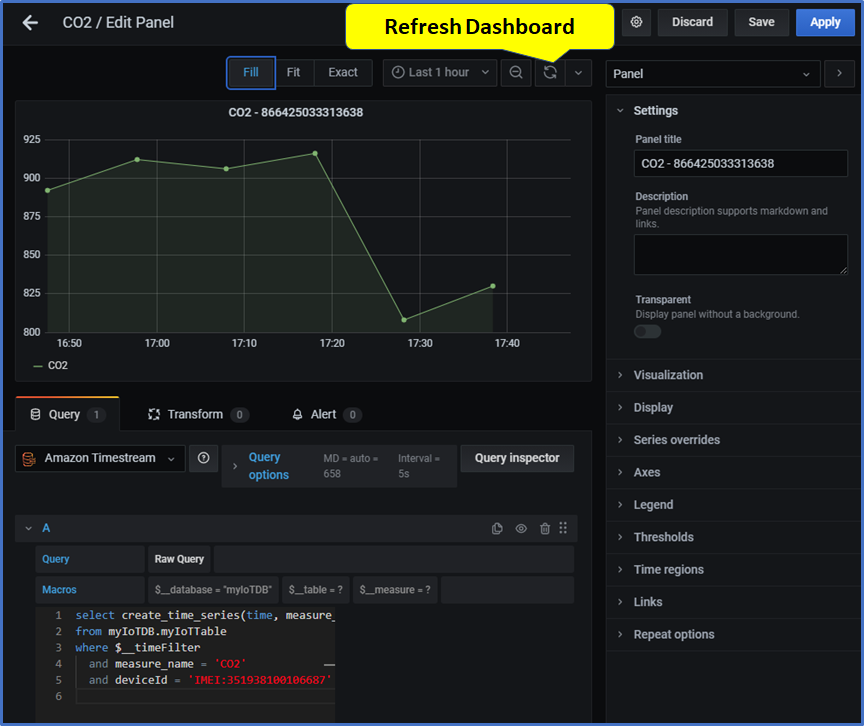
- Click button Apply at the right top of the window
✨ 🌟 👍 👏 Congratulations !!!
If you can see the graph with your values you reached end of this journey. Of cause this is a very simple integration which leaves much space for optmization. But at least it provides you an central theme through an end-to-end IoT solution. It addresses all the important layers of
- device
- mobile connectivity and IoT data provisioning
- IoT data decoding/transformation
- IoT data injection
- IoT data storage
- IoT data visualization
Step 10: Integrate AWS Simple Queue Service
The description how to integrate the AWs Simple Queue Service to decouple the client's post of iot message from its decoding and injection into the Timestream DB will come soon.
Updated over 4 years ago
