Quectel BC66 MQTT client
This tutorial describes how to integrate Quectel BC66 with IoT Creators via MQTT.
Prerequisites
This chapter is mainly going to focus on how to use the Quectel BC66 MQTT client. Please make sure to read the chapter "Integrate a generic MQTT client" to understand the general usage of MQTT. Make sure that you have a callback URL registered in your IoT Creators projec and that your device is registered in your project.
After registering the MQTT device on the IoT Creators platform, make sure to attach your Quectel BC66 with the network using the APN cdp.iot.t-mobile.nl. If the module is configured correctly it should connect automatically. Once you get a "+IP:" URC, you know that your device is attached to the network correctly.
F1: 0000 0000
V0: 0000 0000 [0001]
00: 0006 000C
01: 0000 0000
U0: 0000 0001 [0000]
T0: 0000 00B4
Leaving the BROM

at
at
OK
+IP: 10.128.5.84

ate0
OK
at+qsclk=0

OK
at+cgdcont?

+CGDCONT: 1,"IP","cdp.iot.t-mobile.nl","10.128.5.84",0,0,0,,,,,,0,,0

OK
Connect the MQTT client
To connect the Quectel BC66 to the MQTT Broker of IoT Creators we need to issue two AT commands; one for opening a TCP socket and one to actually send the MQTT Connect message and processing the ACK from the server.
AT+QMTOPEN=?

+QMTOPEN: (0-5),"<host_name>",<port>

OK
AT+QMTCONN=?

+QMTCONN: (0-5),"<clientID>"[,"<username>"[,"<password>"]]

OK
As we are using a SIM card with cdp.iot.t-mobile.nl APN we are communicating through the secure IPSec tunnel, which allows us to do MQTT without TLS using the 172.27.130.11:1883 as destination. The two commands should look as follows:
AT+QMTOPEN=0,"172.27.130.11",1883

OK

+QMTOPEN: 0,0
AT+QMTCONN=0,"531795632694348","531795632694348","<PASSWORD>"

OK

+QMTCONN: 0,0,0
+QMTCONN: 0,0,0 means that we have successfully connected our device to the MQTT Broker.
Attention!
After opening the TCP Socket with AT+QMTOPEN there is a timeout of around 5-6 seconds in which the TCP socket is closed server side, if there is no MQTT CONNECT message. That means, that the second command AT+QMTCONN has to come within 5 seconds. Otherwise you'll get a +QMTSTAT: 0,7 which indicates, that the TCP socket has been closed.
Publishing a message (i.e. uplink message)
To publish a message we need to use the command AT+QMTPUB after we have successfully connected to client to the MQTT broker. We again use the Topic and Payload structure already described in the chapter Integrate a generic MQTT client. The topic is "us/<IMEI>" and the payload is "{"uplinkMsg/0/data": "<VALUE>"}".
AT+QMTPUB=0,1,1,0,"us/531795632694348",{"uplinkMsg/0/data":"HelloWorld"}

OK

+QMTPUB: 0,1,0
After running this command you should see an HTTP POST message on your callback URL that looks like this:
{
  "reports": [
    {
      "serialNumber": "531795632694348",
      "timestamp": 1633948640340,
      "subscriptionId": "af87a23e-e08f-4374-b4d8-96b5603d2bcd",
      "resourcePath": "uplinkMsg/0/data",
      "value": "HelloWorld",
      "customAttributes": {},
      "protocol": "MQTT"
    }
  ],
  "registrations": [],
  "deregistrations": [],
  "updates": [],
  "expirations": [],
  "responses": []
}
Subscriptions and Downlink Messages
To receive downlink messages we need to subscribe to the downlink topic "ds/<IMEI>/request" by sending the command:
AT+QMTSUB=?

+QMTSUB: (0-5),<msgID>,"<topic>",<qos>[,"<topic>",<qos>...]

OK

AT+QMTSUB=0,1,"ds/531795632694348/request",0

OK

+QMTSUB: 0,1,0,0
A downlink message through the GUI is sent to the resourcePath "downlinkMsg/0/data". Our device needs to at least once send a payload to this topic so that IoTCreators knows it can process the resource path. So if you haven't done this yet, you need to run AT+QMTPUB=0,1,1,0,"us/<IMEI>",{"uplinkMsg/0/data":""} before you can receive a downlink message.
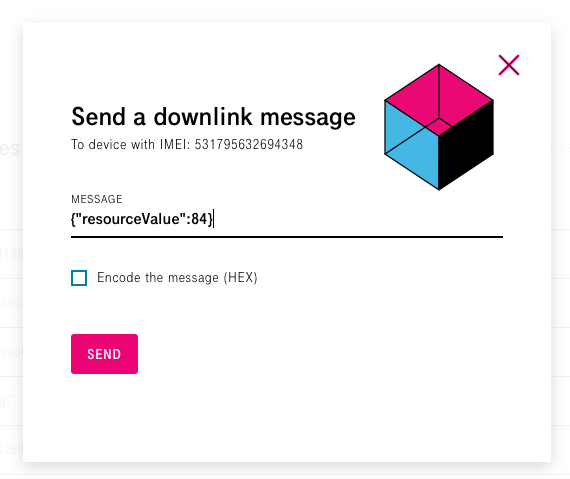
Now that you have subscribed to the topic you can use the Actions -> Send a downlink message function next to your device to send a downlink message to the device

After a couple of seconds (depending on your network coverage conditions) you should automatically get a +QMTRECV: notification on you Quectel BC66 that looks something like this:
+QMTRECV: 0,0,"ds/531795632694348/request","{"type":"write","correlatorid":"f412af60-1f26-448a-8c8a-ebfc1f91702a","resourcepath":"downlinkMsg/0/data","value":"{\"resourceValue\":84}"}"
The notification is again the JSON sent by IoTCreators which specifies the type of the message ("write") and which contains our payload and resourcePath:
{
  "type": "write",
  "correlatorid": "f412af60-1f26-448a-8c8a-ebfc1f91702a",
  "resourcepath": "downlinkMsg/0/data",
  "value": "{\"resourceValue\":84}"
}
Updated over 4 years ago
