ThingsBoard
In this chapter we describe how to integrate IoT Creators SCS with Thingsboard
We show how you can implement your own end-to-end IoT solution for sensor data monitoring.
Beside the NB-IoT sensor which sends data via UDP or CoAP/Leul to IoT Creators Data Provisioning service you need to have access to ThingsBoard Cloud.
Architecture
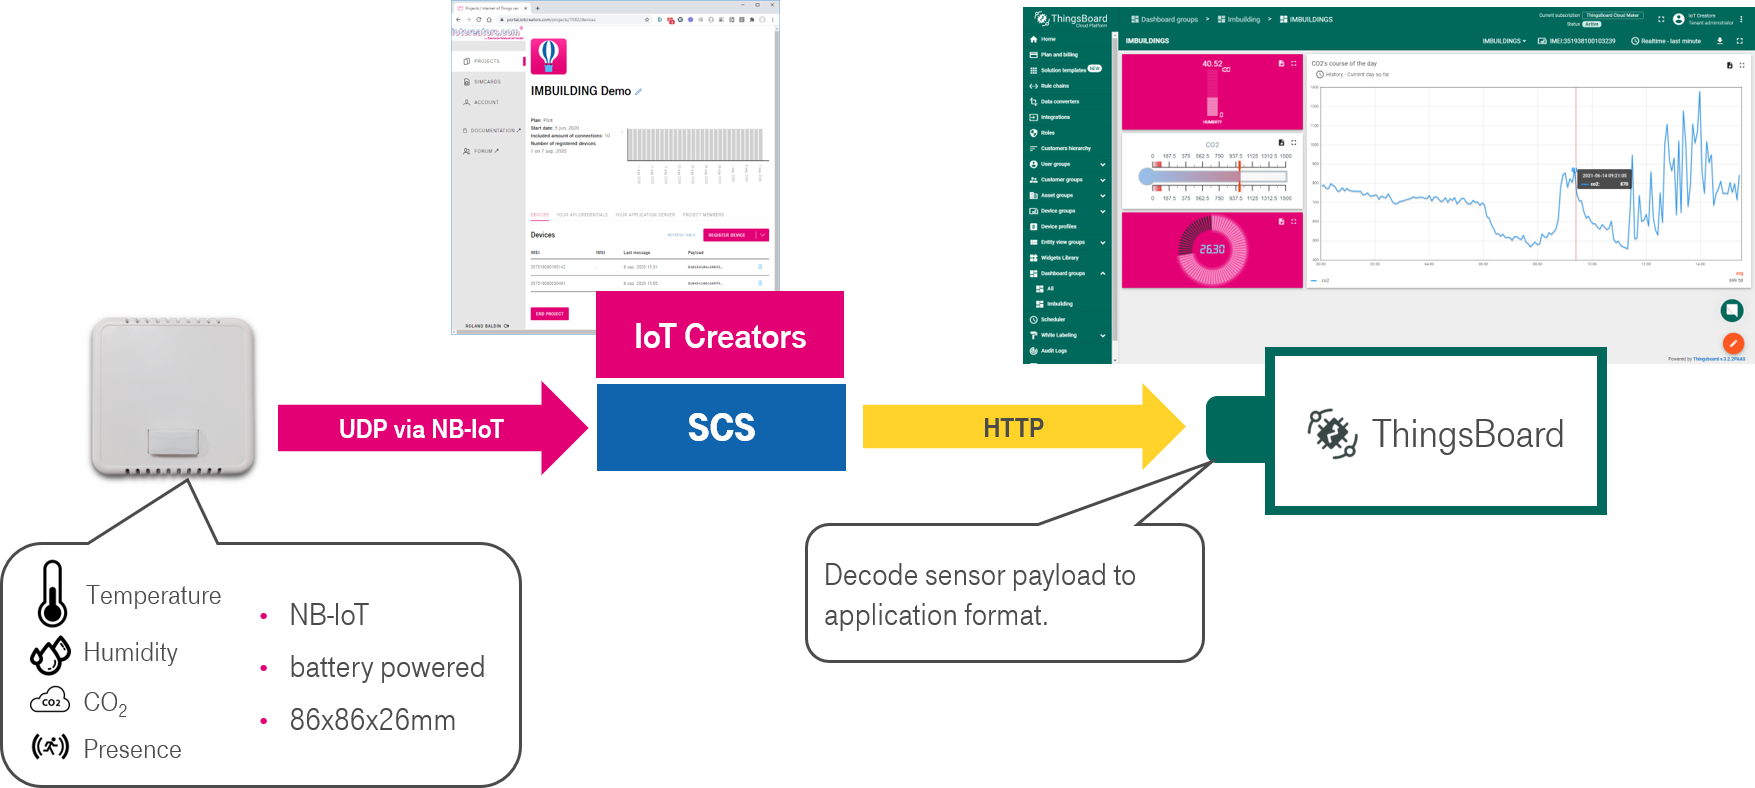
As you can see in the architecture the data from your sensor will be forwarded to ThingsBoard via HTTP. The integration in ThingsBoard is linked to a data converter which decodes the payload. The converted data can then be used to monitore your sensor in ThingsBoard.
Need help?
In case you have any problems with the integration you can find help in the forum or write us an email: [email protected]
Perequisites
To start with this tutorial you need to fulfill the following prerequisites:
- IoT Creators account and at least a Starterkit SIM card.
- NB-IoT IoT Sensor which sends its payload via UDP to IoT Creator's UDP server (e.g. comfortsensor from IMBUILDING (see device catalog or documentation library). Any other NB-IoT devkit such as Quectel BC66 will work as well.
- an account with the ThingsBoard Professional Edition (https://thingsBoard.io/products/thingsboard-pe/)
Steps
Based on this prerequisites you will implement the architecture above with the following steps:
- Step 1: Basic integration of IoT Creators and ThingsBoard
a) Create a converter in ThingsBoard
b) Create an integration in ThingsBoard
c) Configure application URL in IoT Creators Portal
d) Check if everything worked - Step 2: Implement the data converter for SDI sensors
- Step 3: Register and activate your sensor
a) Register the device in IoT Creators Portal
b) Create your device in ThingsBoard
c) Activate IMBUILDING Comfort Sensor
d) Check if everything worked
Step 1: Basic integration of IoT Creators and ThingsBoard
Let's start with a simple integration. Initially, this only serves to familiarize ThingsBoard and IoT Creators Portal with each other and to create a connection between these two plattforms.
a) Create a converter in ThingsBoard
An integration module in ThingsBoard uses converters (or data harmonization) to make uplinks consumable by ThingsBoard and convenient for third party platforms downlinks. To understand the architecture of the integration feature in ThingsBoard you may read the corresponding documentation.
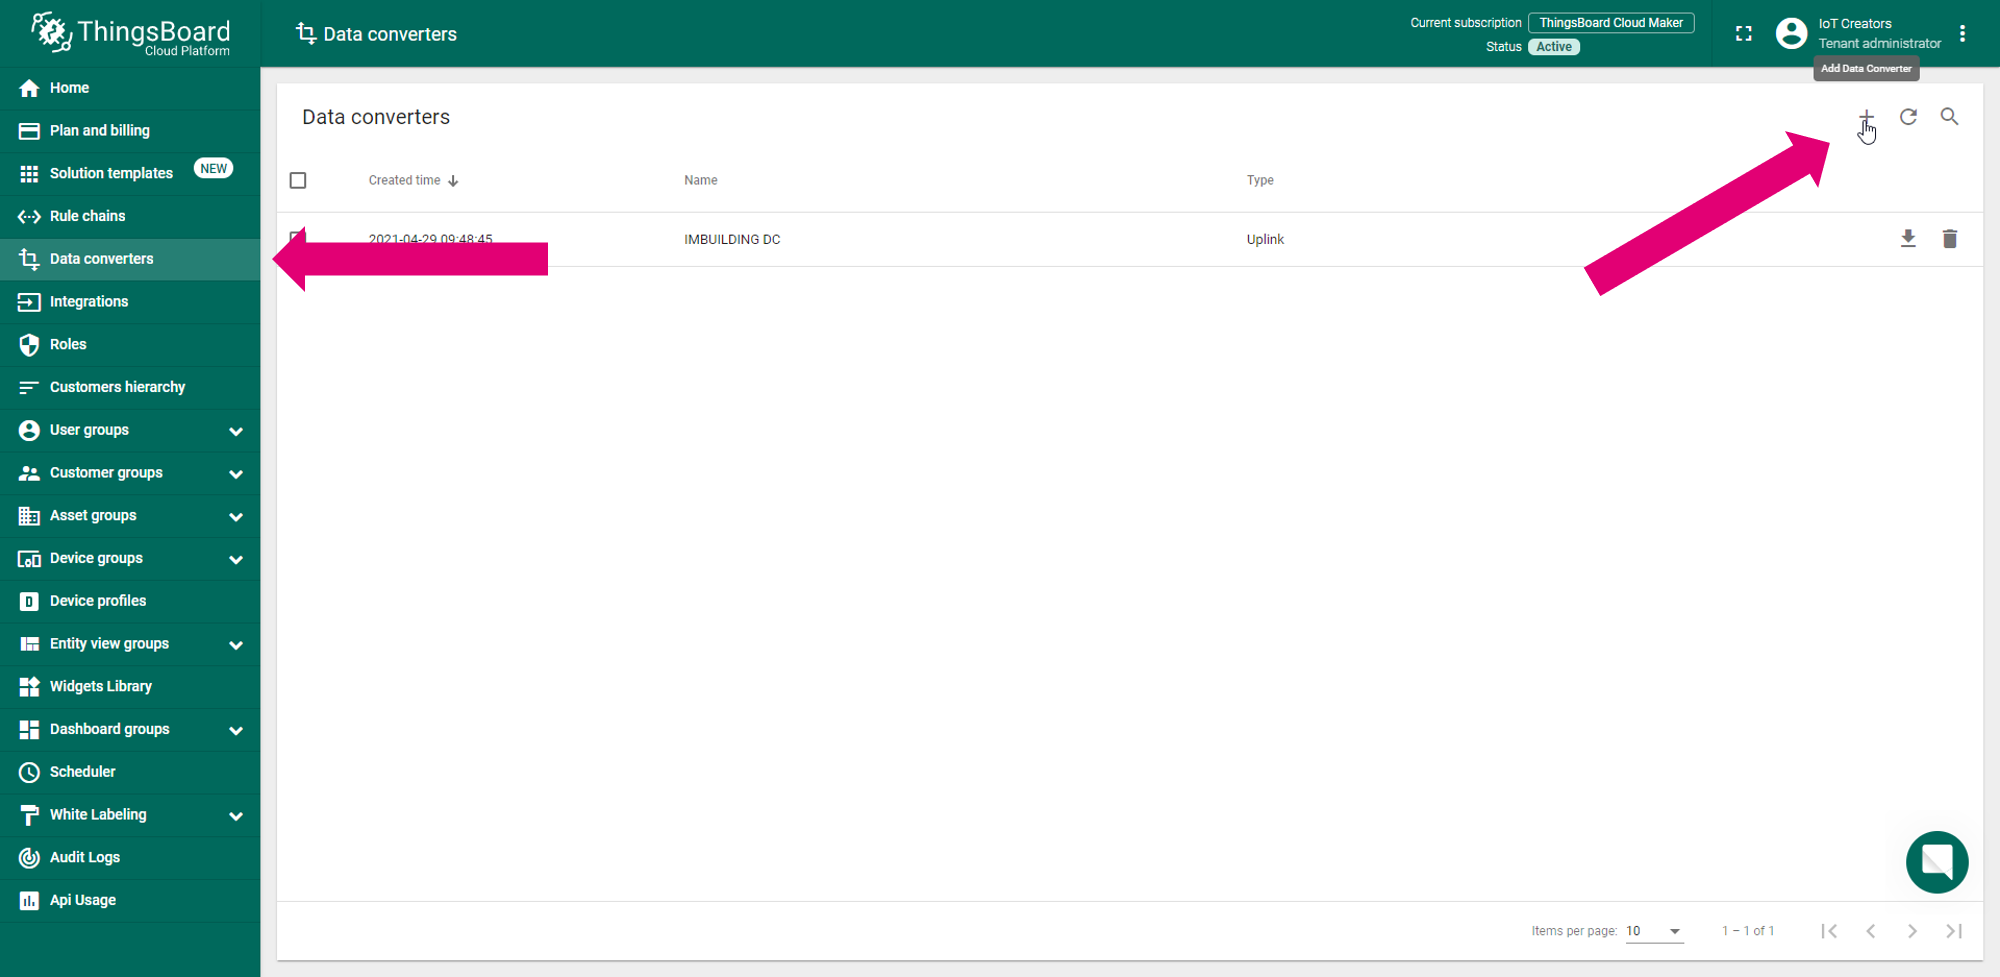
So the first part is to create a data converter, which is absolutely necessary for the integration. To do this, go to Data converters in the left bar and hit the '+' in the upper left corner.
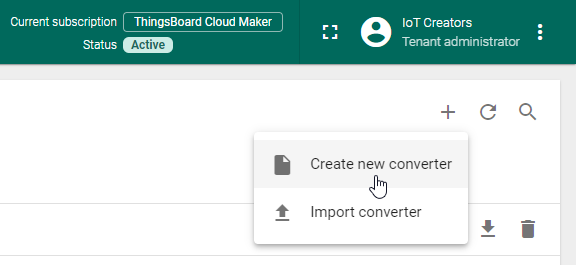
Now you have two opportunities. In our case we select Create new converter.
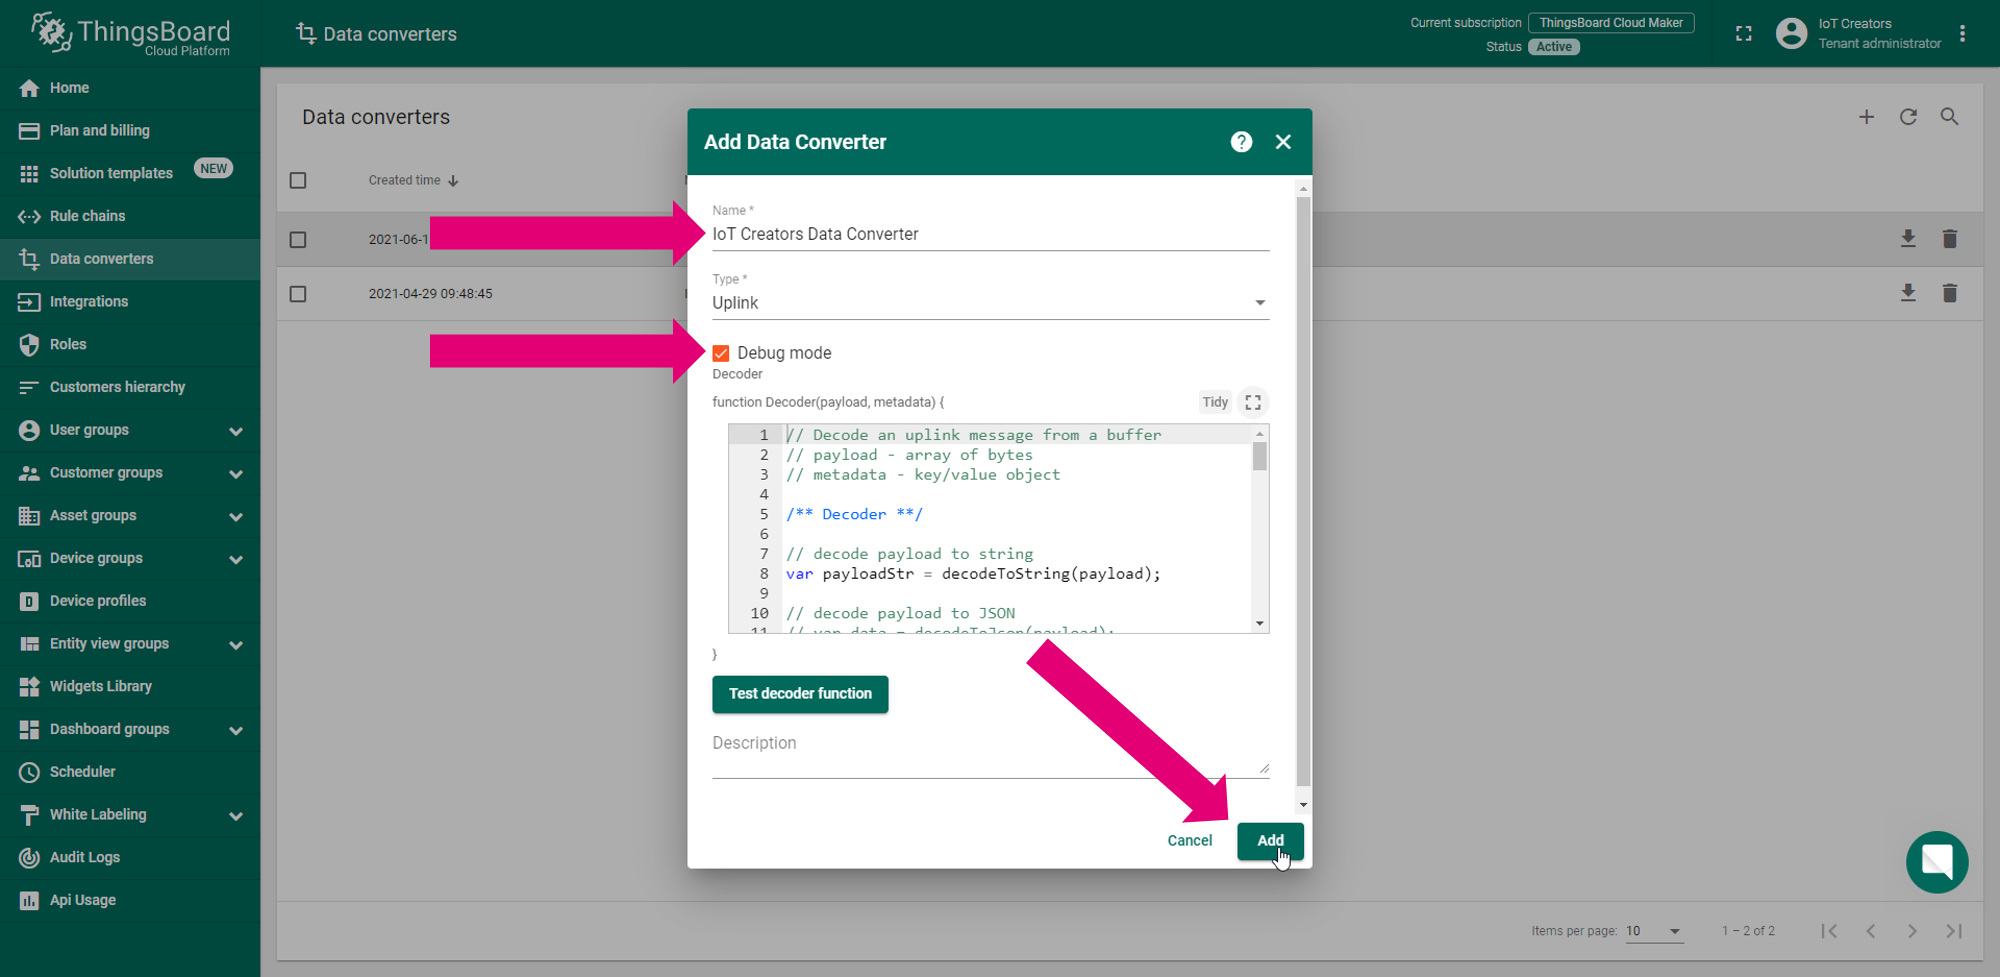
Afterwards you can see a Pop-up with a default decoder. You just have to:
- Enter the Name of your converter
- tick the box Debug mode
- click Add
b) Create an integration in ThingsBoard
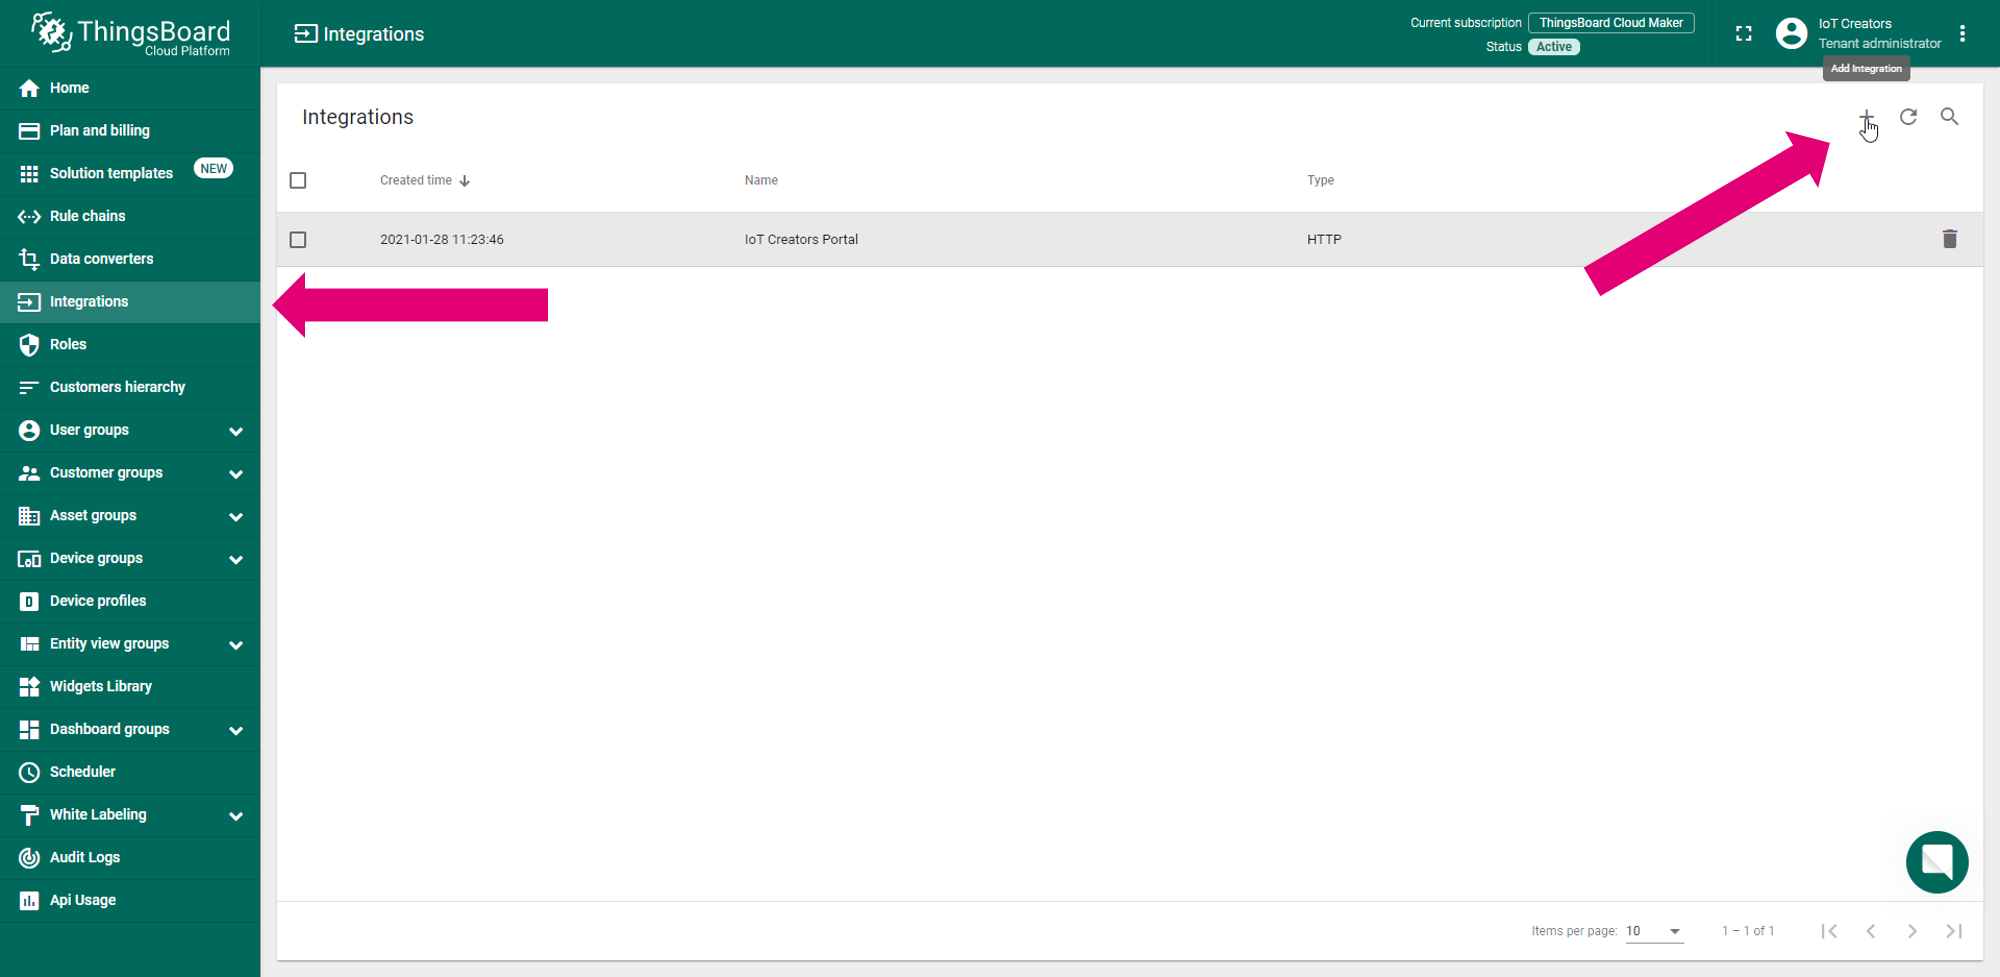
After you successfully created your data converter you are able to create the integration in ThingsBoard. Just go to Integrations in the left bar and click on the grey '+' in the upper right corner like you did with the converter.
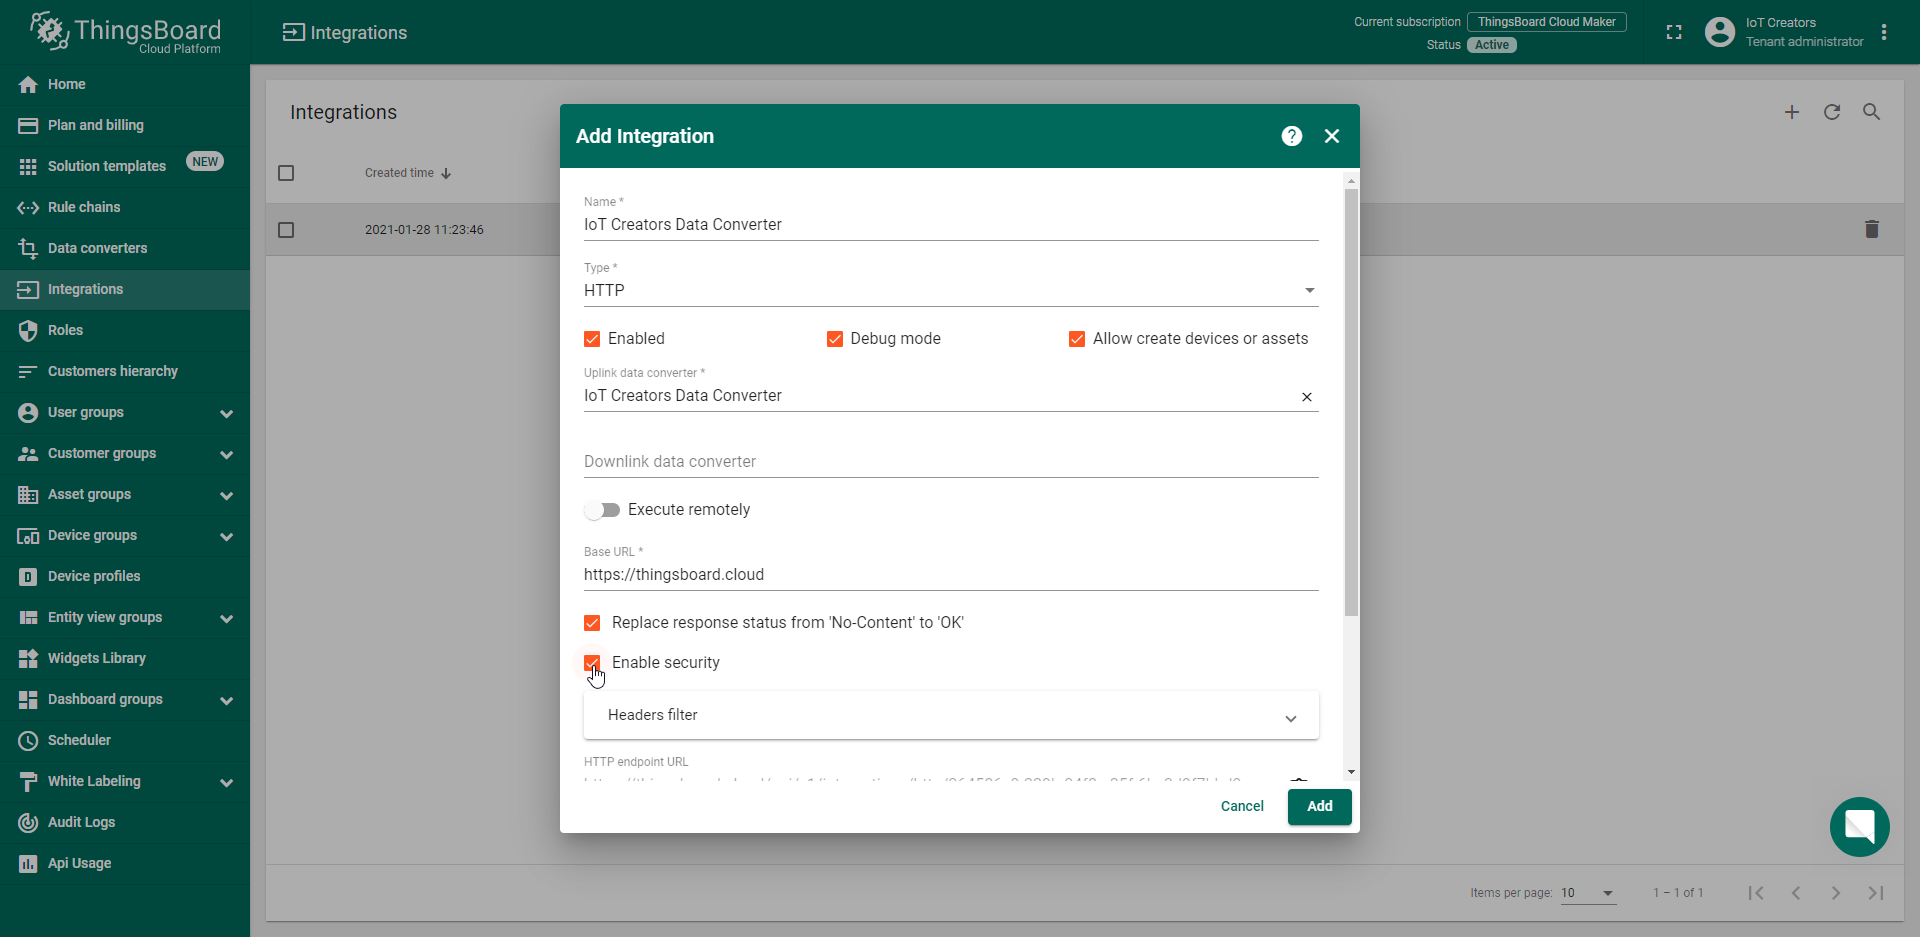
Now we can configure our Integration in the Pop-up. For this you have to...
- Enter the Name
- Enable Debug mode
- Select HTTP as the Type
- Select the Data converter which you created in the last step
- Enable Replace response status from 'No-Content' to 'OK'
- Select Enable security
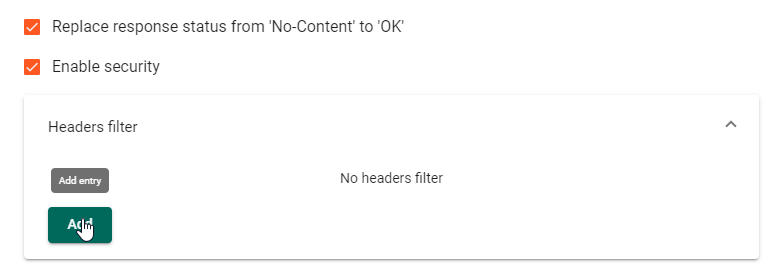
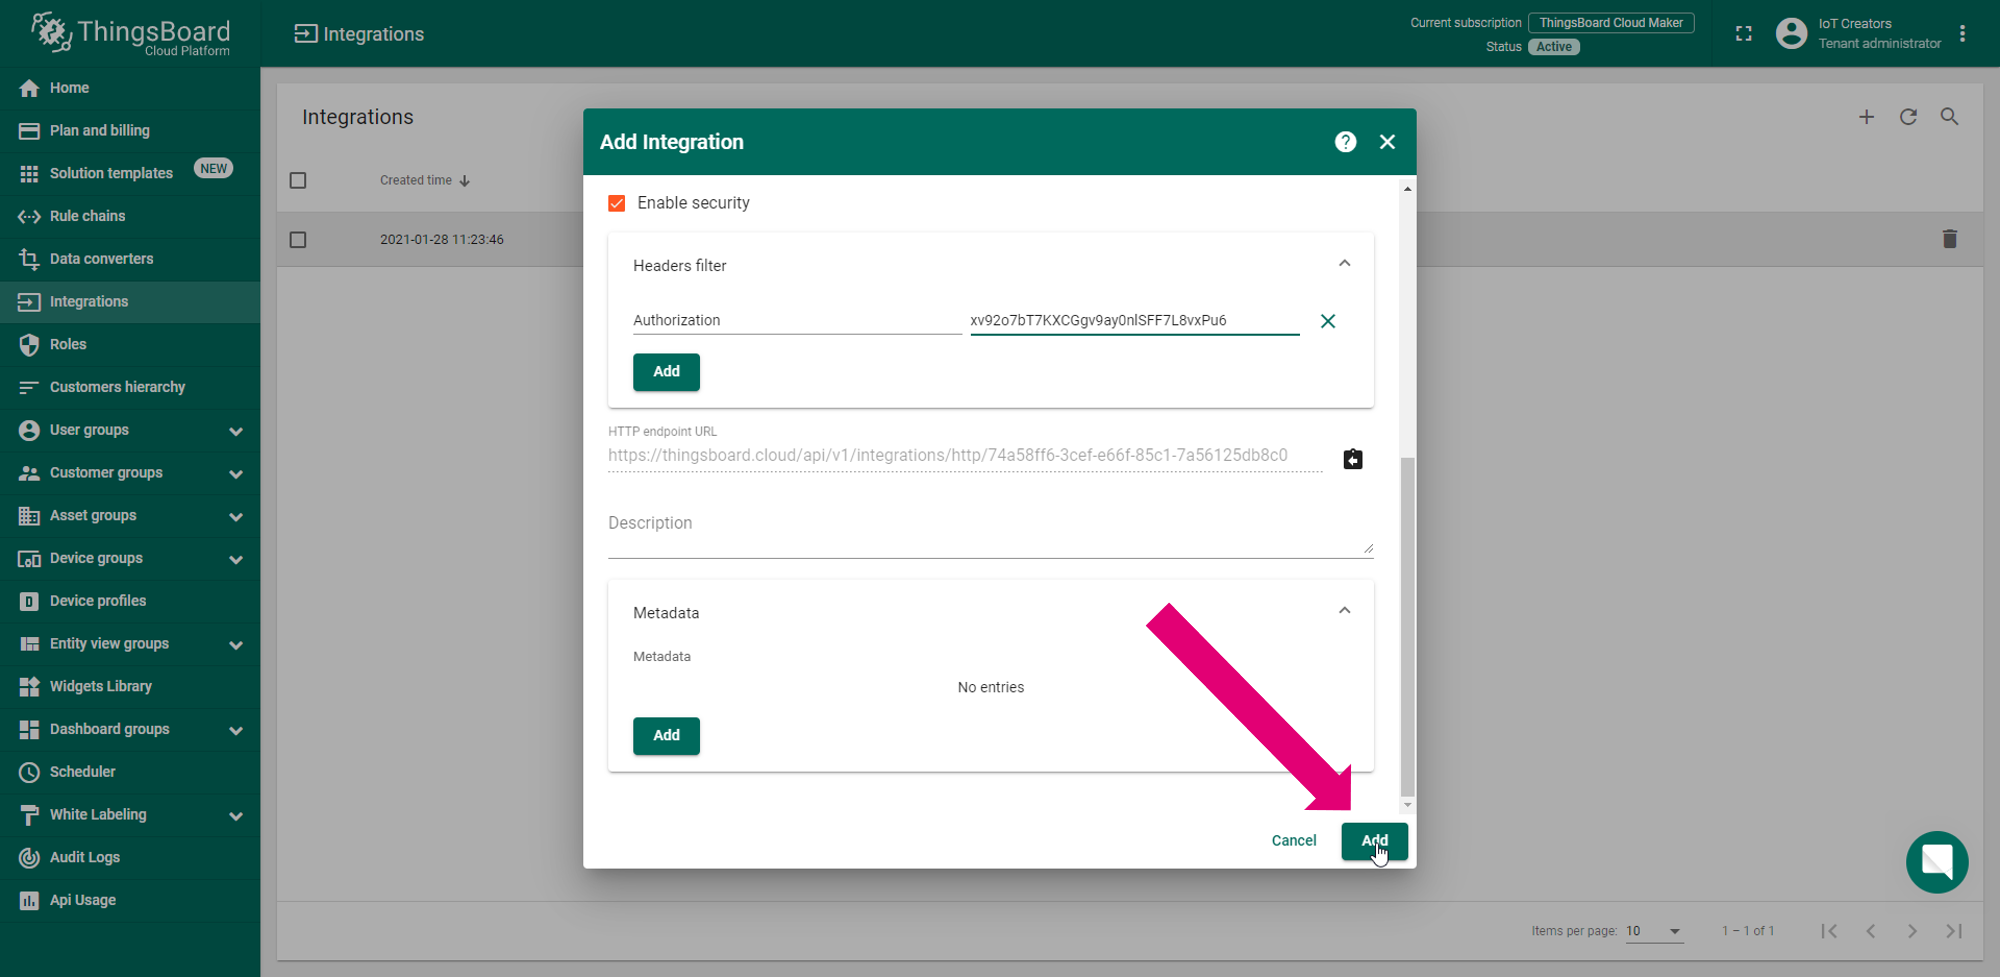
Add header for the security
For security reasons, we recommend to add an Authorization header with a generated value.

Afterwards you can save the integration with the Add button of the Pop-up.
Your ThingsBoard integration should now be available so that we can continue with connecting this integration to IoT Creators Portal.
c) Configure application URL in IoT Creators Portal
In this part we will take the endpoint URL and configure it in IoT Creators Portal with our security header.
To get the URL you can click on your integration and copy it by just clicking on the symbol.
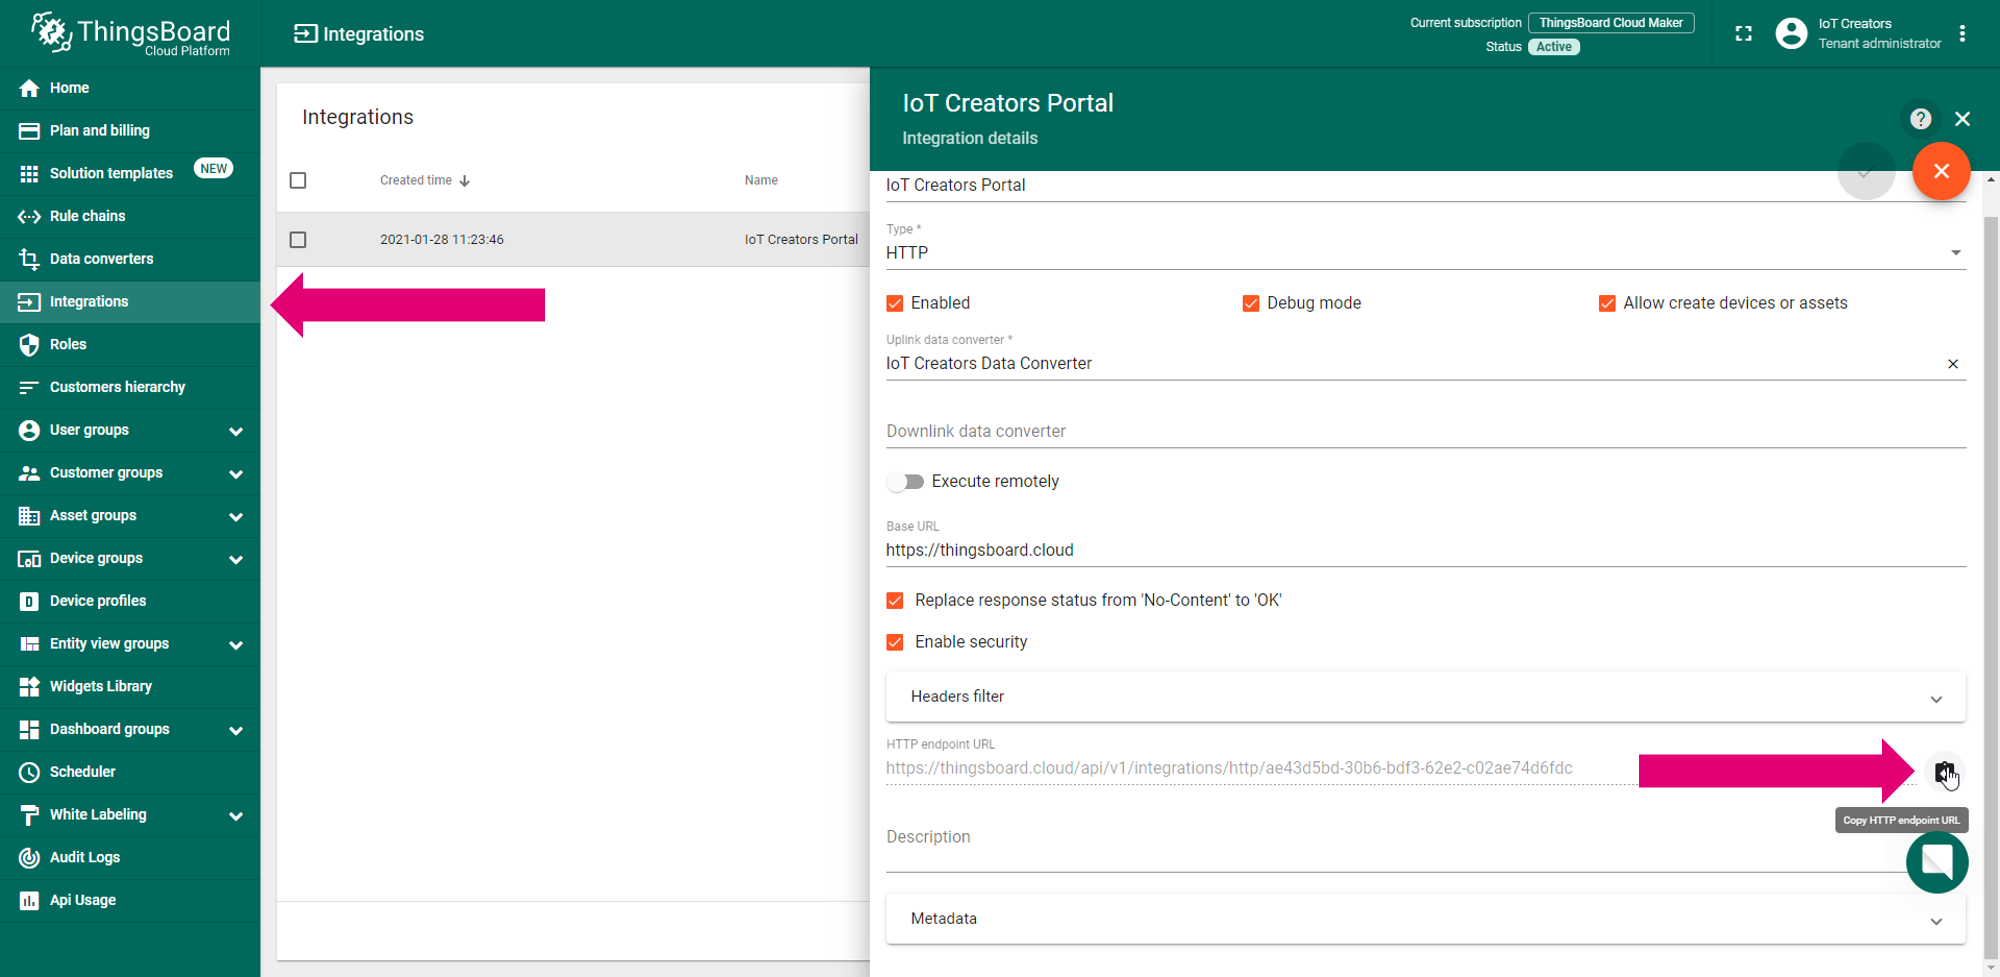
Now you can close the window and go to your project in IoT Creator Portal. Then switch to YOUR APPLICATION SERVER.
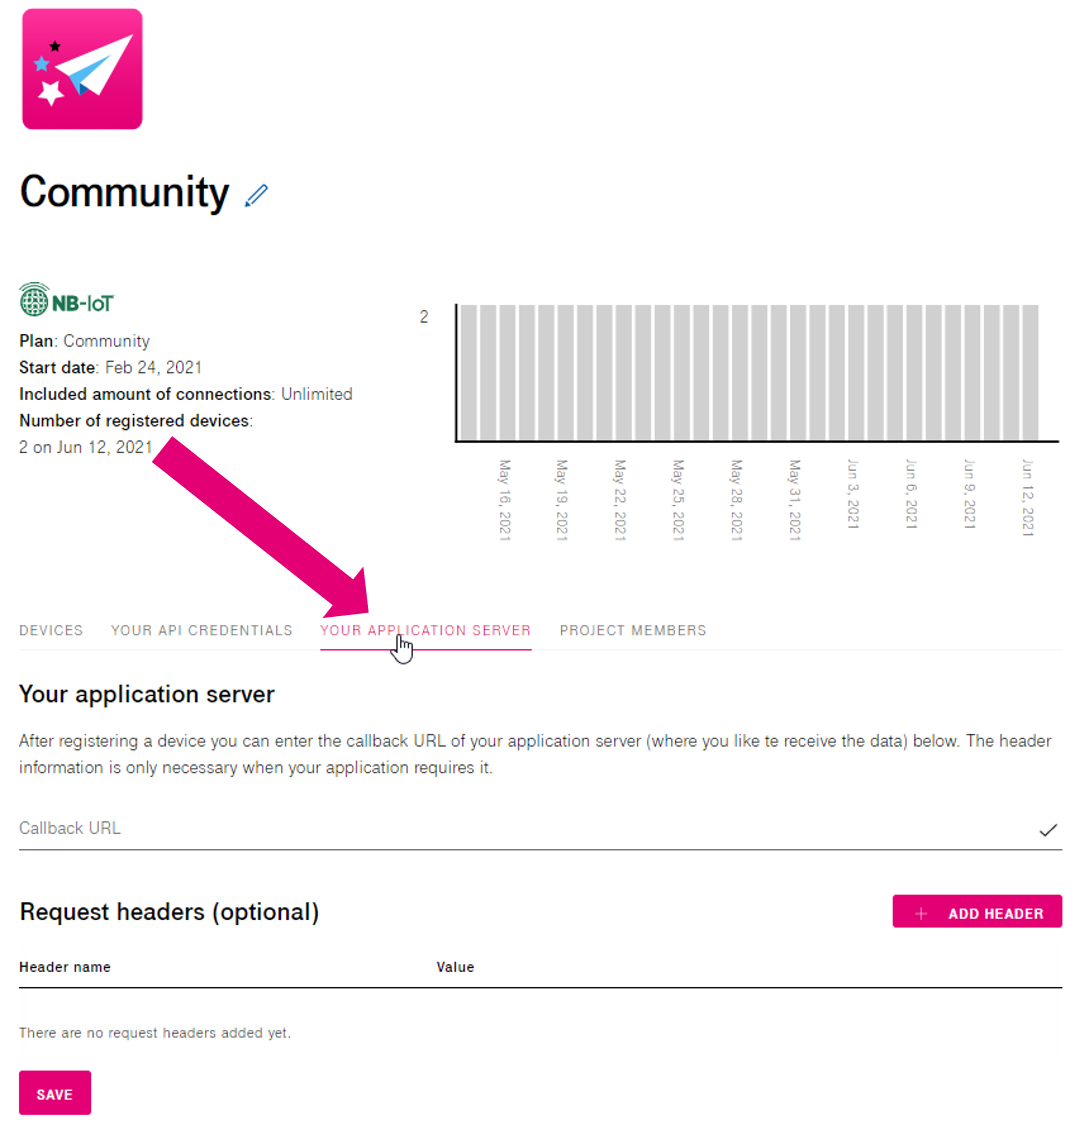
Paste your copied URL from ThingsBoard in the Callback URL line.
and create the same header as you did in ThingsBoard.
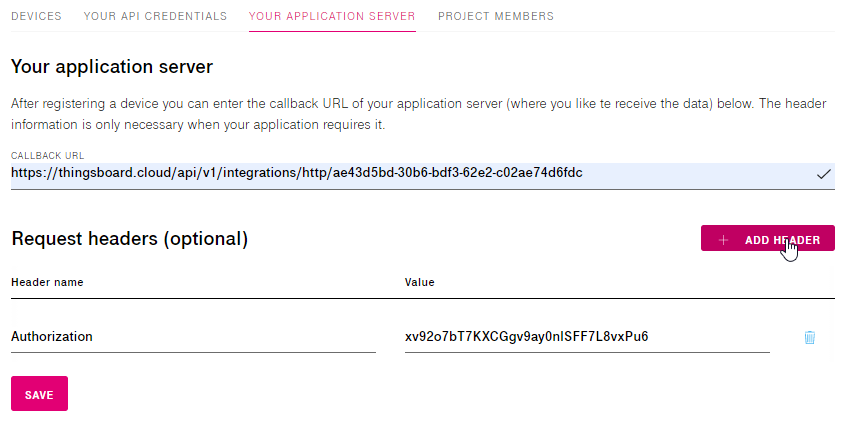
After that you can click on SAVE and should see a confirmation in the upper right corner.
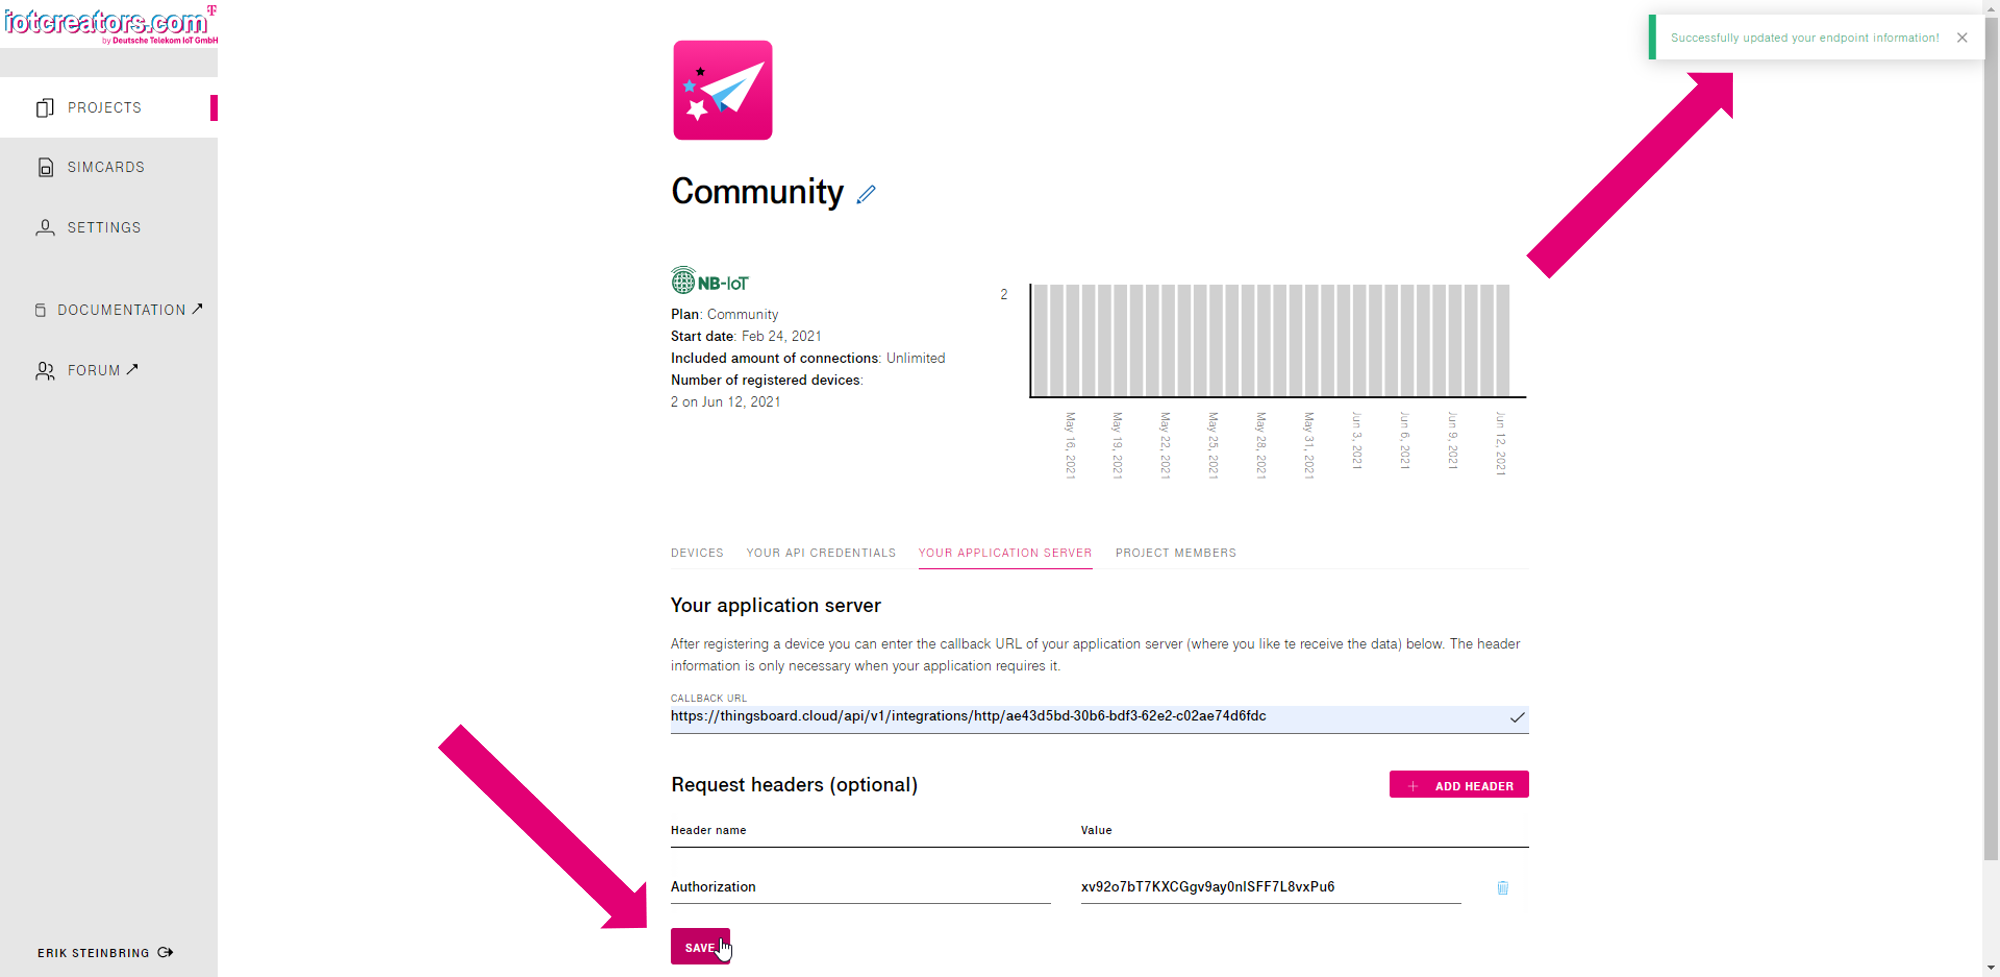
d) Check if everything worked
Let us finish this step with a simple way to doublecheck wether the connection was successful.
Like I mentioned you should have already seen a confirmation in IoT Creators Portal. Which should have look like this:

When you saw an error like in the picture below I would first check if your Authorization header is correct. If so, further investigations are required.

Even with a green notification I recommend to go back to ThingsBoard and check wether there is a new event.
To proof this you have to:
- Click on your integration in ThingsBoard
- Go to Events
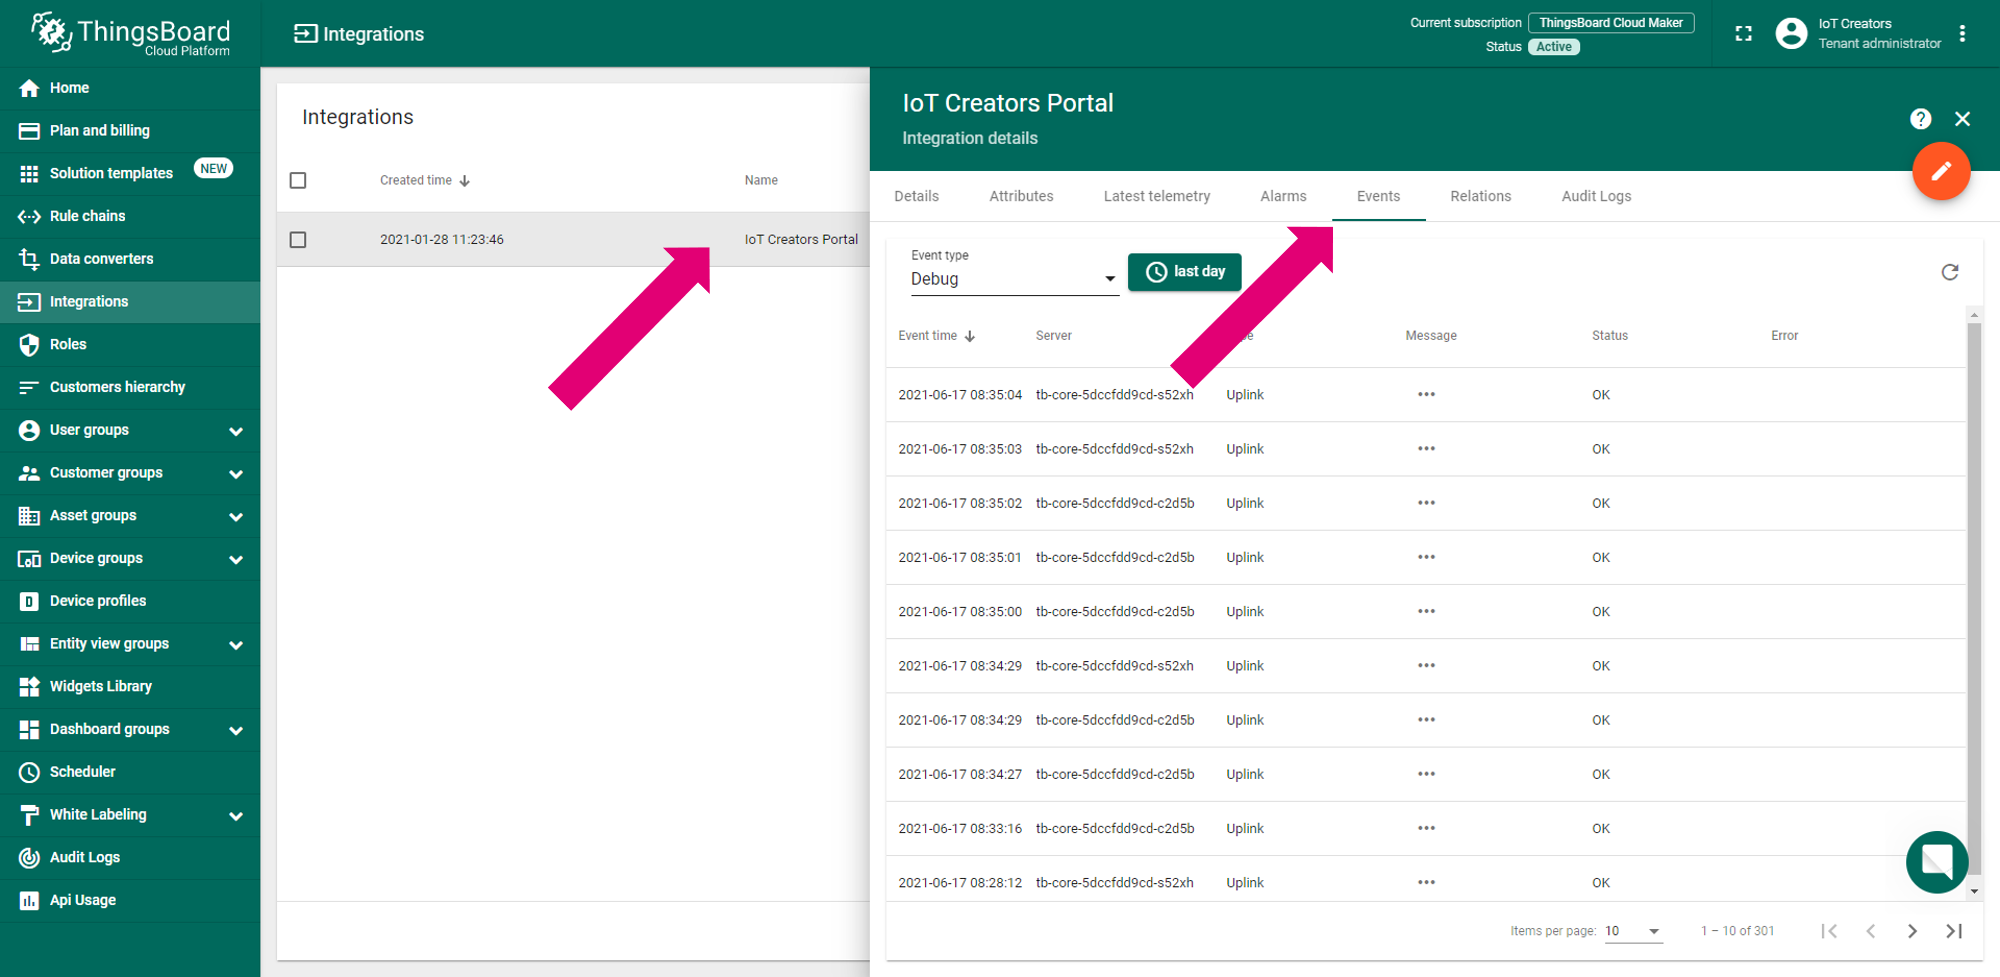
Here you should see a new event. If you did not get one, you will unfortunately have to check again whether the data converter and the integration are configurated correctly.
Step 2: Implement the data converter for SDI sensors
Now that you get a connection between ThingsBoard and IoT Creators Portal we can focus on the SDI sensor. Let us start with the data converter. This step is necessary so that ThingsBoard can decode the data from the sensor.
For this we need to change the default decoder to our own. However, you do not have to write any code yourself to do this. You can copy ours straight away. What this decoder basically does is taking the raw data from your device, dividing it into battery voltage, temperature, humidity, co2, status and presence and returning the data as telemetry.
function sdi_decode(hexString) {
	var d = {};
	d.sensorData = hexString;

	var hexData = hexString.match(/..?/g);

	var typeVersion = hexData[0] + hexData[1];

	if (typeVersion == '0101') {
		d.status = parseInt(hexData[8], 16);
		d.batteryV = parseInt(hexData[9] + hexData[10], 16) / 100;
		d.temperature = parseInt(hexData[12] + hexData[13], 16) / 100;
		d.humidity = parseInt(hexData[14] + hexData[15], 16) / 100;
		d.co2 = parseInt(hexData[16] + hexData[17], 16);
		d.presence = parseInt(hexData[18], 16);

	} else if (typeVersion == '0204') {
		d.status = parseInt(hexData[8], 16);
		d.batteryV = parseInt(hexData[9] + hexData[10], 16) / 100;
		d.counterA = parseInt(hexData[19] + hexData[20], 16);
		d.counterB = parseInt(hexData[21] + hexData[22], 16);
	}
	return d;
}

function iotCr_decode(deviceType, payload) {
  var plD = JSON.parse(payload);

  if (! plD.reports || plD.reports.length == 0) {
      return null;
  }

  ret = [];

  len = plD.reports.length;

  for (i = 0; i < len; i++) {
    var value = plD["reports"][i]["value"];

    if (deviceType == "SDI") {
      var telemetryD = sdi_decode(value);
      groupName = "IMBUILDING";
    }

    var serialNumber = plD["reports"][i]["serialNumber"];

    var deviceName = serialNumber;
    deviceType = "default";
    var customerName = 'customer';

    d = {
      deviceName: serialNumber,
      deviceType: deviceType,
      customerName: customerName,
      groupName: groupName,
      attributes: {
         data: value
      },
      telemetry: telemetryD
   };

   ret[i] = d;
  }

  return ret;
}

function iotCr_decode_bak(deviceType, payload) {
  var plD = JSON.parse(payload);

  if (! plD.reports || plD.reports.length == 0) {
      return null;
  }


  var value = plD["reports"][0]["value"];

  if (deviceType == "SDI") {
    var telemetryD = sdi_decode(value);
    groupName = "IMBUILDING";
  }

  var serialNumber = plD["reports"][0]["serialNumber"];

  var deviceName = serialNumber;
  deviceType = "default";
  var customerName = 'customer';

  return {
    deviceName: serialNumber,
    deviceType: deviceType,
    customerName: customerName,
    groupName: groupName,

    attributes: {
         data: value
    },

    telemetry: telemetryD
 };
}

function decodeToString(payload) {
   return String.fromCharCode.apply(String, payload);
}

var payloadStr = decodeToString(payload);
res = iotCr_decode(metadata["Header:devicetype"], payloadStr);

return res;
When you copied the code you can go back to ThingsBoard and edit your converter.
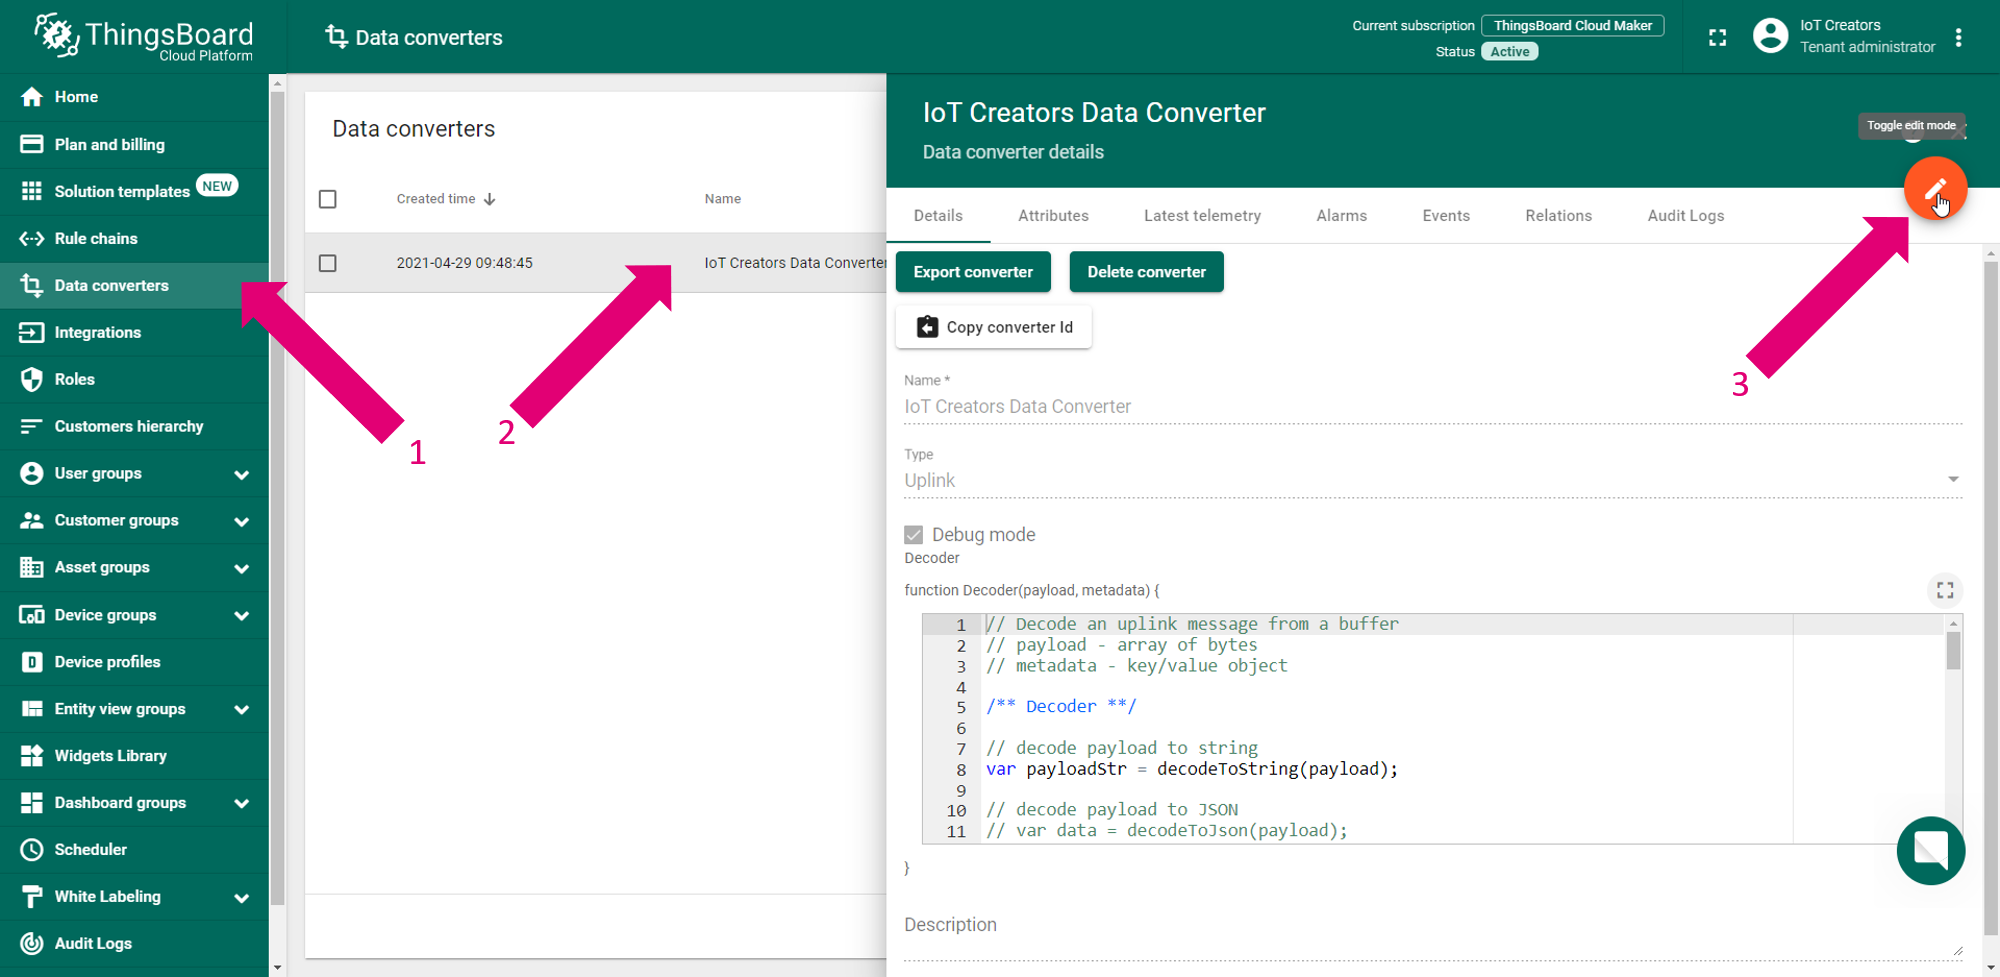
To do this you need to:
- Go to Data Converters in the left bar
- Click on your data converter
- Click on the pen in the upper right corner
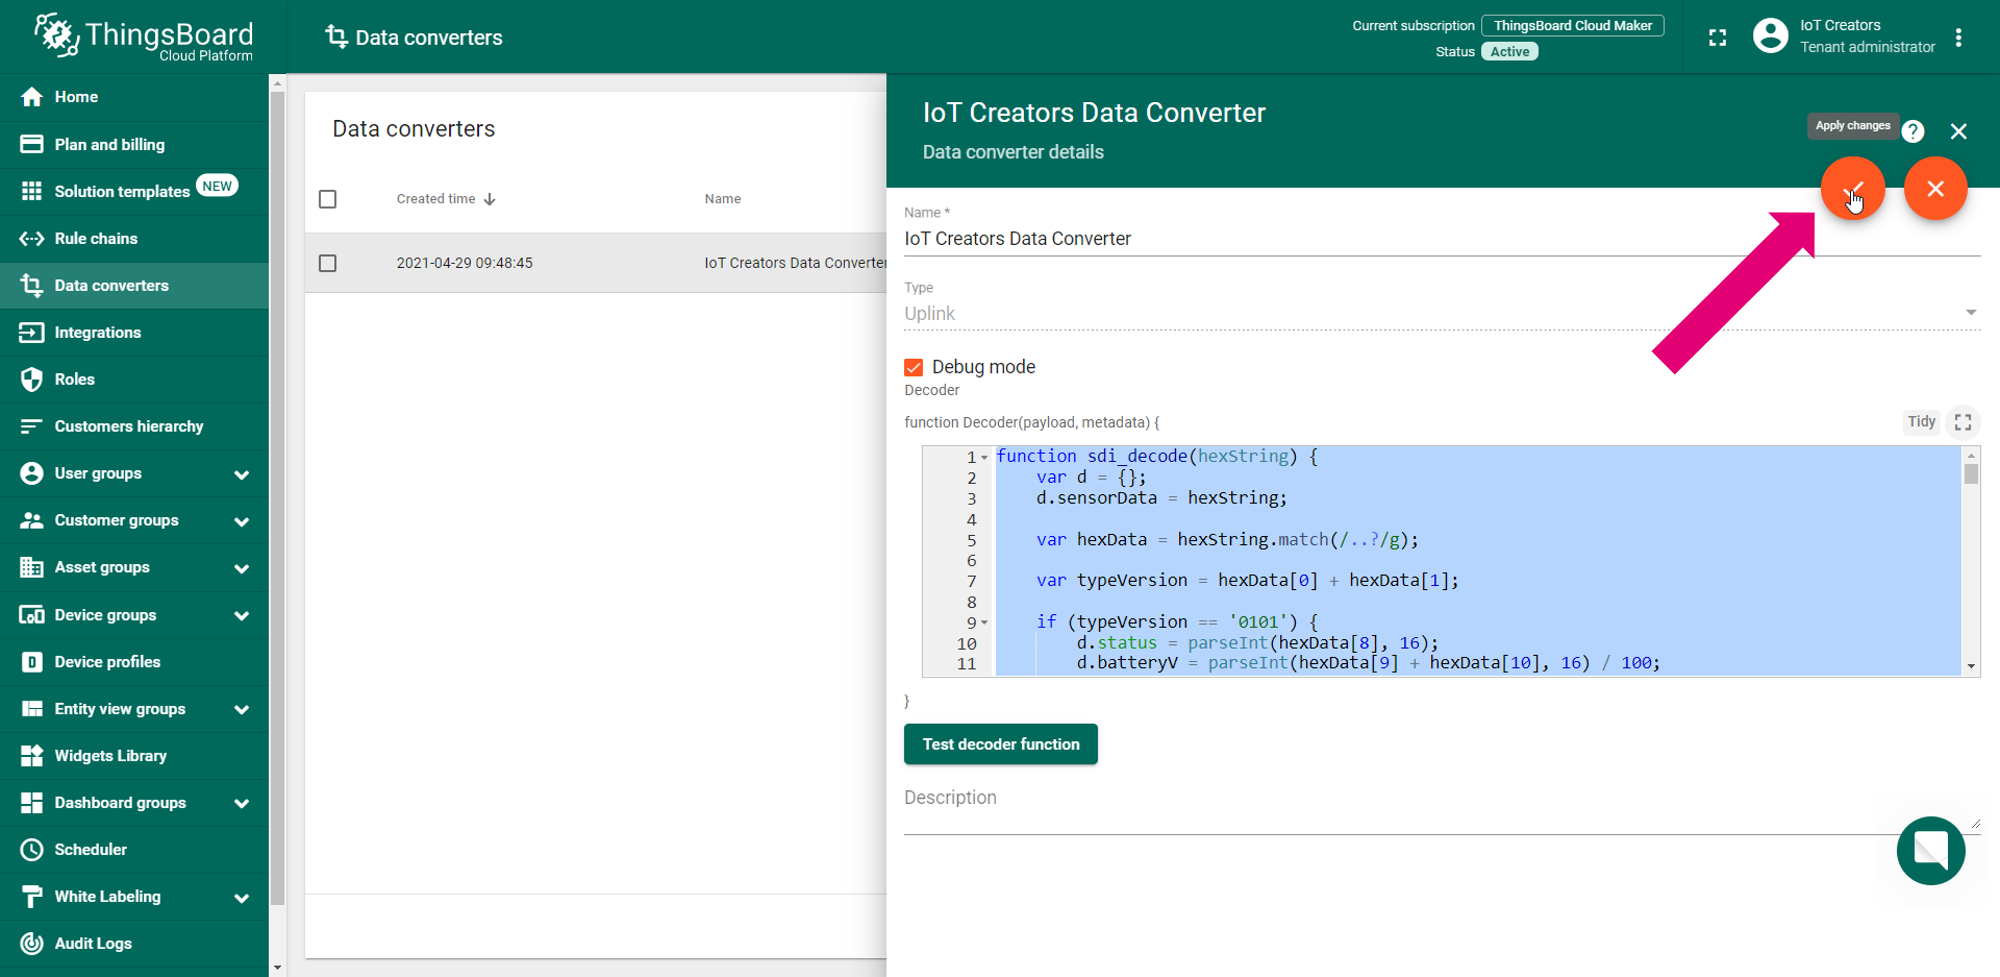
Now you are able to replace the default decoder with the copied one (e.g. STRG+A, STRG+V) and click the checkmark in the upper right corner.
Now your data converter should be able to decode your sensor payload.
Step 3: Register and activate your sensor
First register than activate !
It is important that you first register your device in a project of IoT Creates and than you take the device into operation.
If the device sends messages to IoT Creators before your registered it will be put on the blacklist. After this you can not register it without support from IoT Creators support.
In case this happened to your send an email to [email protected].
a) Register the device in IoT Creators Portal
To register your device perform the following steps:
- Login into IoT Creators portal https://portal.iotcreators.com/auth/login
- Select PROJECTS on the left side and click Details button of the project for which you want to register your device.
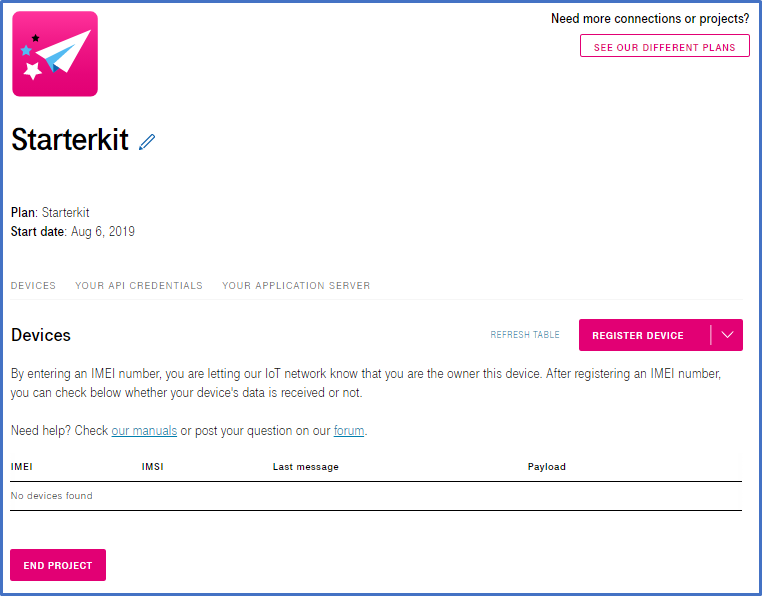
- Click the button REGISTER DEVICE
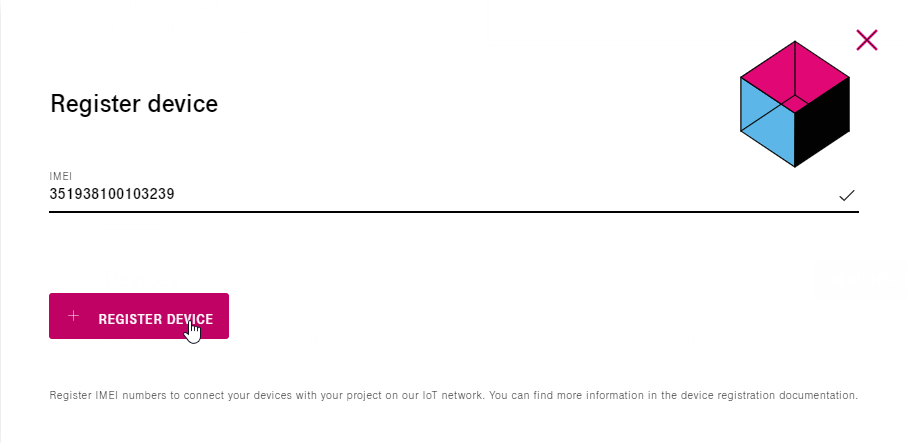
- IMEI: Input the IMEI of your device
- Click button REGISTER DEVICE
b) Create your device in ThingsBoard
In this part we will create a new device which will reflect your 'real' device in ThingsBoard.
I recommend creating a new Device Group first. This helps you to have a better overview of your devices, in case there are several.
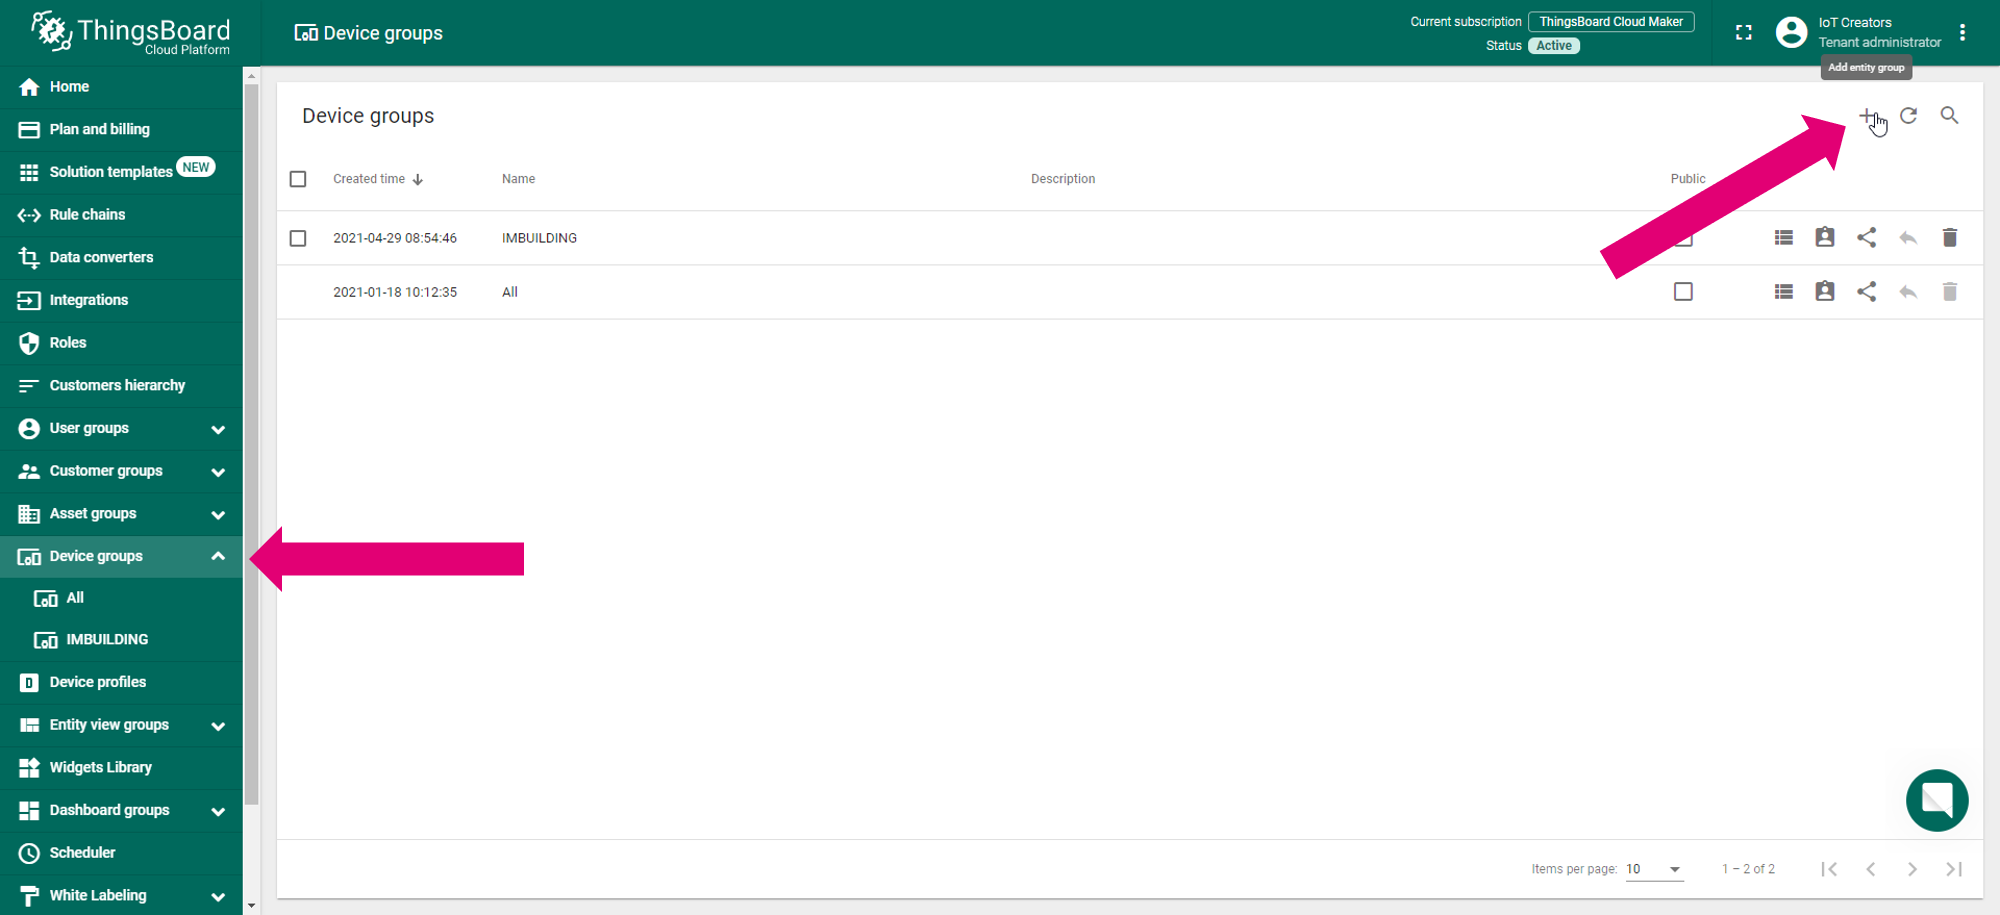
Create a new device group
- Go to Device groups in the left bar
- Click the plus icon in the upper right corner once again
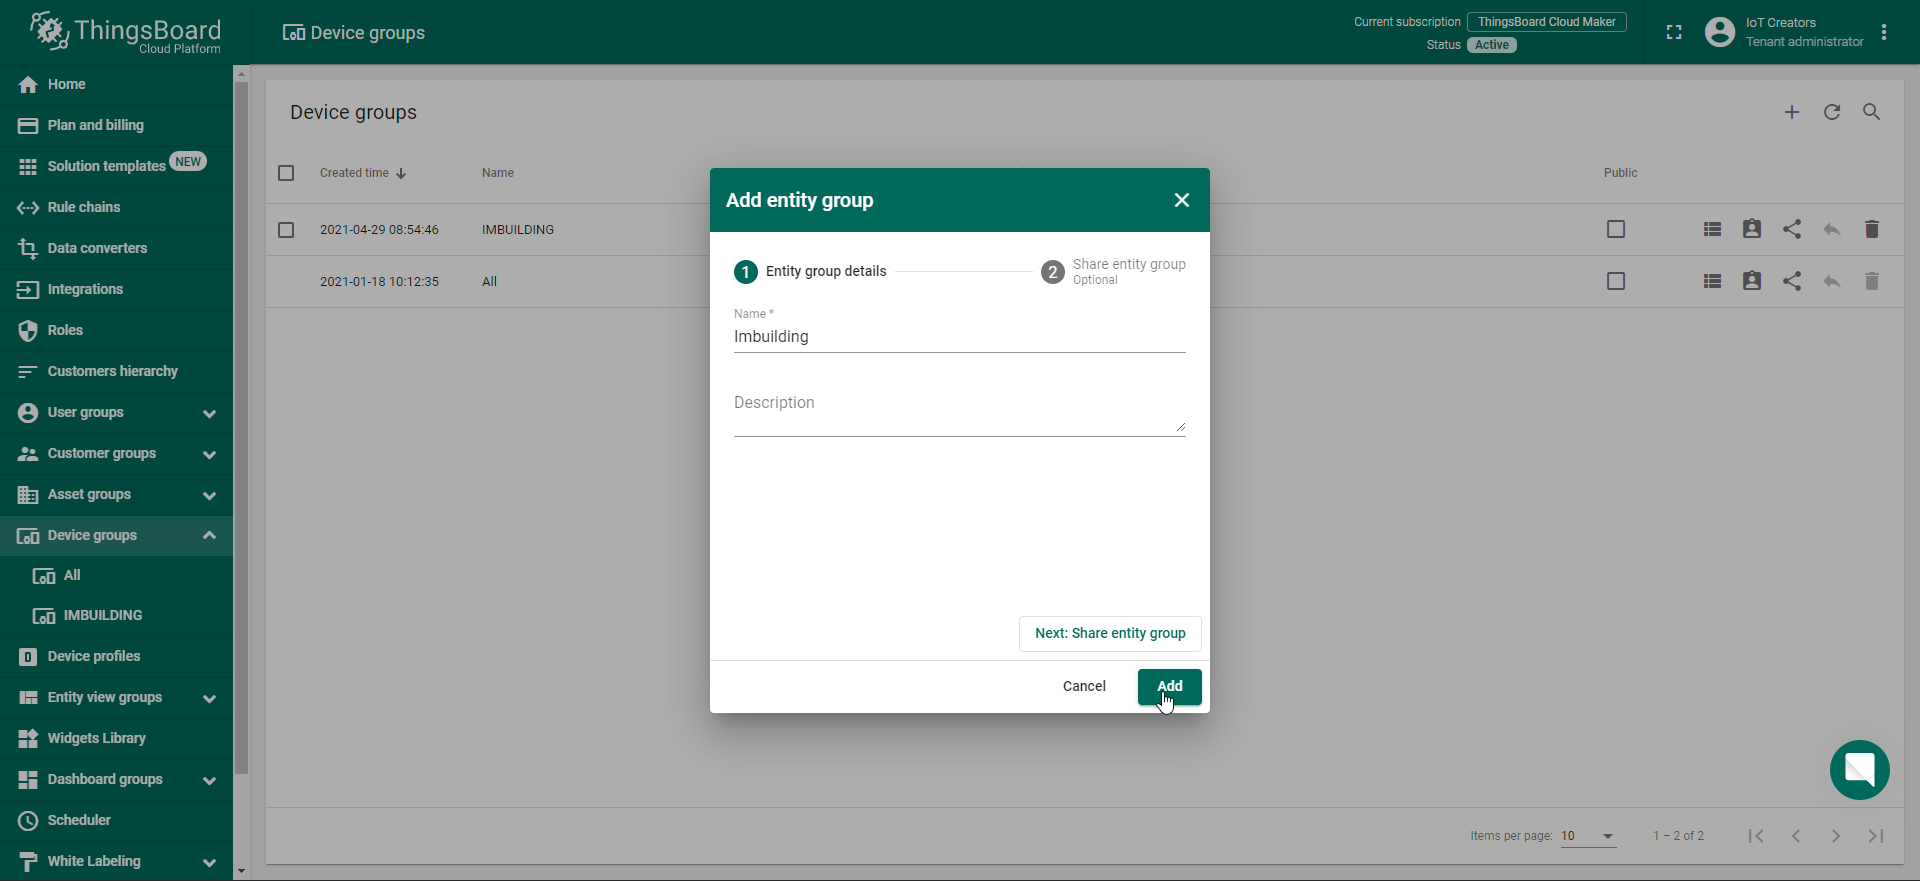
After that you can see a pop up window in which you have to...
- Enter the Name of the sensor group
- Click Add to save your new group
Now you can create your device in this device group
Create a new device
- Select your device group in the left bar
- Click the plus icon in the upper right corner
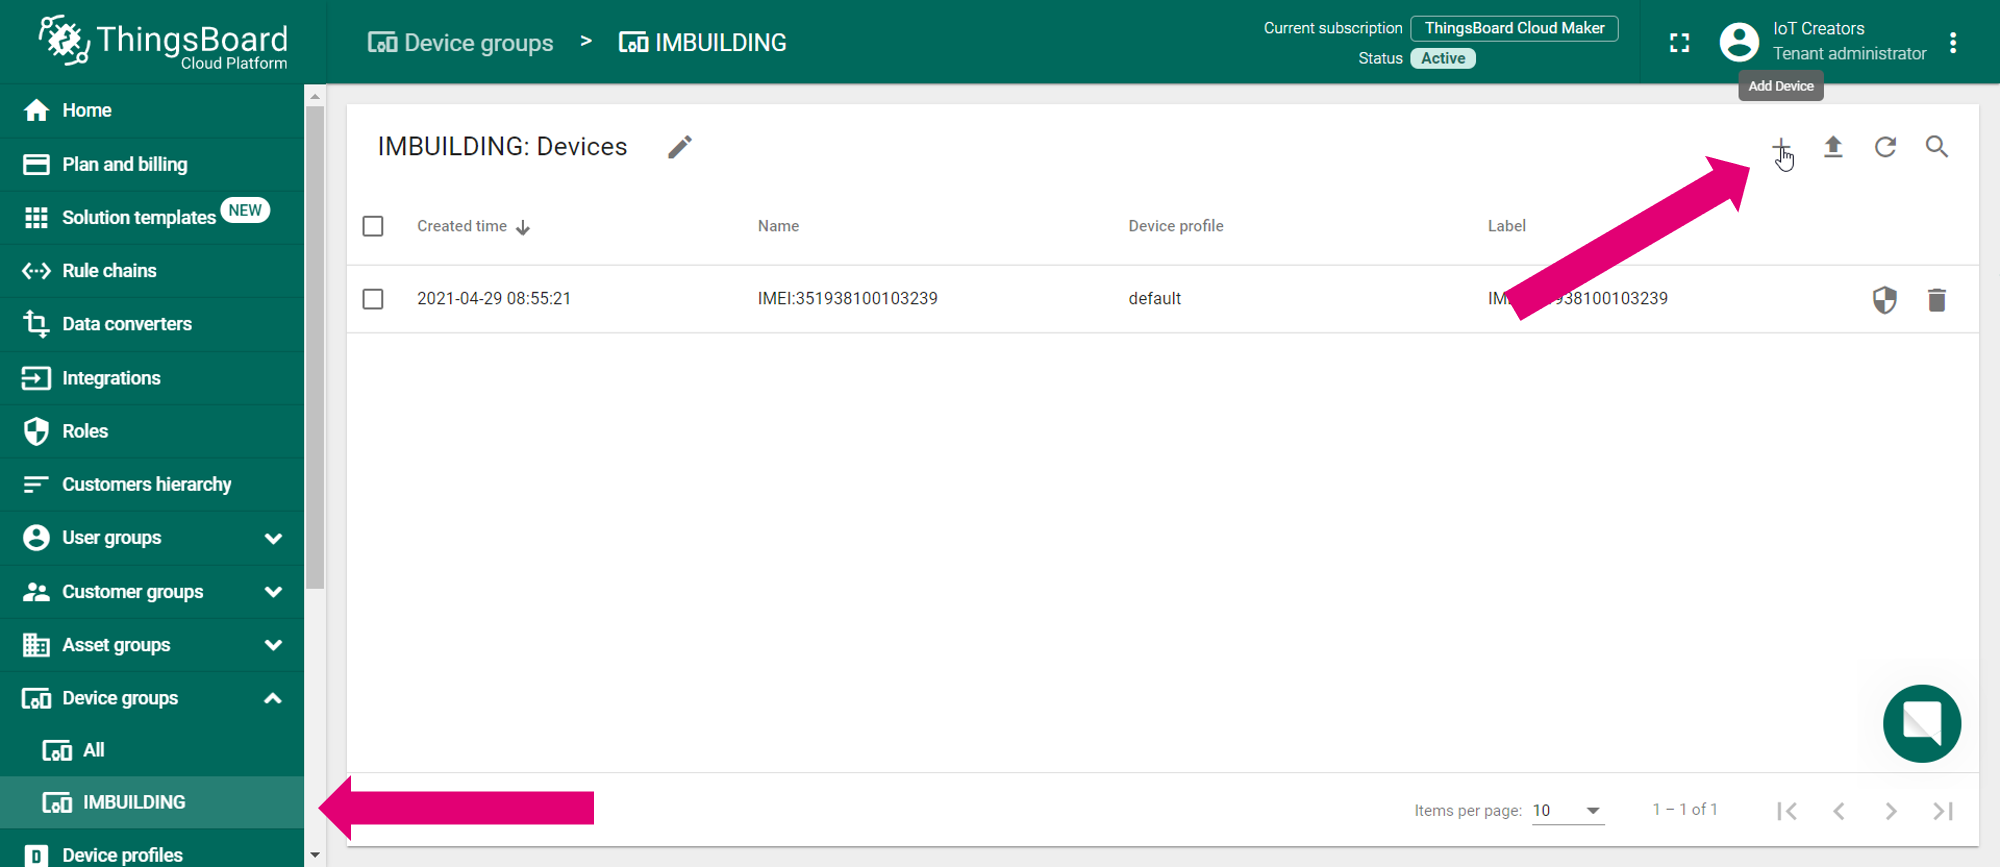
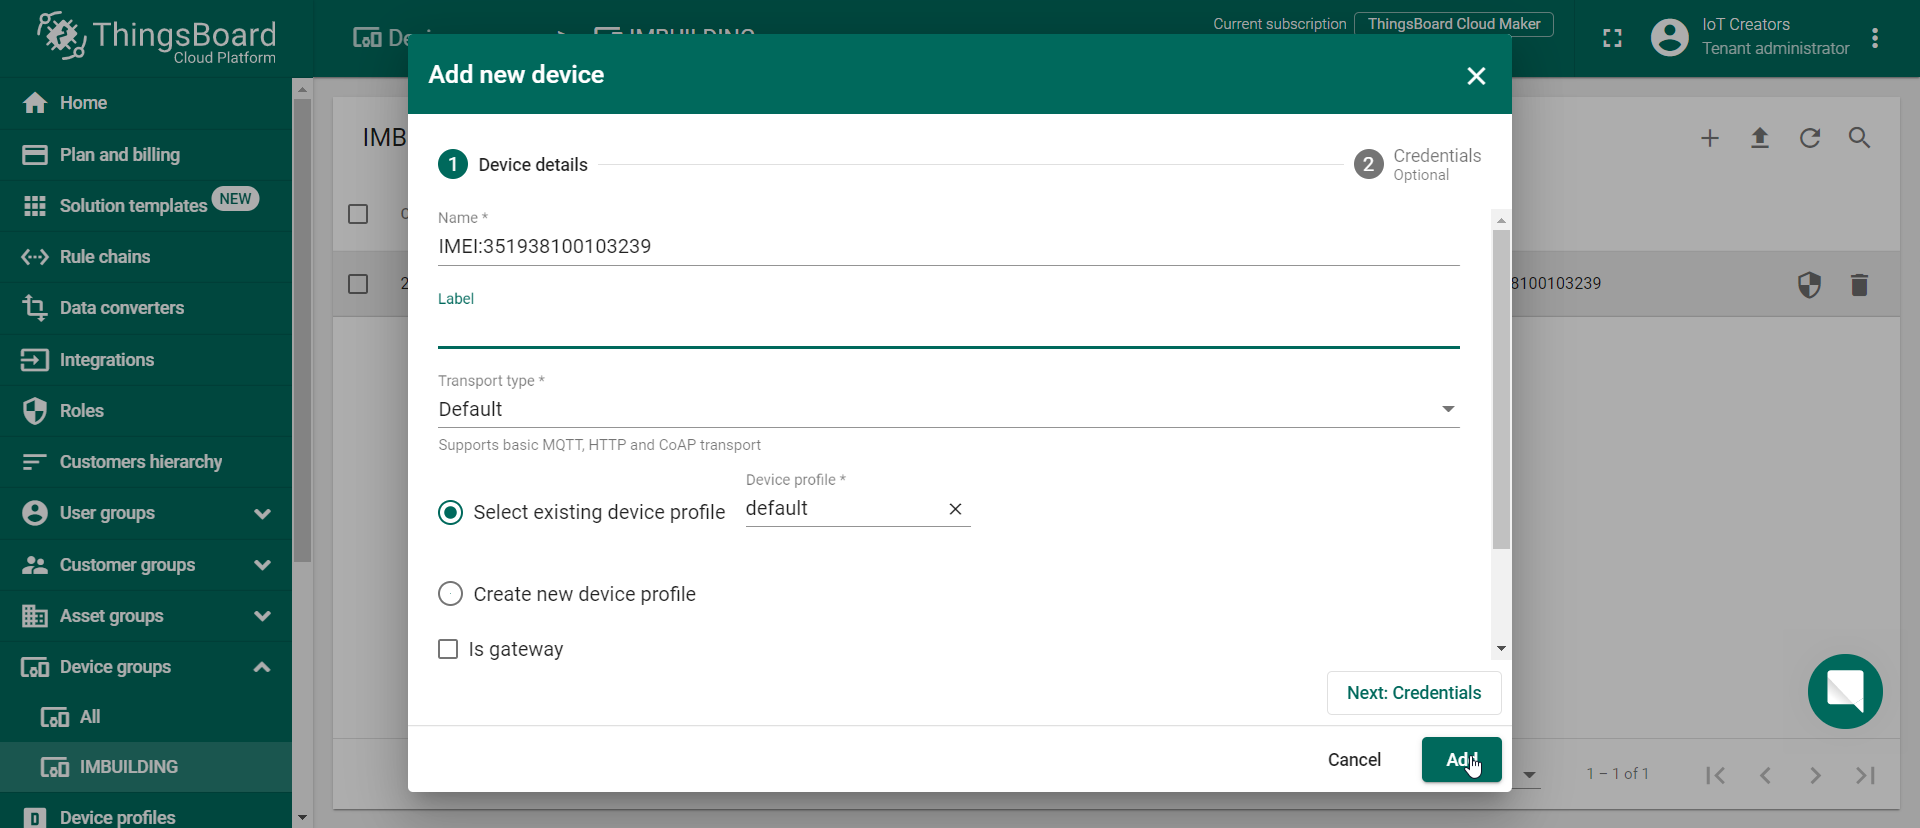
After that you see a popup window similar to the one of the device group. Now you can...
- enter the IMEI of your device as the Name
- click Add to save your new device
c) Activate IMBUILDING Comfort Sensor
If you received an IMBUILDING comfort sensor which is already Ready for IoT Creators you just need to open the device on the bagside and input the 3.6V batteries. As soon you put it under power the devices attaches to the mobile network and starts to send data.
d) Check if everything worked
After activating the sensor you should be able to see the data from your sensor in ThingsBoard.
To check this you can do the following steps:
- 1 Go to your Device groups and select IMBUILDING
- 2 Click on your device
- 3 Check your decoded data in Latest telemetry
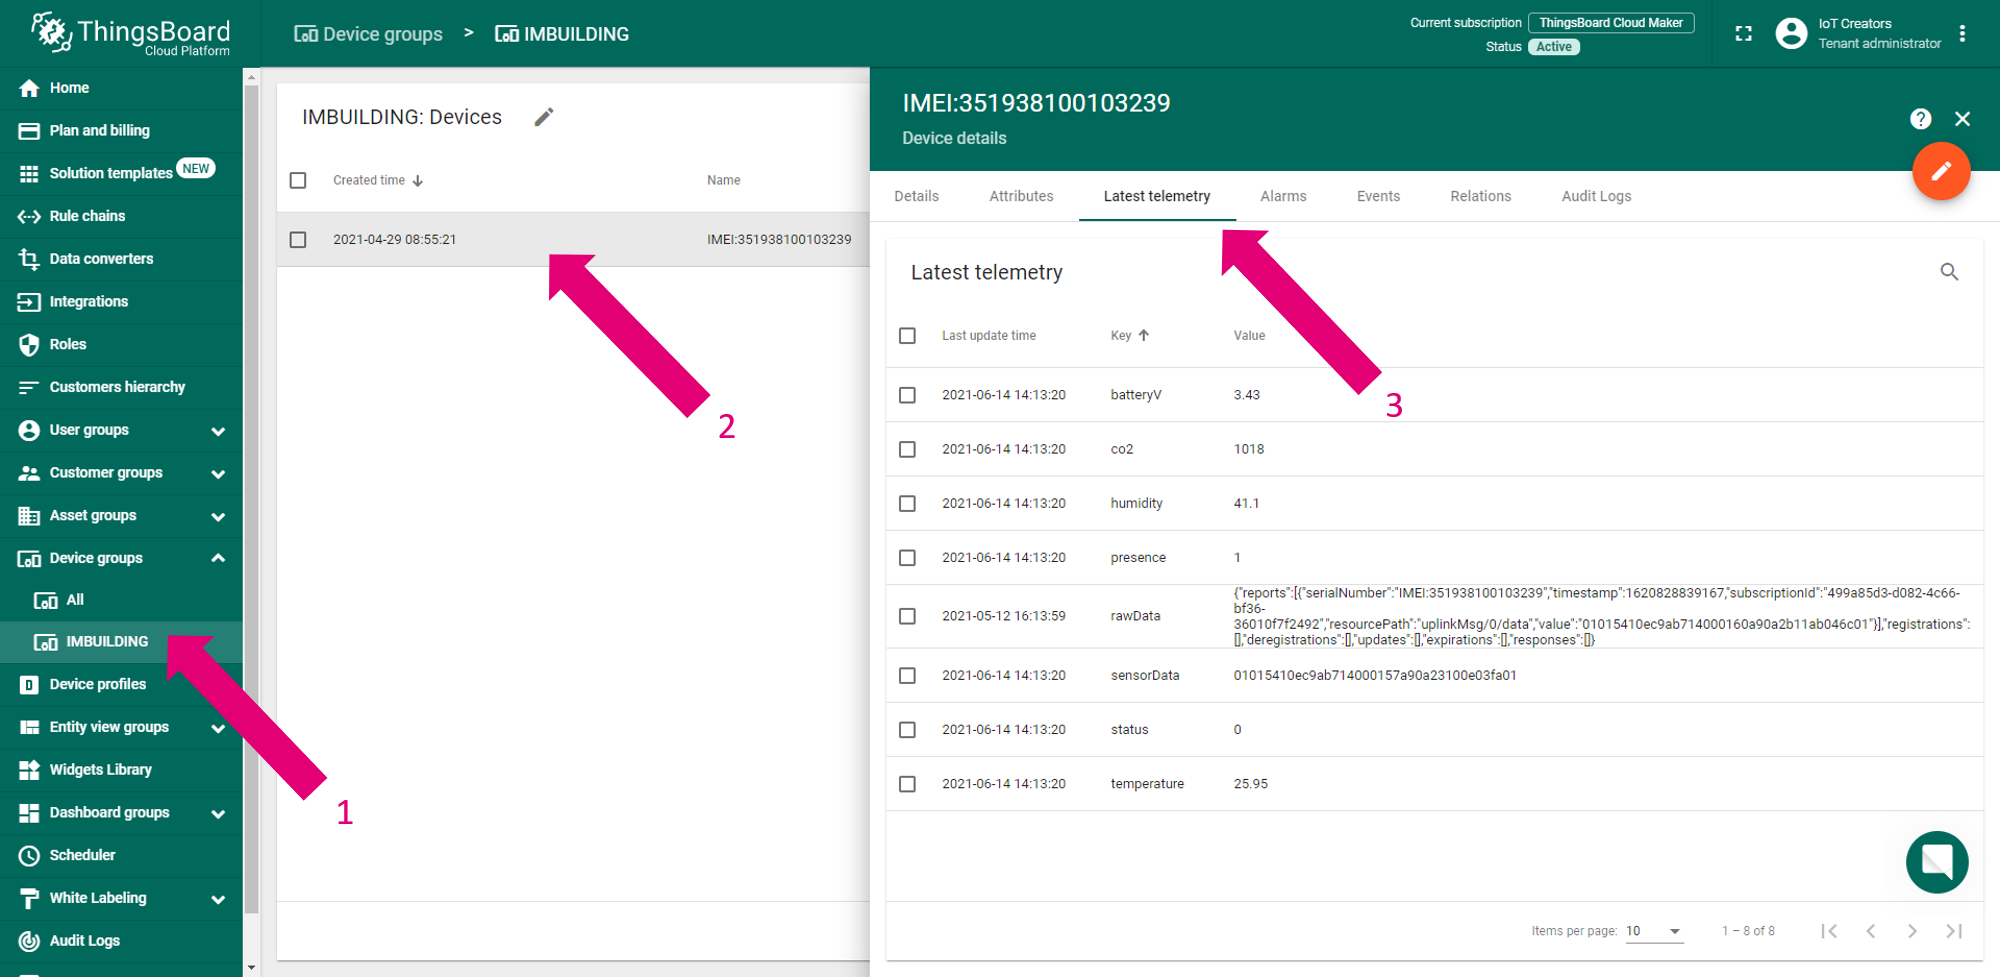
Congratulations if it looks like that, everything worked and now you are able to do cool stuff with the data like creating a dashboard with a thermometer or a diagram of the co2.
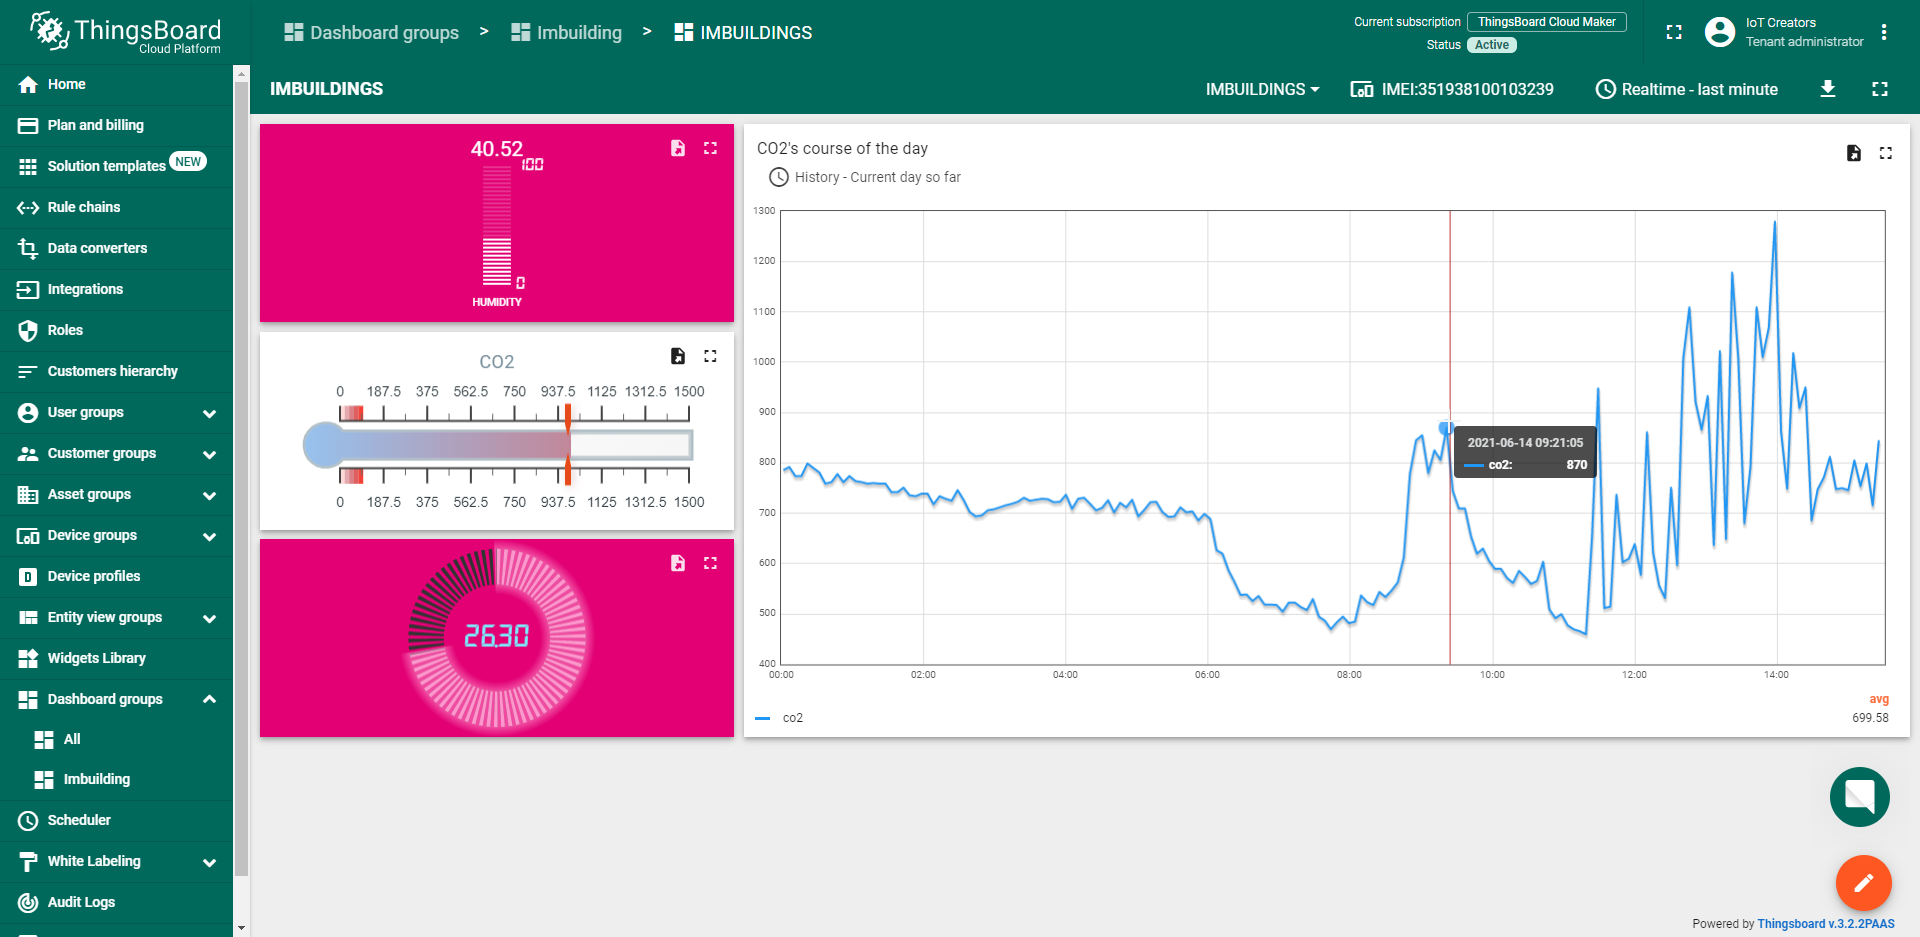
If you want to learn how to do that, I recommend the documentation from ThingsBoard.
Updated over 4 years ago
