Cloud of Things & Cumulocity
Tutorial to integrate IoT Creators with Telekom's IoT platform Cloud of Things or Cumulocity.
Introduction
In this tutorial you will implement a first prototype of an end-to-end IoT solution with an integration between IoT Creators SCS and the IoT platform Cloud of Things (CoT) or Cumulocity. CoT is an IoT product from Deutsche Telekom and it is built on top of Cumulocity. Out of this reason the integration works for both CoT and Cumulocity. In the following I will write CoT/Cumulocity to address both systems similarly.
To let the tutorial as concrete as possible I will explain how to integrate a NB-IoT sensor for CO2, Temperature and Humidity from IMBUILDING (https://www.imbuildings.com/nb-iot-comfort-sensor/). It uses raw UDP as IoT protocol and requires - as many other IoT devices in the market - a device specific data decoding to transform it into an easy-to-handle format. Of cause you can use a different device and implement a different device specific data decoding.
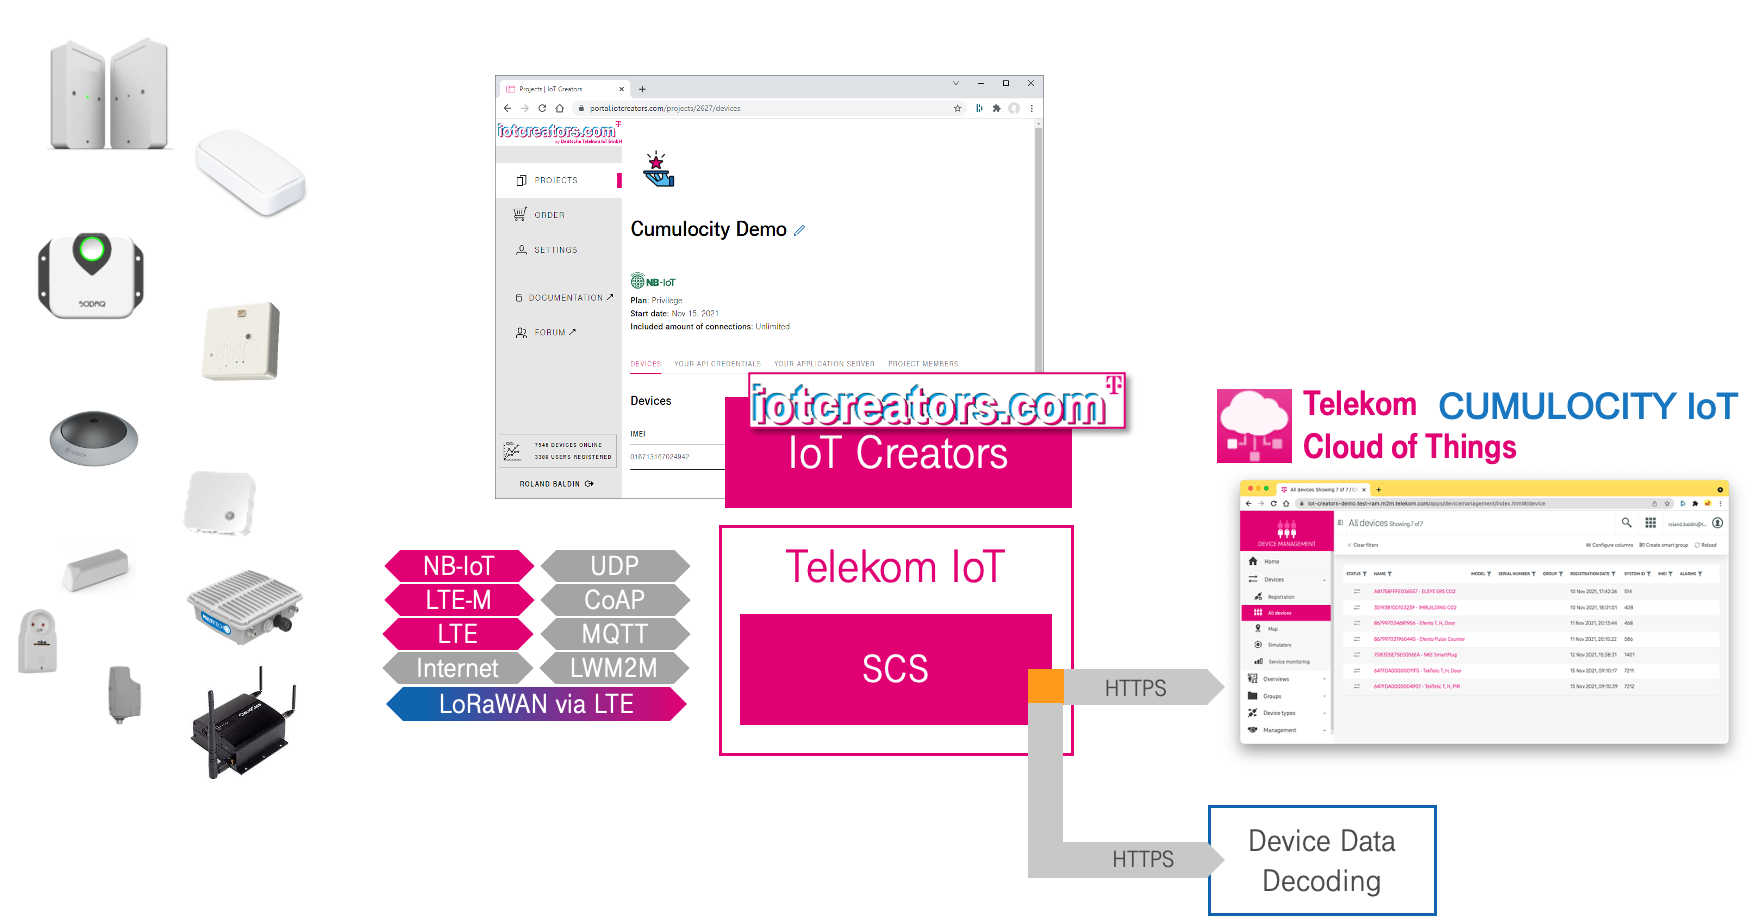
Highlevel architecture of the IoT Creators and Cumulocity or CoT integration.
I recommand to prepare your-self with the following to be able to do the tutorial completely.
- IoT Creators account
- Device which you can integrate
- Cloud of Things or Cumulocity or account with permissions for device management.
- Free pythonanywhere.com account to deploy your device data decoding service to transform the device specific data format into the Cumulocity message format.
In the following figure the the high level integration architecture is shown. The major system components which are involved into the integration are
- Data Collection Service which receives the messages from the devices via all the different IoT networks and protocols.
- CumulocityUplink Adapter which controls the device specific data decoding, the Cumulocity specific message transformation and the integration into the Cumulocity it-self.
- Device Data Decoder to decode the device specific data into a very simple intermediate JSON format.
- Cumulocity to which the decoded and transformed device messages are sent.
During this tutorial you will customize all involved system components step-by-step to establish such end-to-end IoT solution.
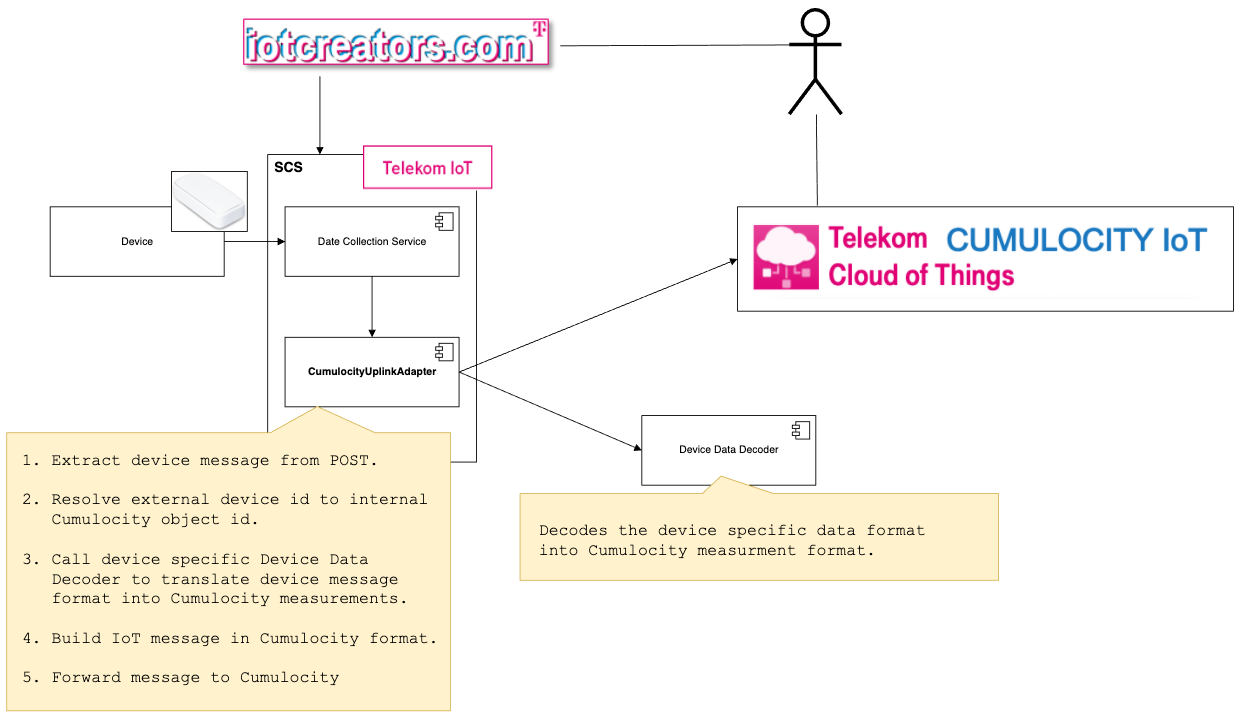
Integration architecture of IoT Creators' SCS platform with CoT/Cumulocity.
Maybe you wonder why we implement in this tutorial the device into CoT/Cumulocity message transformation in an external Device Data Decoding service. We decided to go this way to keep the tutorial simple. The alternative would be to implement a CoT/Cumulocity integrated microservice and to deal with Cumulocity Java libraries. This requires more effort and more alignment with the IoT platform provider.
With the following steps we will walk together through this tutorial
- Step 1: Register sensor device in IoT Creators platform
- Step 2: Register sensor device in CoT/Cumulocity
- Step 3: Implement simple Device Data Decoding Service
- Step 4: Integrate CoT/Cumulocity with IoT Creators platform
- Step 5: Verification
Step1: Register sensor device in IoT Creators platform
In our sample I will integrate a NB-IoT off-the-shelf sensor from IMBUILDING (https://www.imbuildings.com/nb-iot-comfort-sensor/). This sensor is a NB-IoT comfort sensor which measures CO2, temperature, humidity and presence. It uses raw UDP as IoT communication protocol.
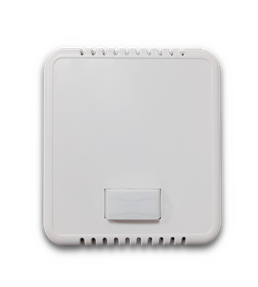
NB-IoT device with CO2, temperature, humidity and presence sensors from IMBUILDING.
To integrate the sensor with IoT Creators platform you simple register the sensor within the IoT Creators project by pushing the REGISTER DEVICE button.
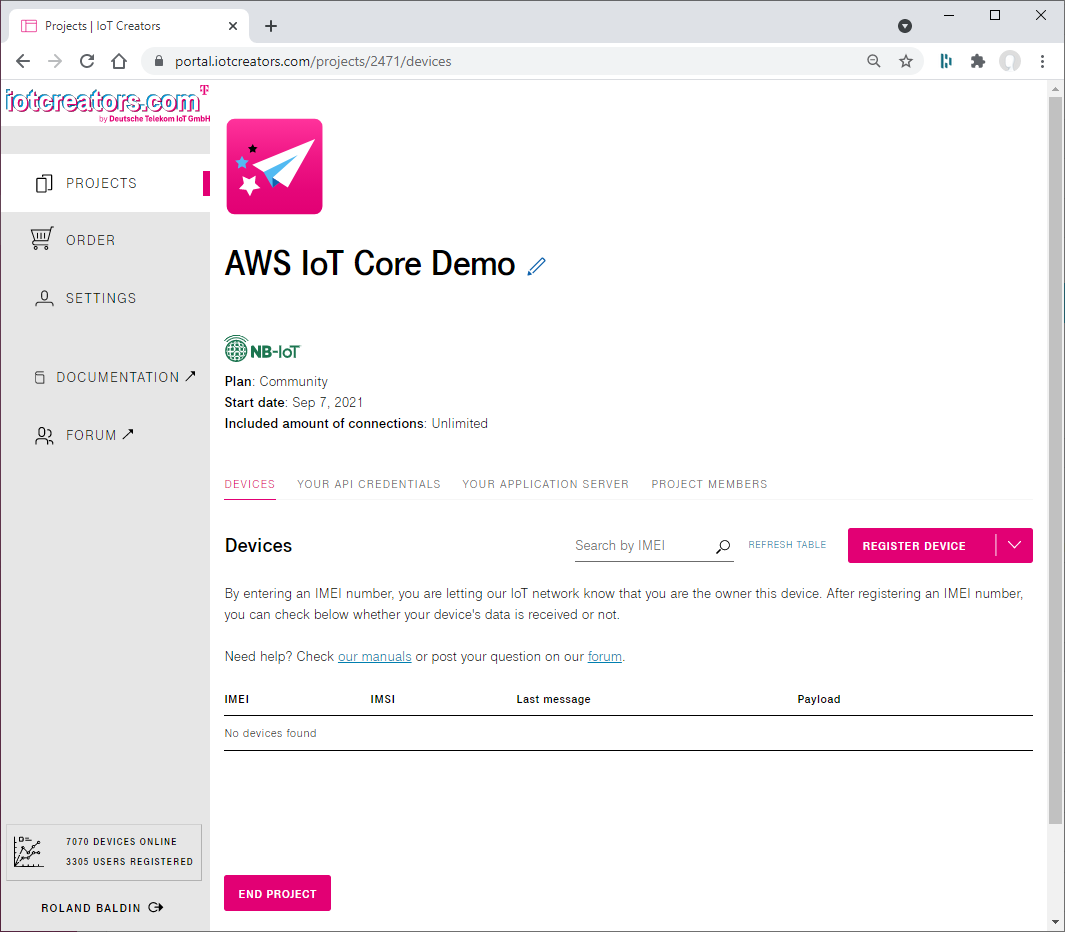
To integrate the device with IoT Creators just register it within the project.
After you pushed the REGISTER DEVICE button the dialog window to register new devices is opened.
Input the IMEI of the device and select UDP as IoT protocol.
To make device data decoding easier for you should know from which type of device a message comes from. IoT Creators provides the possibility to define for each device Uplink message tags. Those tags are attached to each message of the device when it is forwarded to the application URL. To do so click Advanced Settings and then the +ADD button. As name for the for the uplink message tag choose deviceType and as value IMBUILDING CO2".
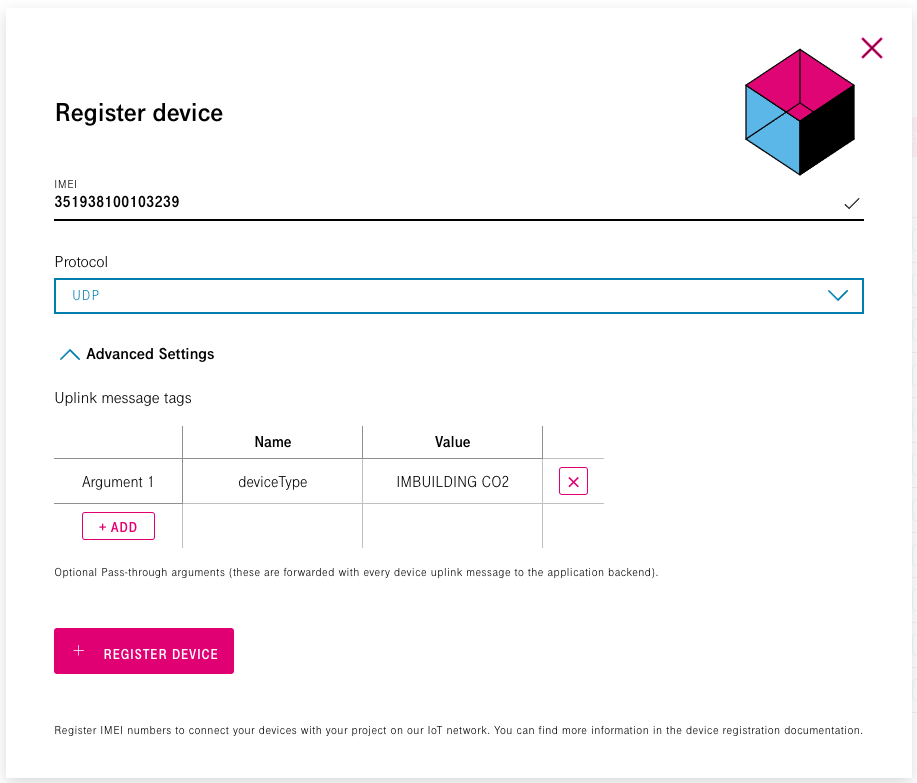
Input IMEI of the device and select UDP as IoT protocol. Use "IMBUILDING CO2" as deviceType for uplink message tag.
Push REGISTER DEVICE to perform the actual device registration.
After this you should see registered device in the device list of the project.
Step 2: Register sensor device in CoT/Cumulocity
To register your sensor CoT/Cumulocity you need to perform the following three steps:
- Register new Device Profile for the type of your sensor in CoT/Cumulocity
- Create new device object in CoT/Cumulocity with the Cumulocity API
- Create new external id for the newly created device in CoT/Cumulocity
Register new Device Profile in CoT/Cumulocity
CoT/Cumulocity manages so-called Device Profiles for the different types of devices. In our case we need to create a new Device Profile for the CO2 sensor from IMBUIILDING.
Perform the following steps:
- On the top right side switch into the application Device Management
- In the Device Management menu on the left side of the window open the branch Management and select Device profiles at the bottom.
- At the right top of the window click Add device profile
- In the dialog window ADD DEVICE PROFILE input IMBUILDING CO2 in both fields for Name and Device type. The name of the device profile needs to be exactly the same like the Uplink Message Tag which you input before in the IoT Creators portal as deviceType.
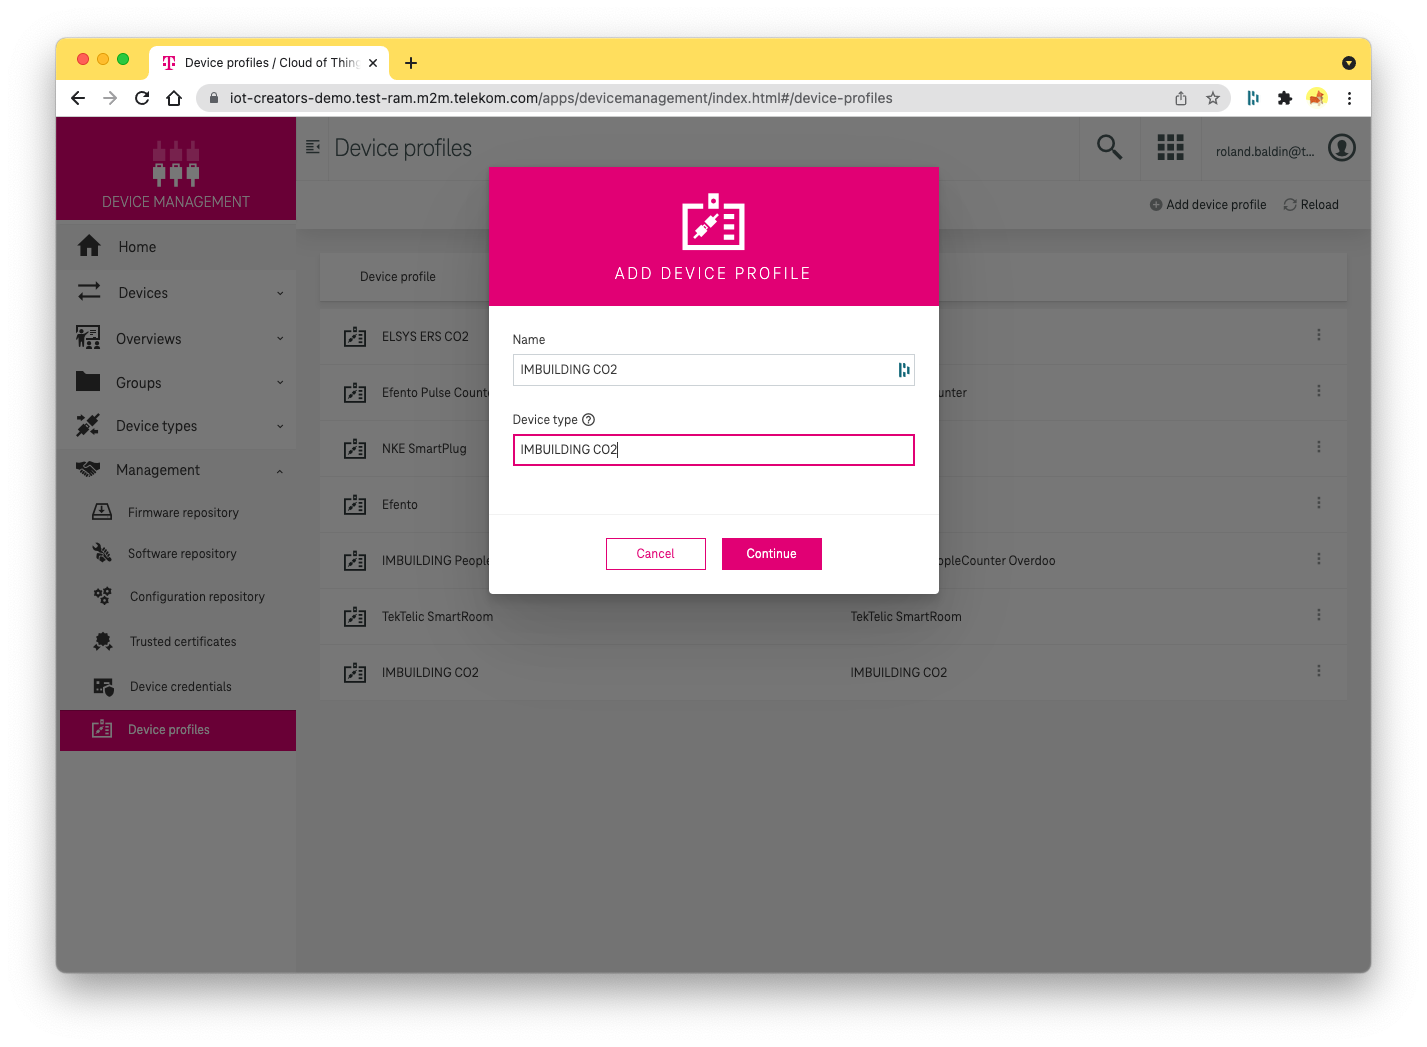
Create a new device profile in CoT/Cumulocity for your sensor.
Create device object in CoT/Cumulocity with the Cumulocity API
As next you shall create a device object in CoT/Cumulocity for your sensor.
As you probably know CoT/Cumulocity provides an interactive function to register new devices. For those device objects a defined interaction between the device and CoT/Cumulocity is required while the device is onboarded to the platform. To keep everything simple in this tutorial we will not use this function to create a device. Instead of this we will call the Cumulocity API with curl or Postman.
To call the API you need
- Username and password of your CoT/Cumulocity account.
- Domain name of your CoT/Cumulocity tenant.
Cumulocity authenticates the API request by a Basic Authorization which requires ":" as base64 coded string.
curl \
  -H 'Authorization: Basic cm9sYWB0ZWxla29tLmRlOnI/Q2g4UWZpMXVBREo1IT93NDJJ' \
  -H 'Content-Type: application/vnd.com.nsn.cumulocity.managedObject+json;charset=UTF-8; ver=0.9' \
  -H 'Accept: application/vnd.com.nsn.cumulocity.managedObject+json;charset=UTF-8; ver=0.9' \
  -d '{
         "type":"IMBUILDING CO2",
         "c8y_IsDevice" : {},
         "name" : "3519381000103239 - IMBUILDING CO2"
      }' \
  -X POST https://iot-creators-demo.telekom.com/inventory/managedObjects

 {
    "additionParents": {
        "self": "https://iot-creators-demo.telekom.com/inventory/managedObjects/80363/additionParents",
        "references": []
    },
    "owner": "[email protected]",
    "childDevices": {
        "self": "https://iot-creators-demo.telekom.com/inventory/managedObjects/80363/childDevices",
        "references": []
    },
    "childAssets": {
        "self": "https://iot-creators-demo.telekom.com/inventory/managedObjects/80363/childAssets",
        "references": []
    },
    "creationTime": "2021-12-08T15:33:46.573Z",
    "type": "IMBUILDING CO2",
    "lastUpdated": "2021-12-08T15:33:46.573Z",
    "childAdditions": {
        "self": "https://iot-creators-demo.telekom.com/inventory/managedObjects/80363/childAdditions",
        "references": []
    },
    "name": "OTTO9999 - IMBUILDING CO2",
    "assetParents": {
        "self": "https://iot-creators-demo.telekom.com/inventory/managedObjects/80363/assetParents",
        "references": []
    },
    "deviceParents": {
        "self": "https://iot-creators-demo.telekom.com/inventory/managedObjects/80363/deviceParents",
        "references": []
    },
    "self": "https://iot-creators-demo.telekom.com/inventory/managedObjects/80363",
    "id": "80363",
    "c8y_IsDevice": {}
}
To check if the API request above created the device object successfully you can switch Devices/All devices of the Device Management application in CoT/Cumulocity. You should the new device in the list of devices.
Create external id for the new created device in CoT/Cumulocity
To enable IoT Creators to send sensor data to the corresponding device object in CoT/Cumulocity the CumulocityUplink Adapter needs to address the device object by an id. Since the internal device id of CoT/Cumulocity is not known to all external components you will create an so-called external id for the device object in CoT/Cumulocity. This external id will be the same like the IMEI or serial number of the real sensor device.
To do so perform the following steps in CoT/Cumulocity:
- Switch into application Device Management.
- In the menu on the left side of the window select the branch Devices/All devices.
- In the list of devices search for your new created device and click on the Name Link.
- At the bottom of the device menu click Identity
- At right top of the window click Add external ID
- In the dialog window to add an external id input IMEI as type and the external id 3519381000103239 of the sensor.
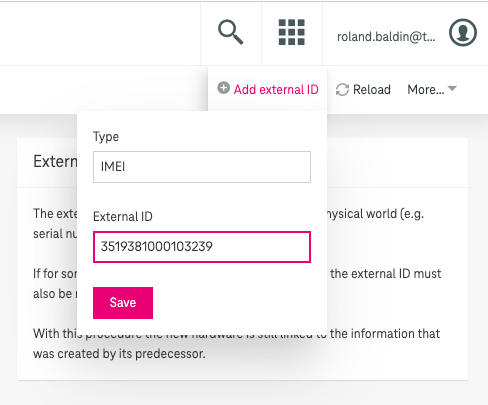
Dialog to add an external id to a device object in CoT/Cumulocity
The CumulocityUplink Adapter component will resolve the external id which is provided along with the sensor message to the internal id in CoT/Cumulocity.
So far you registered your NB-IoT sensor in the IoT Creators and in the CoT/Cumulocity platform. Before you can link both platforms together you will implement a simple Device Data Decoding Service (DDD Service). The DDD server decodes the device specific HEX data into a very simple IoT Creators intermediate JSON format. The intermediate JSON format can be easily translated into the CoT/Cumulocity format by the CumulocityUplink Adapter.
You will implement the DDD service in the next step.
Step 3: Implement simple Device Data Decoding Service
As already described above Cumulocity API requires that input device messages are compliant to the Cumulocity specific format. Such a measurement message for a device shall look like the following sample.
{
   "time": "2021-11-09T20:30:00",
   "source": { "id": "505" },
   "type":"IMBUILDING CO2",
   "CO2": {
     "C": {"unit": "ppm", "value": 745}
   },
   "Temperature": {
     "T": {"unit": "ºC", "value": 25.7}
   },
   "Humidity": {
     "H": {"unit": "%", "value": 56}
   }
}
To generate this message the CumulocityUplinkAdapter
- resolves the internal device id from the external serial number of the device,
- calls the configured Device Data Decoding (DDD) service to decode the sensor specific data into a more generial JSON format and
- build the complete measurement messsage.
To keep everything as easy as possible you implement your own DDD service by using the python hosting service at pythonanywhere.com. By going this way you don't need to deal with Cumulocity micro service capabilities, Cumulocity Java libraries and you don't need to get additionally get in contact with Cumulocity service to be able to use those capabilties.
In the following I will describe you how you can register for a free test account at pythonanywhere.com and create a very simple flask web service into which you can upload the python code of your DDD service.
Register pythonanywhere.com
To register at pythonanywhere.com goto www.pythonanywhere.com/registration/register/beginner/ and fill out the form.
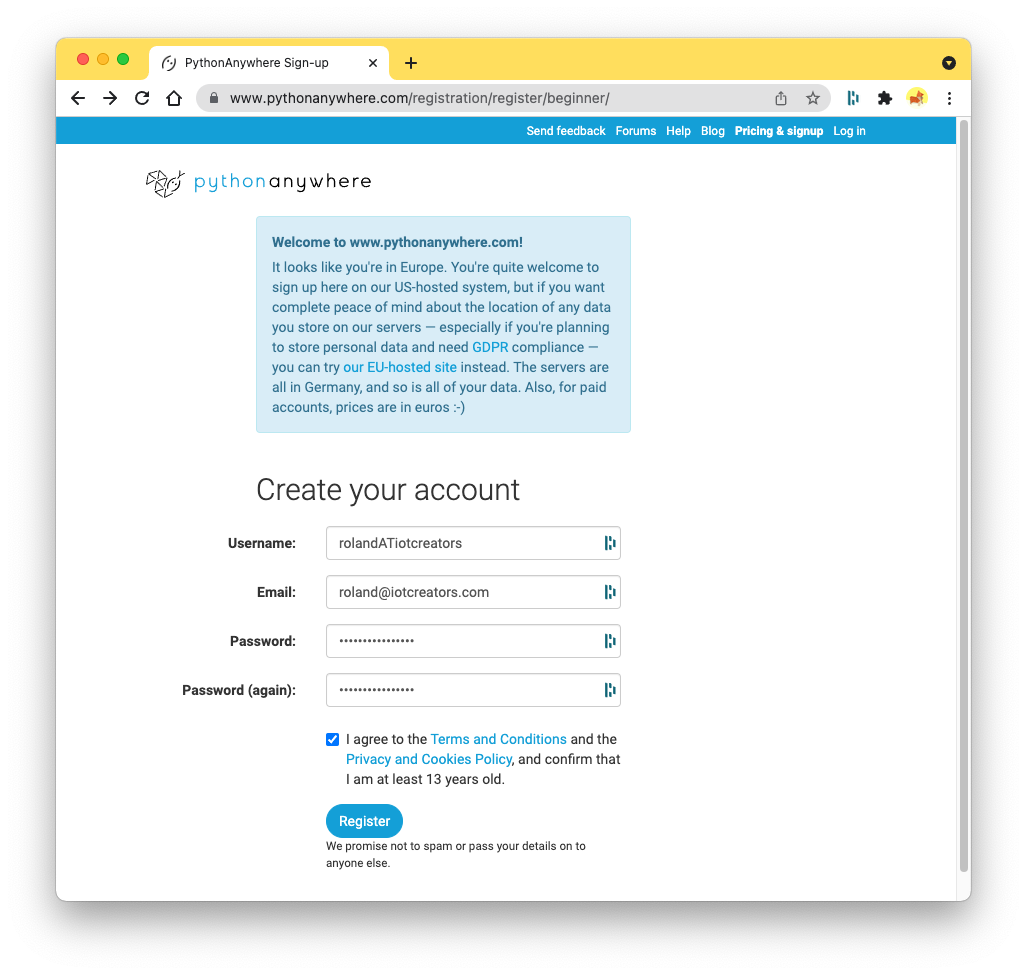
Registration form of pythonanywhere.com
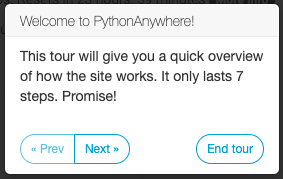
As next a small welcome window pops up and invites you to tour. Just skip this by clicking the End tour button.
After ending the tour you will land on your account's Dashboard.
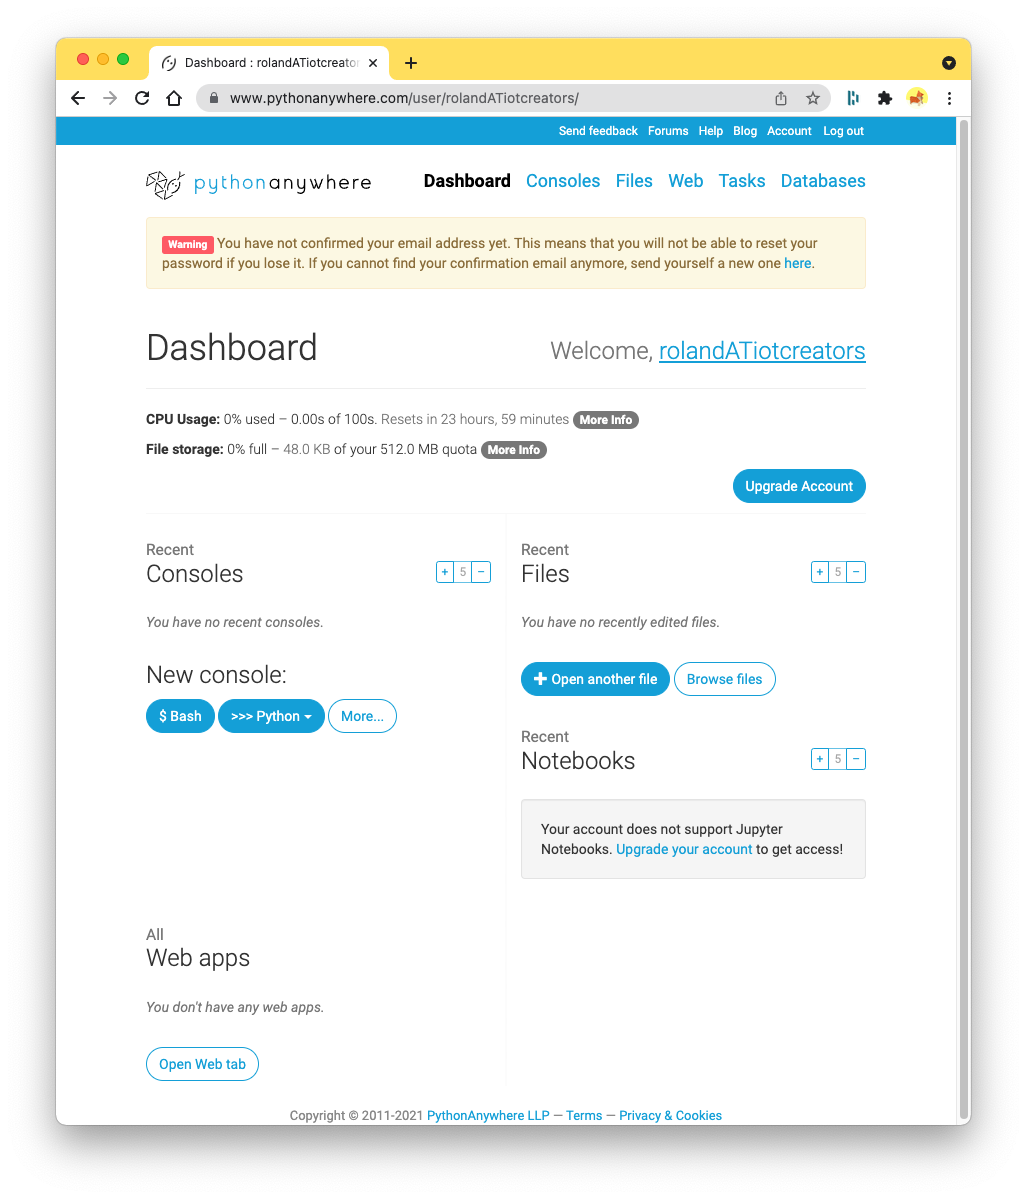
pythonanywhere account's Dashboard
Create web app for your DDD service
You will implement your DDD service as a python web app. To do so perform the following steps.
Goto the bottom of the Dashboard page and click the button Open Web tab (see above).
The page with which you manage your web applications is opened.
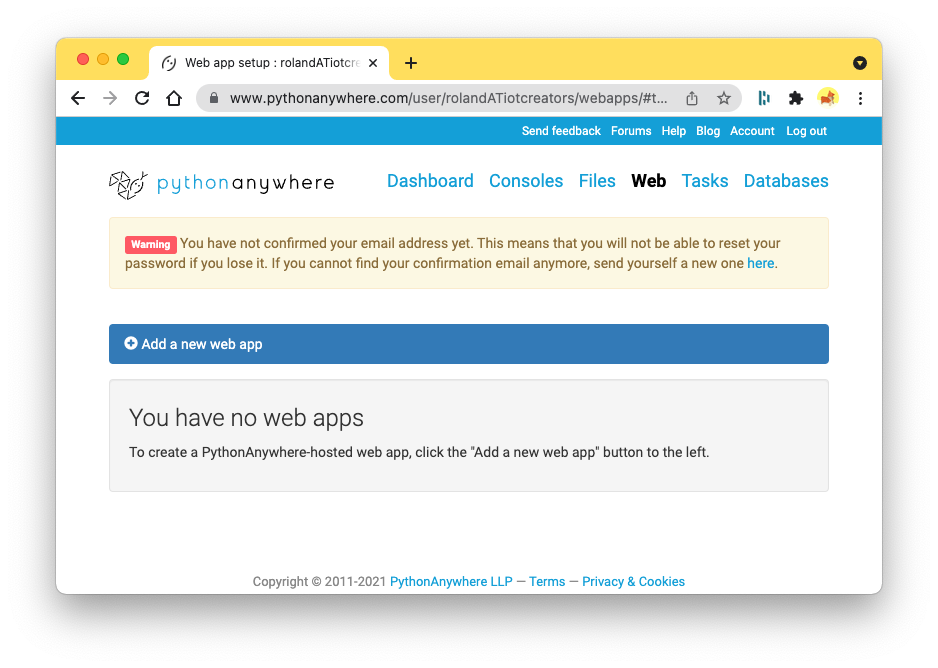
Click the button Add a new web app.
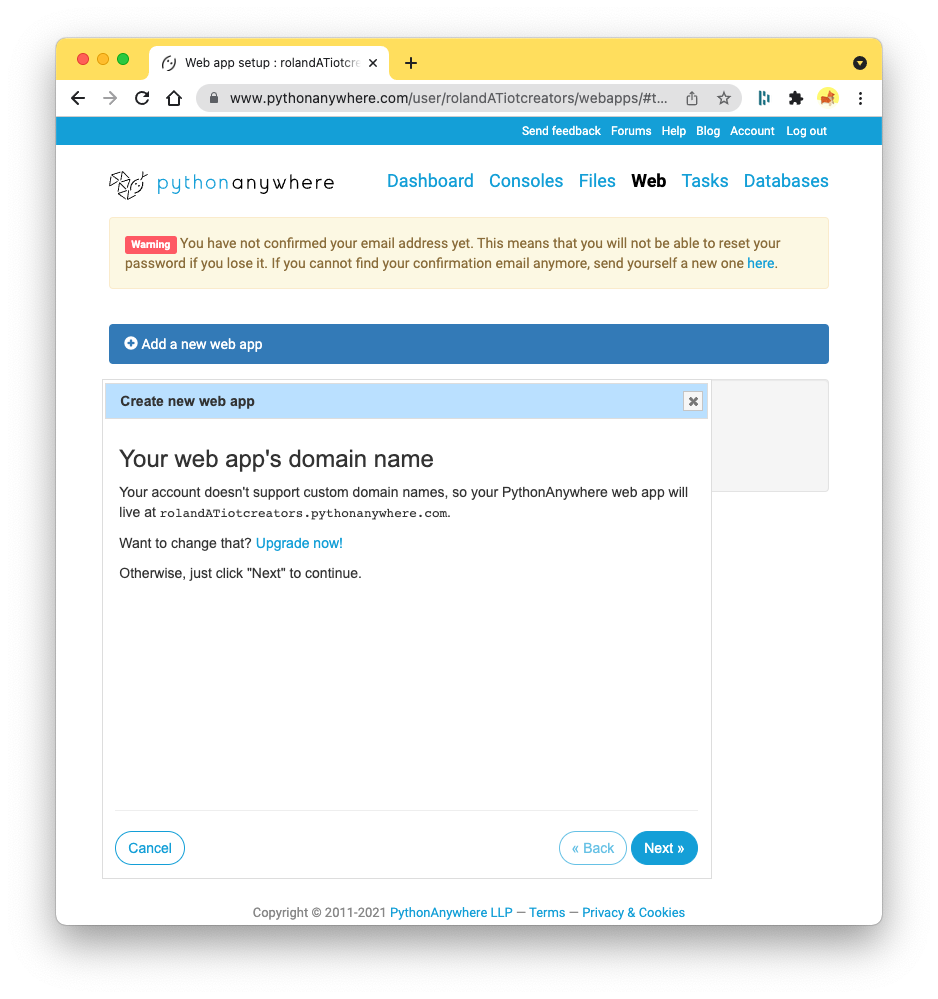
Push Next at the right bottom of the page.
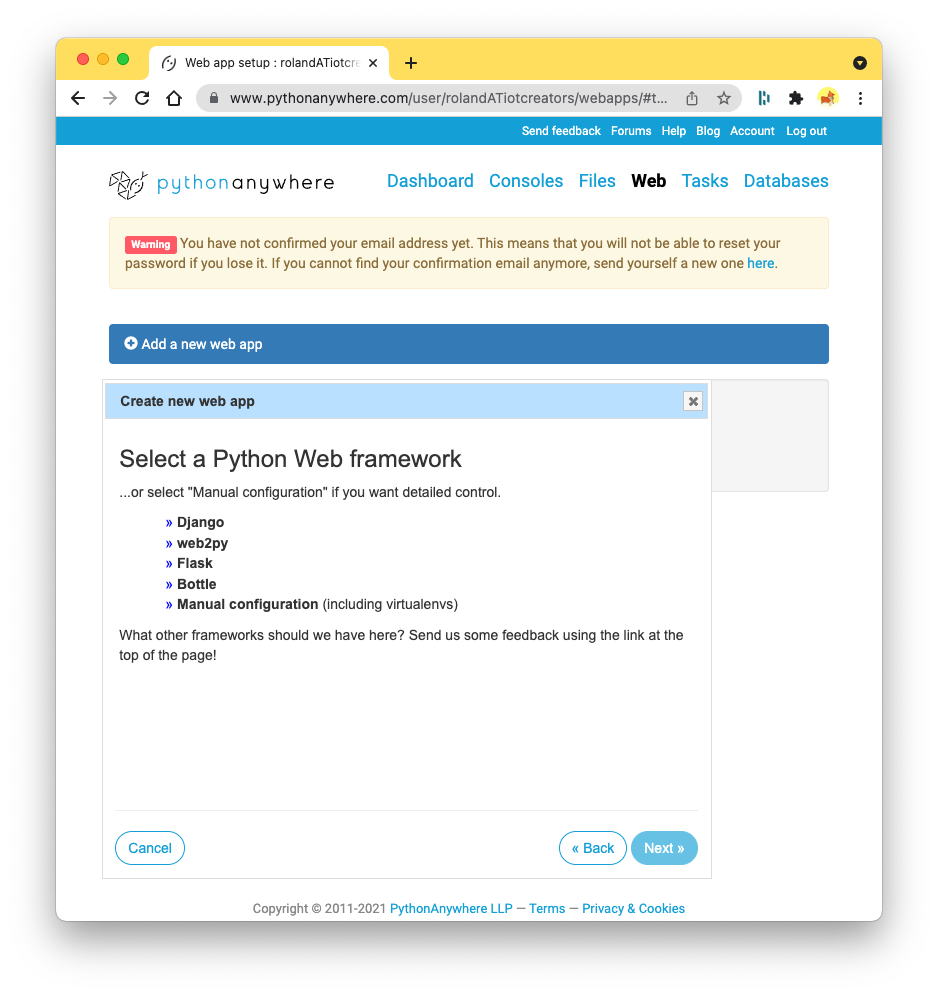
Click on the Flask link. Flask is the web app framework which you will use to implement your DDD service.
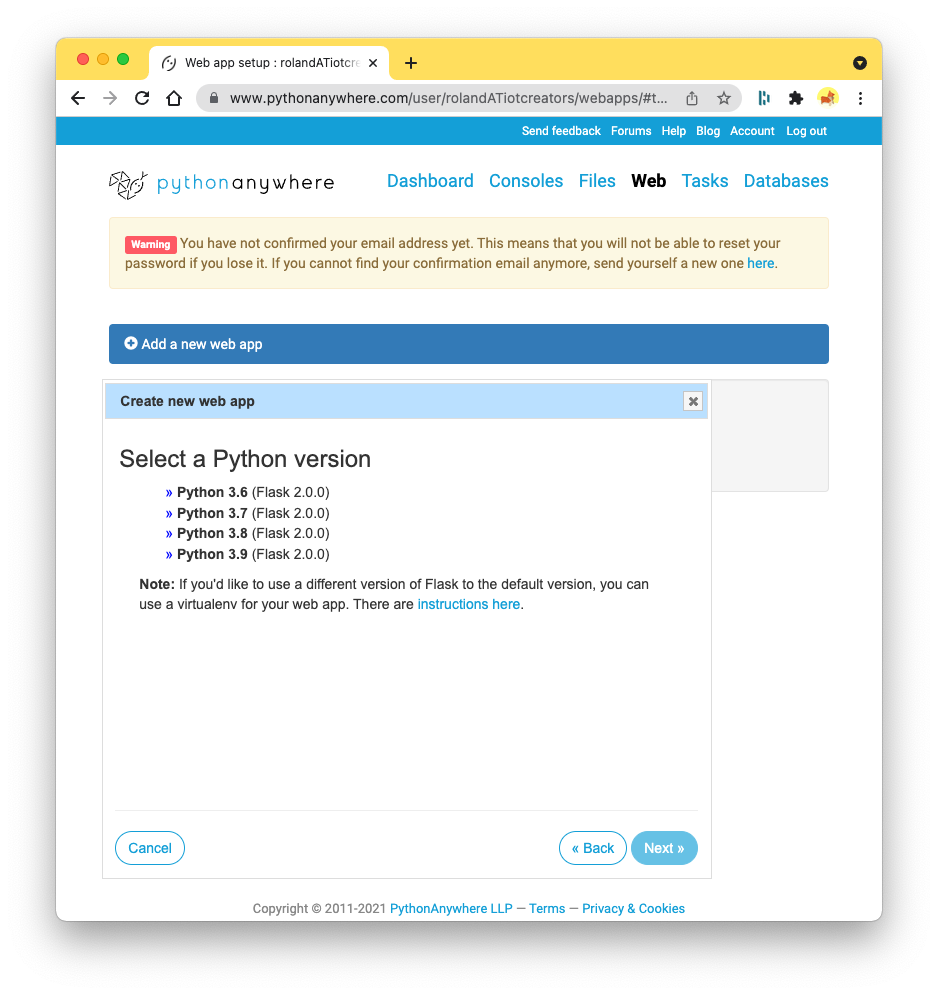
Click Python 3.9.
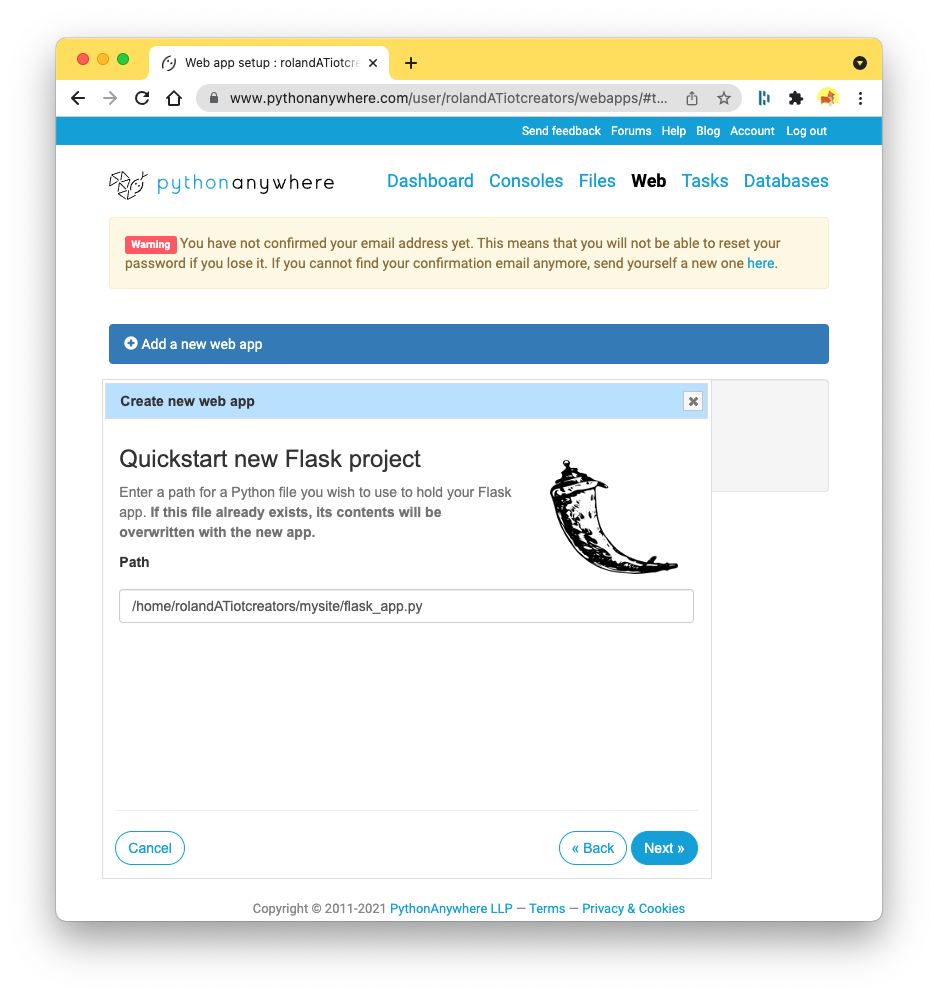
Accept the default path for your flask application by clicking Next button.
By this the flask web application into which your will upload the code for your DDD service is created.
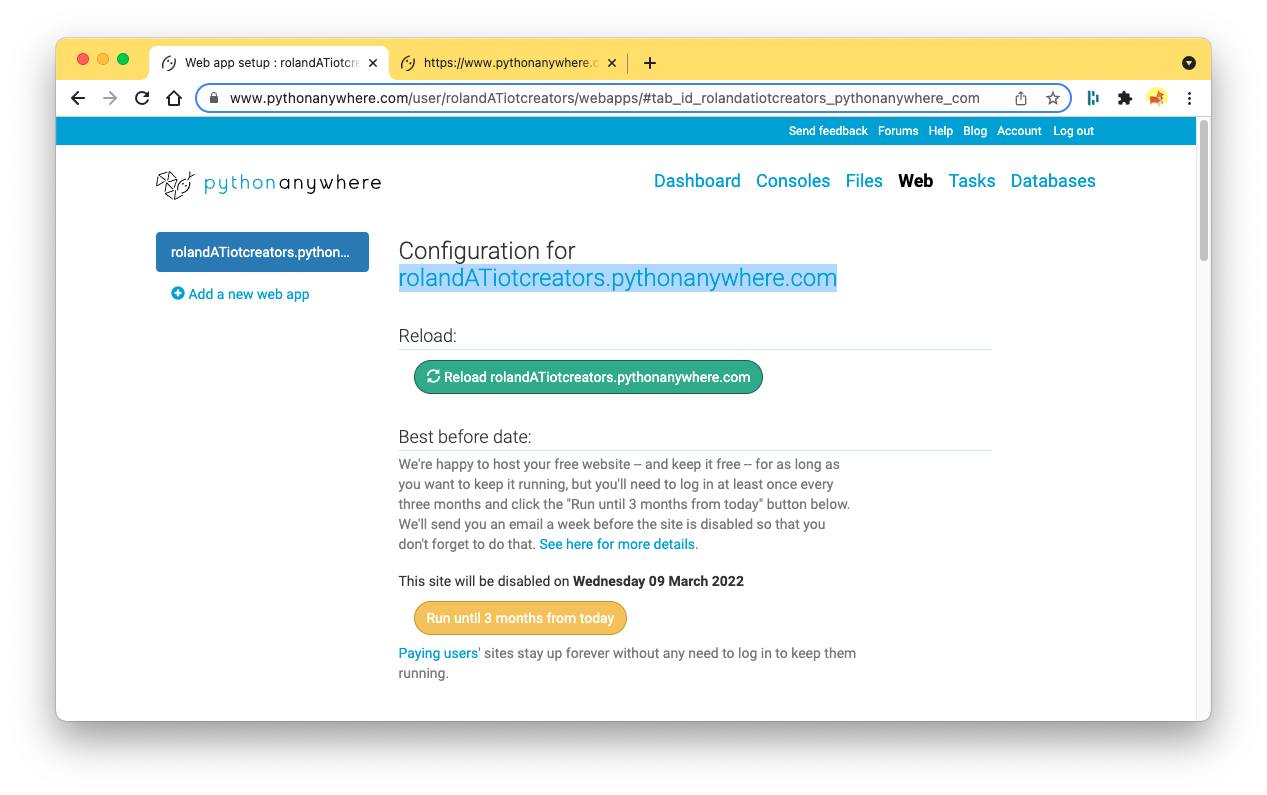
Upload python code of DDD service
To upload the python code of your DDD service into the flask web app perform the following steps.
- In the Web page of your pythonanywhere.com account select your newly created web app on the left side of the window.
- Scroll down to the section Code and click in the line Source code the link Go to directory.

- Pythonanywhere.com brings you to the page Files. Click on the file flask_app.py.
- The editor window opens into which you can paste the code below.
In case you do the tutorial with your own device you have use a different device data decoding function. Just add as new function to the code below and call it from the body of the function
def decode(msg).
import logging
import json
from flask import Flask, request

log = logging.getLogger(__name__)

def decode_imbuilding_co2(hexstr):
    a = bytearray.fromhex(hexstr)
    type = a[0]
    version = a[1]

    if type == 1 and version == 1:
        d = {}

        # CO2
        v = int.from_bytes(a[16:18], "big")
        d["CO2"] = {"Concentration": {"unit": "ppm", "value": v}}

        # Temperature
        v = int.from_bytes(a[12:14], "big") / 100.
        d["Temperature"] = {"T": {"unit": "°C", "value": v}}

        # Humidity
        v = int.from_bytes(a[14:16], "big") / 100.
        d["Humidity"] = {"H": {"unit": "%", "value": v}}

        # Presence
        v = 1 if a[18] > 0 else 0
        d["Presence"] = {"1/0": {"unit": "", "value": v}}

        # Battery in V
        v = int.from_bytes(a[9:11], "big") / 100.
        d["Battery"] = {"Voltage": {"unit": "V", "value": v}}

        return d

    else:
        raise Exception("IMBUILDING format type=%d with  version=%d not supported." % (type, version))

def decodeMeasurements(msg):
    try:
        # Get out the encoded data from the message
        if "data" not in msg.keys():
            raise Exception("Message does not contain data.")

        data = msg["data"]
        encoded = data["encoded"] if "encoded" in data.keys() else None

        if not encoded:
            raise Exception("Message does not contain data.")

        # Decode the data for the IMBUILDING CO2 sensor
        decoded = decode_imbuilding_co2(encoded)

        # Build OK result
        msg["data"]["decoded"] = decoded
        msg["status"] = "OK"
        msg["statusMessage"] = "Data has been decoded ok"
        msg["statusCode"] = 0

    except Exception as ex:
        # Build error result
        msg["status"] = "ERROR"
        msg["statusMessage"] = str(ex)
        msg["statusCode"] = 999

    return msg

def logRequest(request):
    log.info("###############################")
    for h in request.headers.keys():
        log.info("%s : %s" % (h, request.headers[h]))
    log.info("###")
    j = json.loads(request.data)
    log.info(json.dumps(j, indent=4))
    log.info("###############################")

def handleDecodeMeasurementsRequest(request):
    logRequest(request)

    action = None

    try:
        # Get the
        action = "extracting string body from request"
        data = request.data.strip() if request.data else None

        if not data or len(data) == 0:
            raise Exception("No request body defined.")

        log.info("REQUEST BODY: %s" % (data))

        action = "converting string body to dictionary"
        body = json.loads(data)

        # Decode
        action = "decoding the device data"
        rv = decodeMeasurements(body)
        rv = json.dumps(rv, indent=4)

        log.info("RESPONSE BODY: %s" % (rv))

        # Return Ok
        return (rv, 200)

    except Exception as ex:
        rv = {"errorMessage":"Error while %s: %s" % (action, str(ex))}

        # Return Erro
        return (json.dumps(rv), 400)

# Build the  Flask endpoint
app = Flask("My Device Data Decoding Service")

@app.route("/decodeMeasurements", methods=["GET"], strict_slashes=False)

def _handleDecodeMeasurementRequest():
    return handleDecodeMeasurementsRequest(request)

# Uncomment to test it locally with "$ python3 flask_app.py"
#app.run(host="0.0.0.0", port=8080, debug=0)
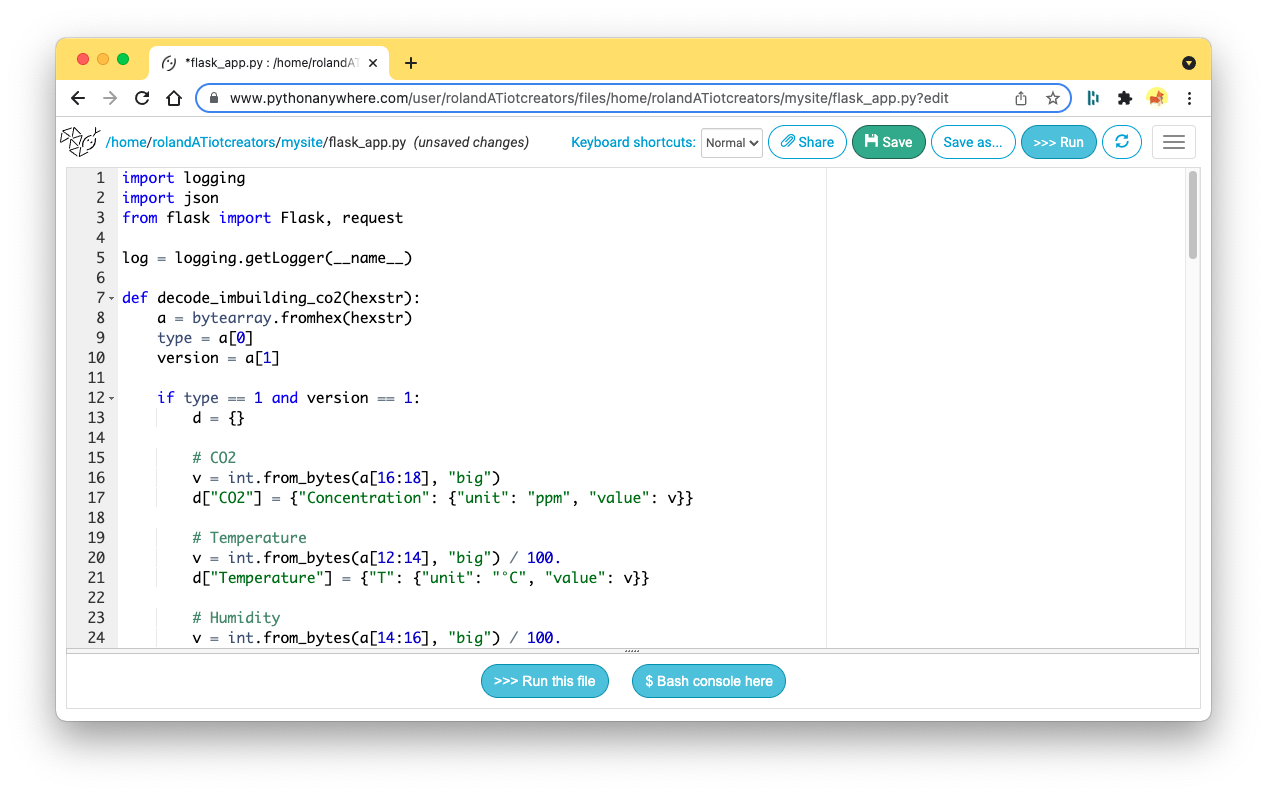
- Click the Save button at the top of the window.
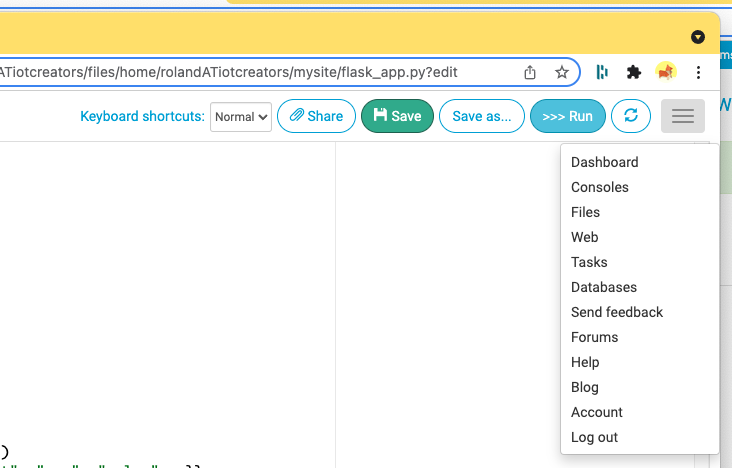
- Return to your web app page by clicking Web in the drop down menu at right top corner of the window.
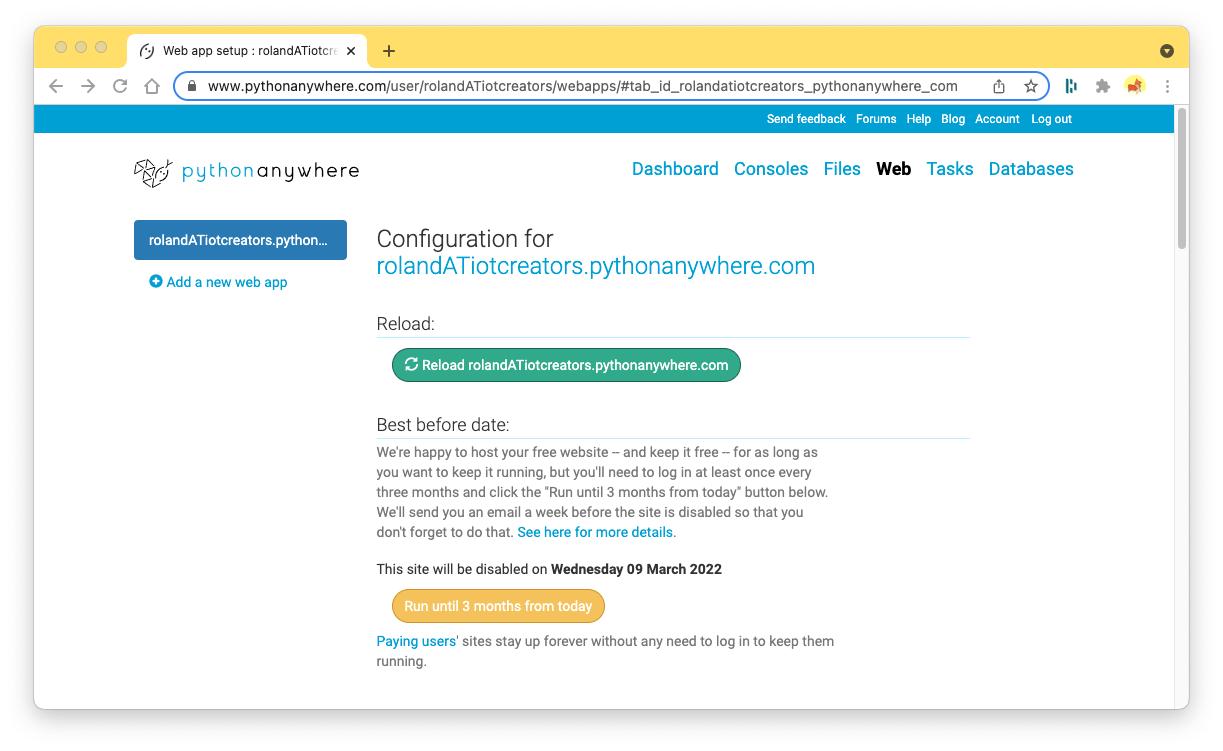
- Make sure your web app is selected at left side of window and push the Reload button to reload your application with the new code.
Create! You just created your first DDD service and you are ready to test it.
Test your DDD service
To test your DDD service you can simple call it with curl with the following command.
If your service works fine you should see something like shown in the next code block underneath the curlcommand.
In case you do the tutorial with your own device you will have to use a different values for the type and the encoded elements.
$ curl \
  -H 'Content-Type: application/json' \
  -H 'Accept: application/json' \
  -d '{
        "device": {
          "type": "IMBUILDING CO2"
        },
        "data": {
          "encoded": "01015410ec9ab714000131a9098913f2055001"
        }
      }' \
  -X GET https://<YOUR-WEB-APP-NAME>.pythonanywhere.com/decodeMeasurements

{
    "device": {
        "type": "IMBUILDING CO2"
    },
    "data": {
        "encoded": "01015410ec9ab714000131a9098913f2055001",
        "decoded": {
            "CO2": {
                "Concentration": {
                    "unit": "ppm",
                    "value": 1360
                }
            },
            "Temperature": {
                "T": {
                    "unit": "\u00b0C",
                    "value": 24.41
                }
            },
            "Humidity": {
                "H": {
                    "unit": "%",
                    "value": 51.06
                }
            },
            "Presence": {
                "1/0": {
                    "unit": "",
                    "value": 1
                }
            },
            "Battery": {
                "Voltage": {
                    "unit": "V",
                    "value": 3.05
                }
            }
        }
    },
    "status": "OK",
    "statusMessage": "Data has been decoded ok",
    "statusCode": 0
}
HTTP Authorization!
The tutorial explains how to implement the DDD service at pythonanywhere.com without any username/password authentication.
You can activate Basic HTTP authentication in the web app by
- open web app page in pythonanywhere,
- goto section Security,
- activate Password protection and input your username and password.
In your
curltest request add the option -H 'Authorization: Basic <BASE64(:)>
If you see some JSON response from your DDD service on the command line Concratulations!
You are ready now to link together IoT Creators portal wit your CoT/Cumulocity tenant via the Cumulocity Uplink Adapter.
Step 4: Integrate CoT/Cumulocity with IoT Creators platform
So far you performed the following steps:
- Register your device in IoT Creators platform
- Register the type of your device in CoT/Cumulocity
- Register your device in CoT/Cumulocity
- Implement your DDD service for your device
the last step to integrate IoT Creators platform with CoT/Cumulocity is register your CoT/Cumulocity tenant as application in the IoT Creators portal.
Perform the following steps:
- Log into IoT Creators platform and open the project into which you registered your device before.
- Activate the tap YOUR APPLICATION SEVER
- Input the required callback url and headers fields as described below
- Push the SAVE button.
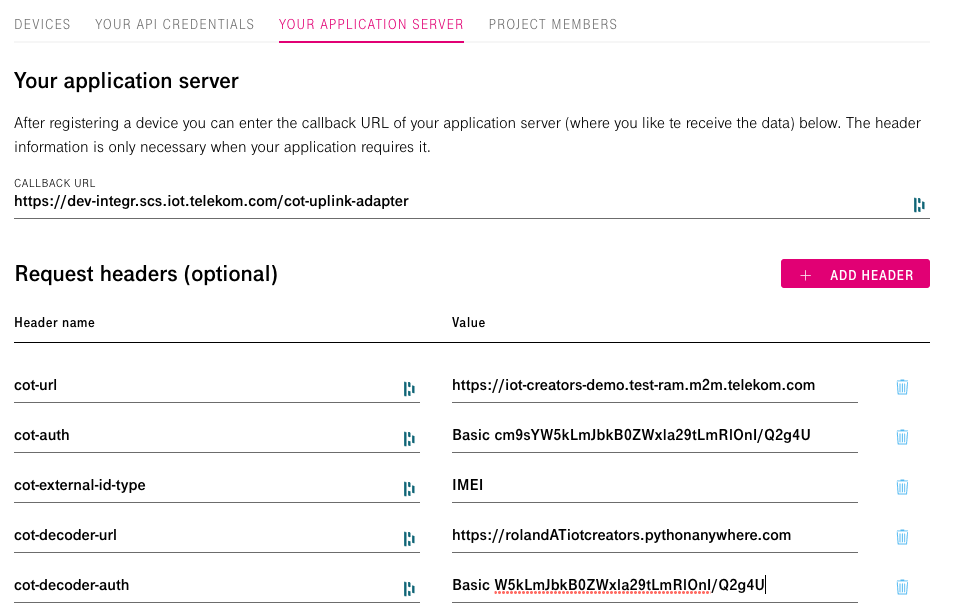
By pushing the SAVE button not only the URL and the header fields are stored, they are tested. If something is wrong with your url or auth the test returns with error and you cannot store your settings.
Callback URL
The CALLBACK URL is the url of your application endpoint to which all messages of the devices in the project are forwarded as HTTP POST request (a sample body of such a HTTP POST request is given below).
Use https://dev-integr.scs.iot.telekom.com/cot-uplink-adapter as URL. This is our integration service CumuilocityUplink Adapter*.
{
    "reports": [
        {
            "serialNumber": "IMEI:70B3D5E75E0056EA",
            "timestamp": 1639136019404,
            "subscriptionId": "36a85040-d9e3-43e7-a695-7745dbae50d1",
            "resourcePath": "uplinkMsg/0/data",
            "value": "110a00520000410c000000000000623800000000",
            "customAttributes": {
                "deviceType": "NKE SmartPlug",
                "decoder": "nke-smartplug"
            }
        }
    ],
    "registrations": [],
    "deregistrations": [],
    "updates": [],
    "expirations": [],
    "responses": []
}
Header Fields
| Name | Description / Sampe |
|---|---|
| cot-url | Description: The URL to your CoT/Cumulocity tenant. Sample: cot-url: https://env8786192.eu-latest.cumulocity.com |
| cot-auth | Description Your user credentials of CoT/Cumulocity as a base64 encoded HTTP Basic authorization string. Sample: username: roland password: baldin base64(roland:baldin): cm9sYW5kOmJhbGRpbg== cot-auth: Basic cm9sYW5kOmJhbGRpbg== |
| cot-external-id-type | Description: The type of the external ids with which the CoT/Cumulocity devices are identified. Sample: cot-external-id-type: IMEI |
| cot-decoder-url | Description: The url of your custom decoder which you implemented with pythonanywhere.com. Sample: cot-decoder-url: https://rolandAiotcreators.pythonanywhere.com |
| cot-decoder-auth | Description: In case your custom decoder requires a HTTP authorization header field the value of it can be added to this field. Sample: cot-decoder-auth: Basic am9ubnk6bWN3aWZl |
😃😃😃😃😃😃😃
If you reached this point - CONCRATULATIONS !!
The next step for you is to open your CoT/Cumulocity, search for your device and check the system received measurements.
Step 5: Verification
To verify if your device sends data and if the data has arrived at CoT/Cumulocity tenant you should
- check in IoT Creators portal for the Last message with its Payload in the Devices tab of your project and
- check in CoT/Cumulocity if your device received Measurements.

IoT Creator portal displaya the Last message with its payload

In case you can see the Measurements in CoT/Cumulocity in the menu of your device and in case you can see some data points you did a very good job !!!
Conclusion
I hope the previous tutorial didn't take to much time from you. By this you could implement the end-to-end uplink message flow from your device via e.g. NB-IoT, IoT Creators into CoT/Cumulocity. To implement your device specific Device Data Decoding service you used a free-trial registration at pythonanywhere.com.
In case would continue with type of integration architecture on the basis of IoT Creators and CoT/Cumulocity you would probably do the following next steps:
- Add more devices of different types to your DDD service.
- Use a commercial registration at pythonanywhere.com or migrate your DDD service into an Azure Function or an AWS Lambda Function.
- Send downlink messages to your device by using IoT Creators Downlink API.
In case you have any question regarding those next steps just ask [email protected] for support or help.
I would appreciate any feedback about this tutorial to [email protected].
Updated about 4 years ago
