DRAGINO Distance Detection Sensor (NDDS75)
Describes how to integrate the Distance Sensor from Dragino with your application.
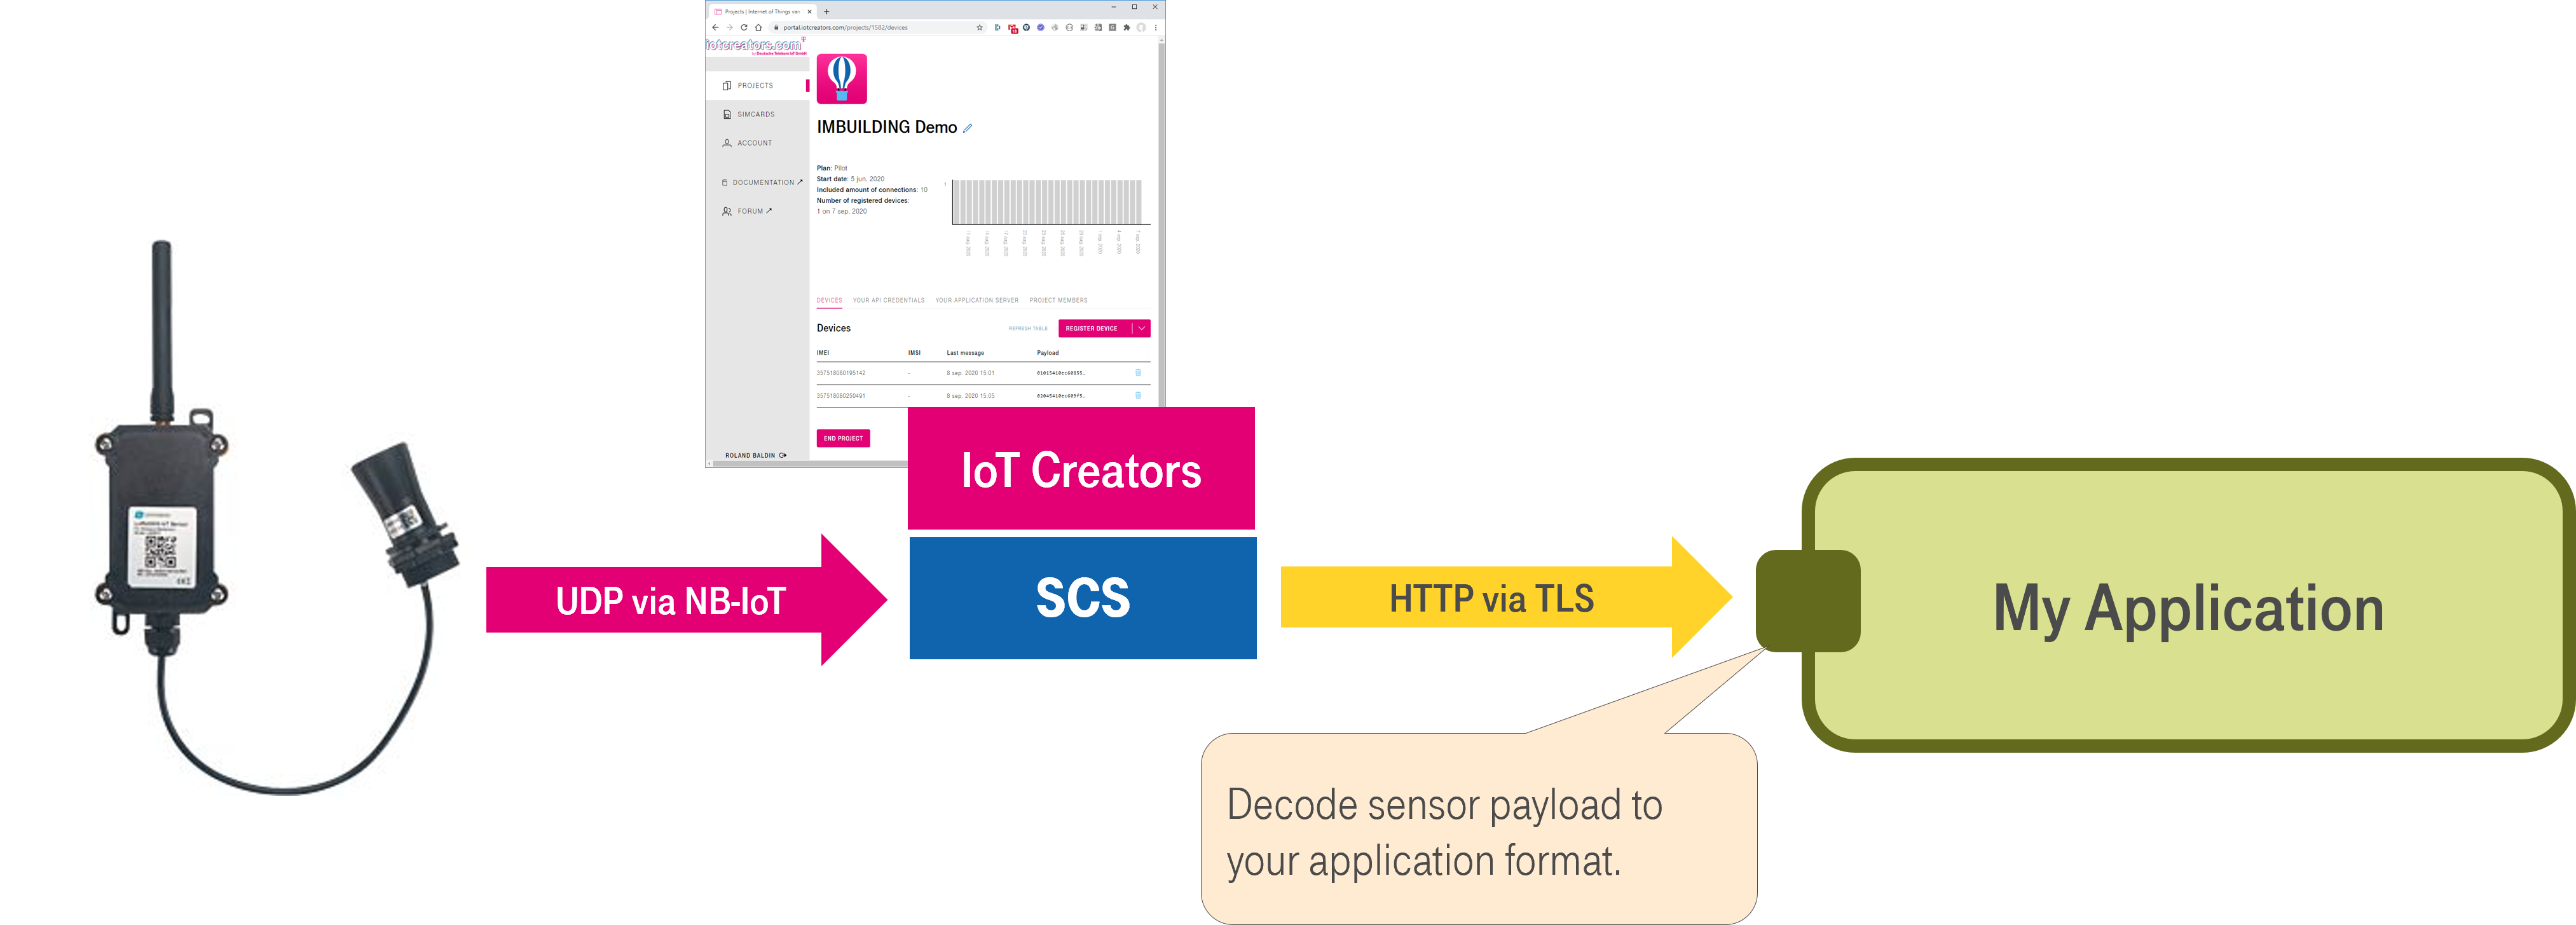
DRAGINO provides a wide range of NB-IoT sensors to measure temperature, humidity, CO2, pressure, gas, water leakage, open/close, etc.. On demand they can be provided as Ready for IoT Creators and be shipped with an IoT Creators SIM card and pre-integrated with IoT Creators SCS.
In this chapter you get explained how you can register DRAGINO's distance detection sensor in the IoT Creators portal and how you can decode the sensor data to integrate it with your application or IoT platform.

DRAGINO NB-IoT sensors can use different IoT communication protocols like for example MQTT. In our case we will use UDP.
Register your Device!
Before you send any UDP message to IoT Creators make sure you registered the device IMEI in your project before. You can find the IMEI on the Quectel BC35-G chip after you opened the sensor box.
If you forget, you will have problems to register your device afterwards. In this case please get in contact with IoT Creators support team.
The sensor provides the measurement value as a single data package in hex format. This data is forwarded by the SCS to your application URL as the value element as part of the following JSON payload.
{
    "reports":[{
        "serialNumber":"IMEI:868411056756471",
        "timestamp":1600439712734,
        "subscriptionId":"fa37d89c-a7e2-4f3d-b12f-6002a3642b4c",
        "resourcePath":"uplinkMsg/0/data",
        "value":"41105675647100640cd1070a1600"
    }],
    "registrations":[],
    "deregistrations":[],
    "updates":[],
    "expirations":[],
    "responses":[]
}
To get the measurement values of the sensor into your application you need to decode the hex data of the value element to the actual measurement values.
Payload Specification
No matter if you can receive JSON payload from IoT Creators SCS directly in your application or if you have to switch an additional message transformation service in between you have to implement (or to configure) data decoding according to the data specification of DRAGINO.
The payload of the LDDS75 sensor is divided as follows:
| Size (Byte) | 6 | 2 | 2 | 1 | 2 | 1 |
| Value | Device ID | Version | BAT | Signal | Distance (mm) | Interruptions |
In the following you will get a simple sample how you can decode the payload of the DRAGINO sensor for your application.
Decoding the Payload
In the following I give you some source code examples how to decode the sensor data of the LDDS75 sensor with JavaScript and Python.
Don't forget that the data in the value element of the forwarded JSON message is in hex format. By this each byte consists of two character.
JavaScript Sample
function Decoder(bytes, port) {
  // Decode an uplink message from a buffer
  // (array) of bytes to an object of fields.
  var value=(bytes[0]<<8 | bytes[1]) & 0x3FFF;
  var batV=value/1000;//Battery,units:V

  value=bytes[2]<<8 | bytes[3];
  var distance=(value)+" mm";//distance,units:mm

  var i_flag = bytes[4];

  value=bytes[5]<<8 | bytes[6];
  if(bytes[5] & 0x80)
  {value |= 0xFFFF0000;}
  var temp_DS18B20=(value/10).toFixed(2);//DS18B20,temperature

  var s_flag = bytes[7];
  return {
       Bat:batV +" V",
       Distance:distance,
	   Interrupt_flag:i_flag,
	   TempC_DS18B20:temp_DS18B20+" °C",
	   Sensor_flag:s_flag,
  };
}
Python Decoder
from curses import A_ALTCHARSET
import sys
import argparse
import json
import logging
import traceback
import base64

logging.basicConfig(level=logging.INFO, format="%(asctime)s | %(levelname)s | %(message)s")
log = logging.getLogger(__name__)

def decode(data):
    if data.startswith("0x"):
        a = data[2:]
    else:
        a = data

    # Device Id:       6:  0 ...  5  -> Hex  0 ... 12
    # Version:         2:  6 ...  7  -> Hex 12 ... 16
    # Battery:         2:  8 ...  9  -> Hex 16 ... 20
    # Signal Strength: 1: 10 ... 10  -> Hex 20 ... 22
    # Distance (mm):   2: 11 ... 12  -> Hex 22 ... 26
    # Interrupt:       1: 13 ... 13  -> Hex 26 ... 28

    d = {}
    d["deviceId"] = str(a[0:12])
    d["version"] = int(a[12:16], 16)
    d["batteryV"] = int(a[16:20], 16) / 1000.
    d["signalStrength"] = int(a[20:22], 16)
    d["distanceMM"] = int(a[22:26], 16)
    d["interrupt"] = int(a[26:28], 16)

    return d

if __name__ == '__main__':
    log.debug("*** START ***")

    cmdlineParser = argparse.ArgumentParser(prog="decode.py",
                                            description="Decodes sensor payload.")

    cmdlineParser.add_argument("-loglevel", metavar='<loglevel>',
                               choices=["INFO", "WARN", "DEBUG"], default="INFO",
                               help="Log level.Possible values  are INFO, WARN, DEBUG.")

    cmdlineParser.add_argument("payload", nargs='+',
                               help="Payload")

    ns = cmdlineParser.parse_args()

    if ns.loglevel is not None:
        log.setLevel(ns.loglevel)

    log.debug("loglevel = %s" % (str(ns.loglevel)))
    log.debug("payload = %s" % (str(ns.payload)))

    exitCode = 0

    try:

        d = decode(ns.payload[0])
        log.info(json.dumps(d, sort_keys=True, indent=4))

    except Exception as ex:
        log.error(str(ex))
        exitCode = 1
        traceback.print_exc()

    finally:
        log.debug("*** END OK ***")
        sys.exit(exitCode)
For the payload of 41105675647100640cd1070a1600 the decoding function provided me the following result:
{
'deviceId': '411056756471',
'version': 100,
'batteryV': 3.281,
'signalStrength': 7,
'distanceMM': 2582,
'interrupt': 0
}
Set up your DRAGINO LDDS75
Now that you know how to decode your sensor data it makes sense to finally send some.
So let's set up the sensor.
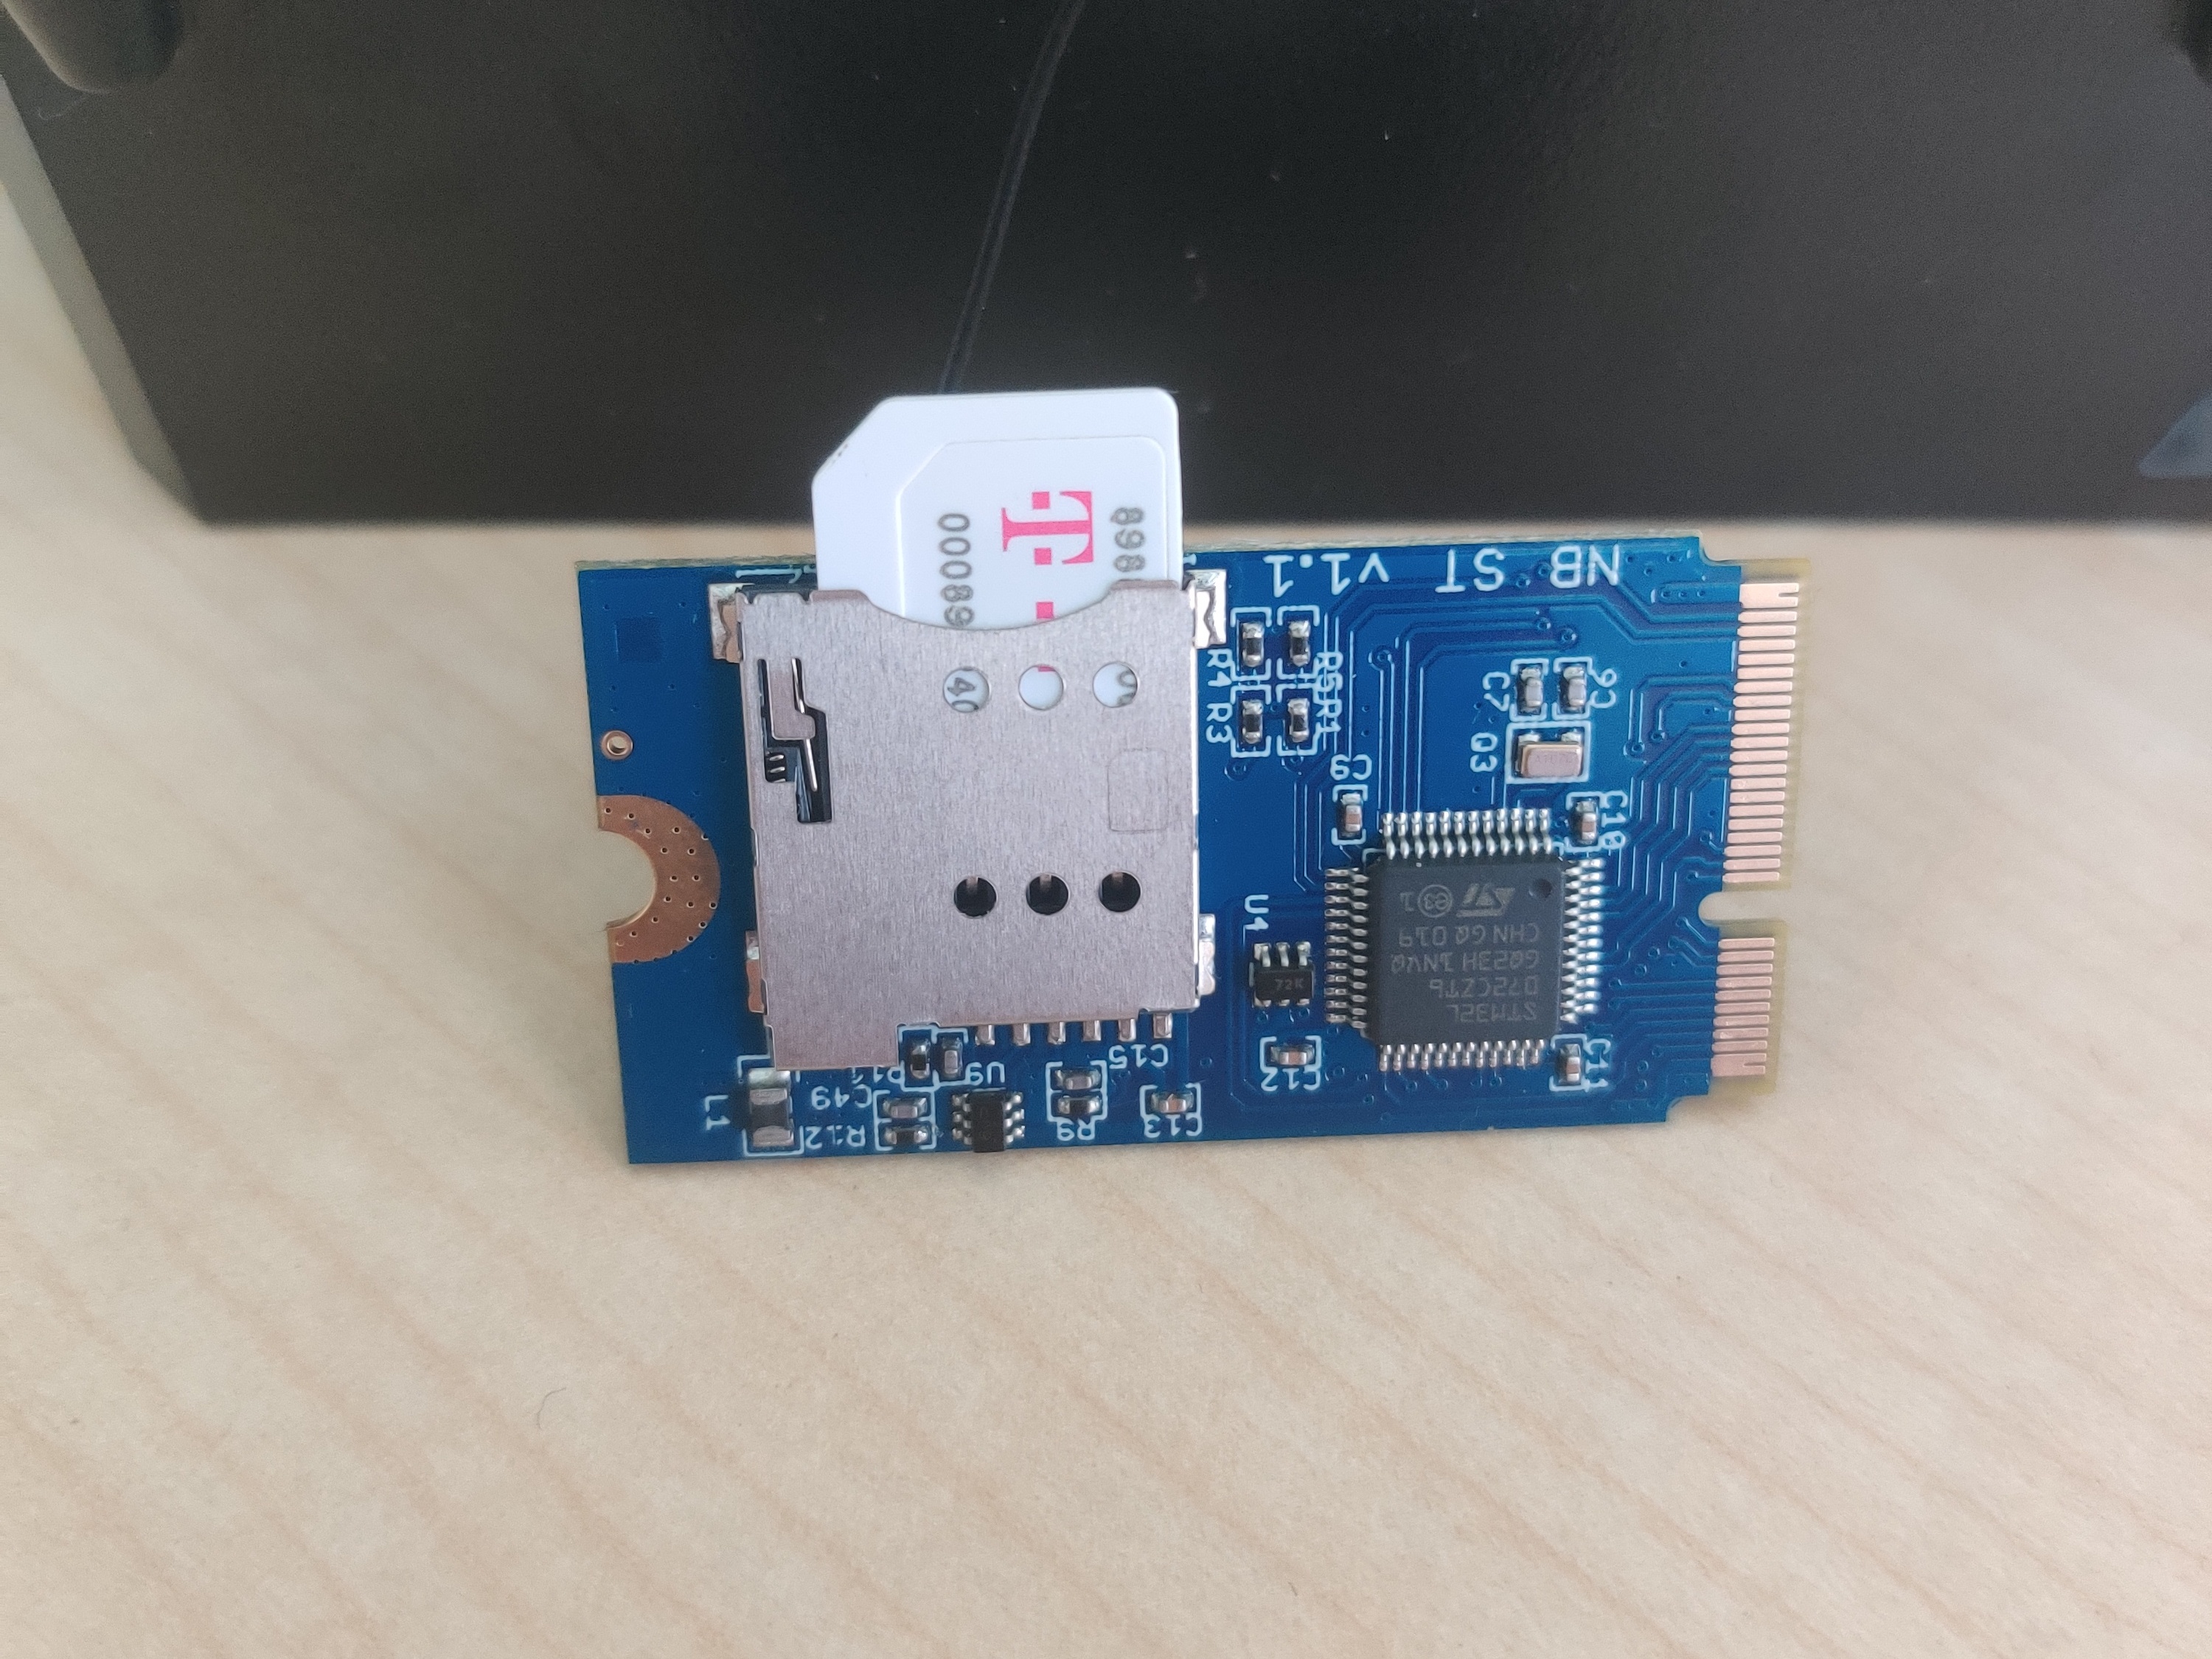
First you have to unscrew the Quectel module from the circuit board of the LDDS75 and insert the SIM card as you can see in the picture below.
Pay attention to the SIM card position
Unlike other devices, the SIM card must face outwards with the "double corner".

After you put it all the way in you can screw the Quectel module back onto the DRAGINO device.
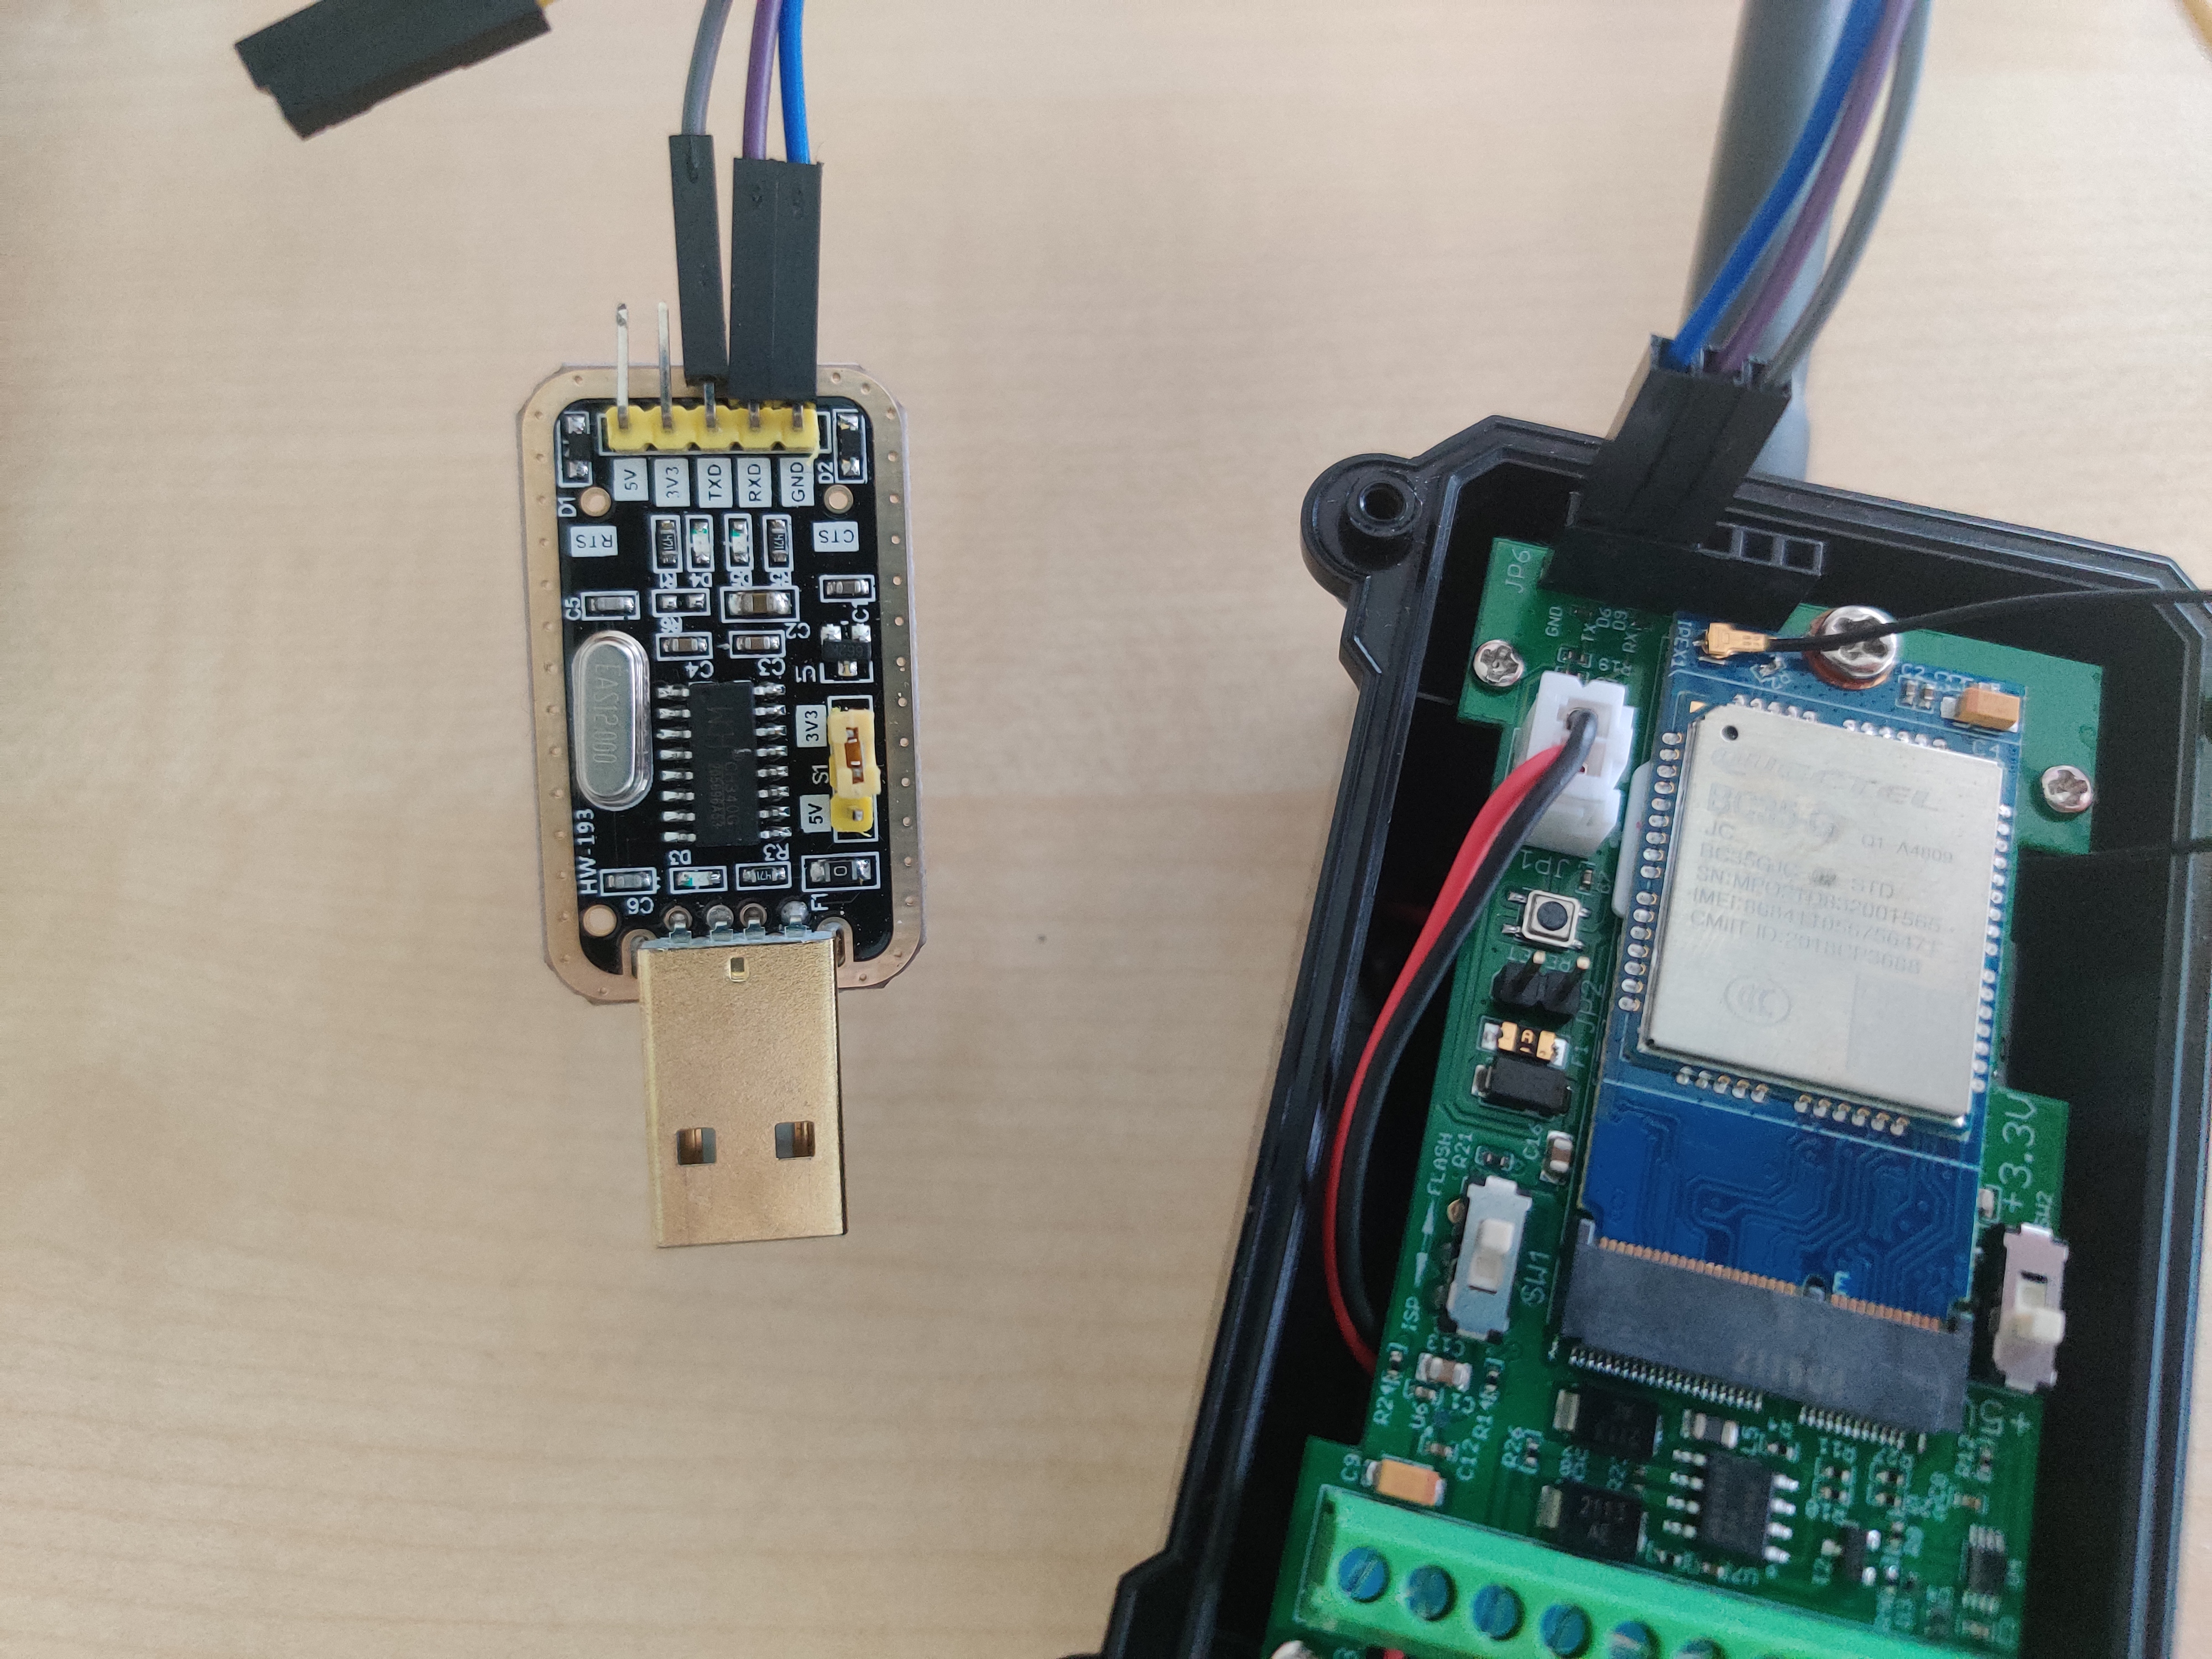
Connect the board with the USB transmitter like this:
TXD - RX
RXD - TX
GND - GND

Now you are able to connect your sensor with your PC via USB and access the LDDS75 using a terminal program such as screen or minicom.
Afterwards you can search for your device. In the most cases you can find it under /dev/ttyUSB0.
Set the baudrate to 9600
Deactivate Flow control and active the local echo
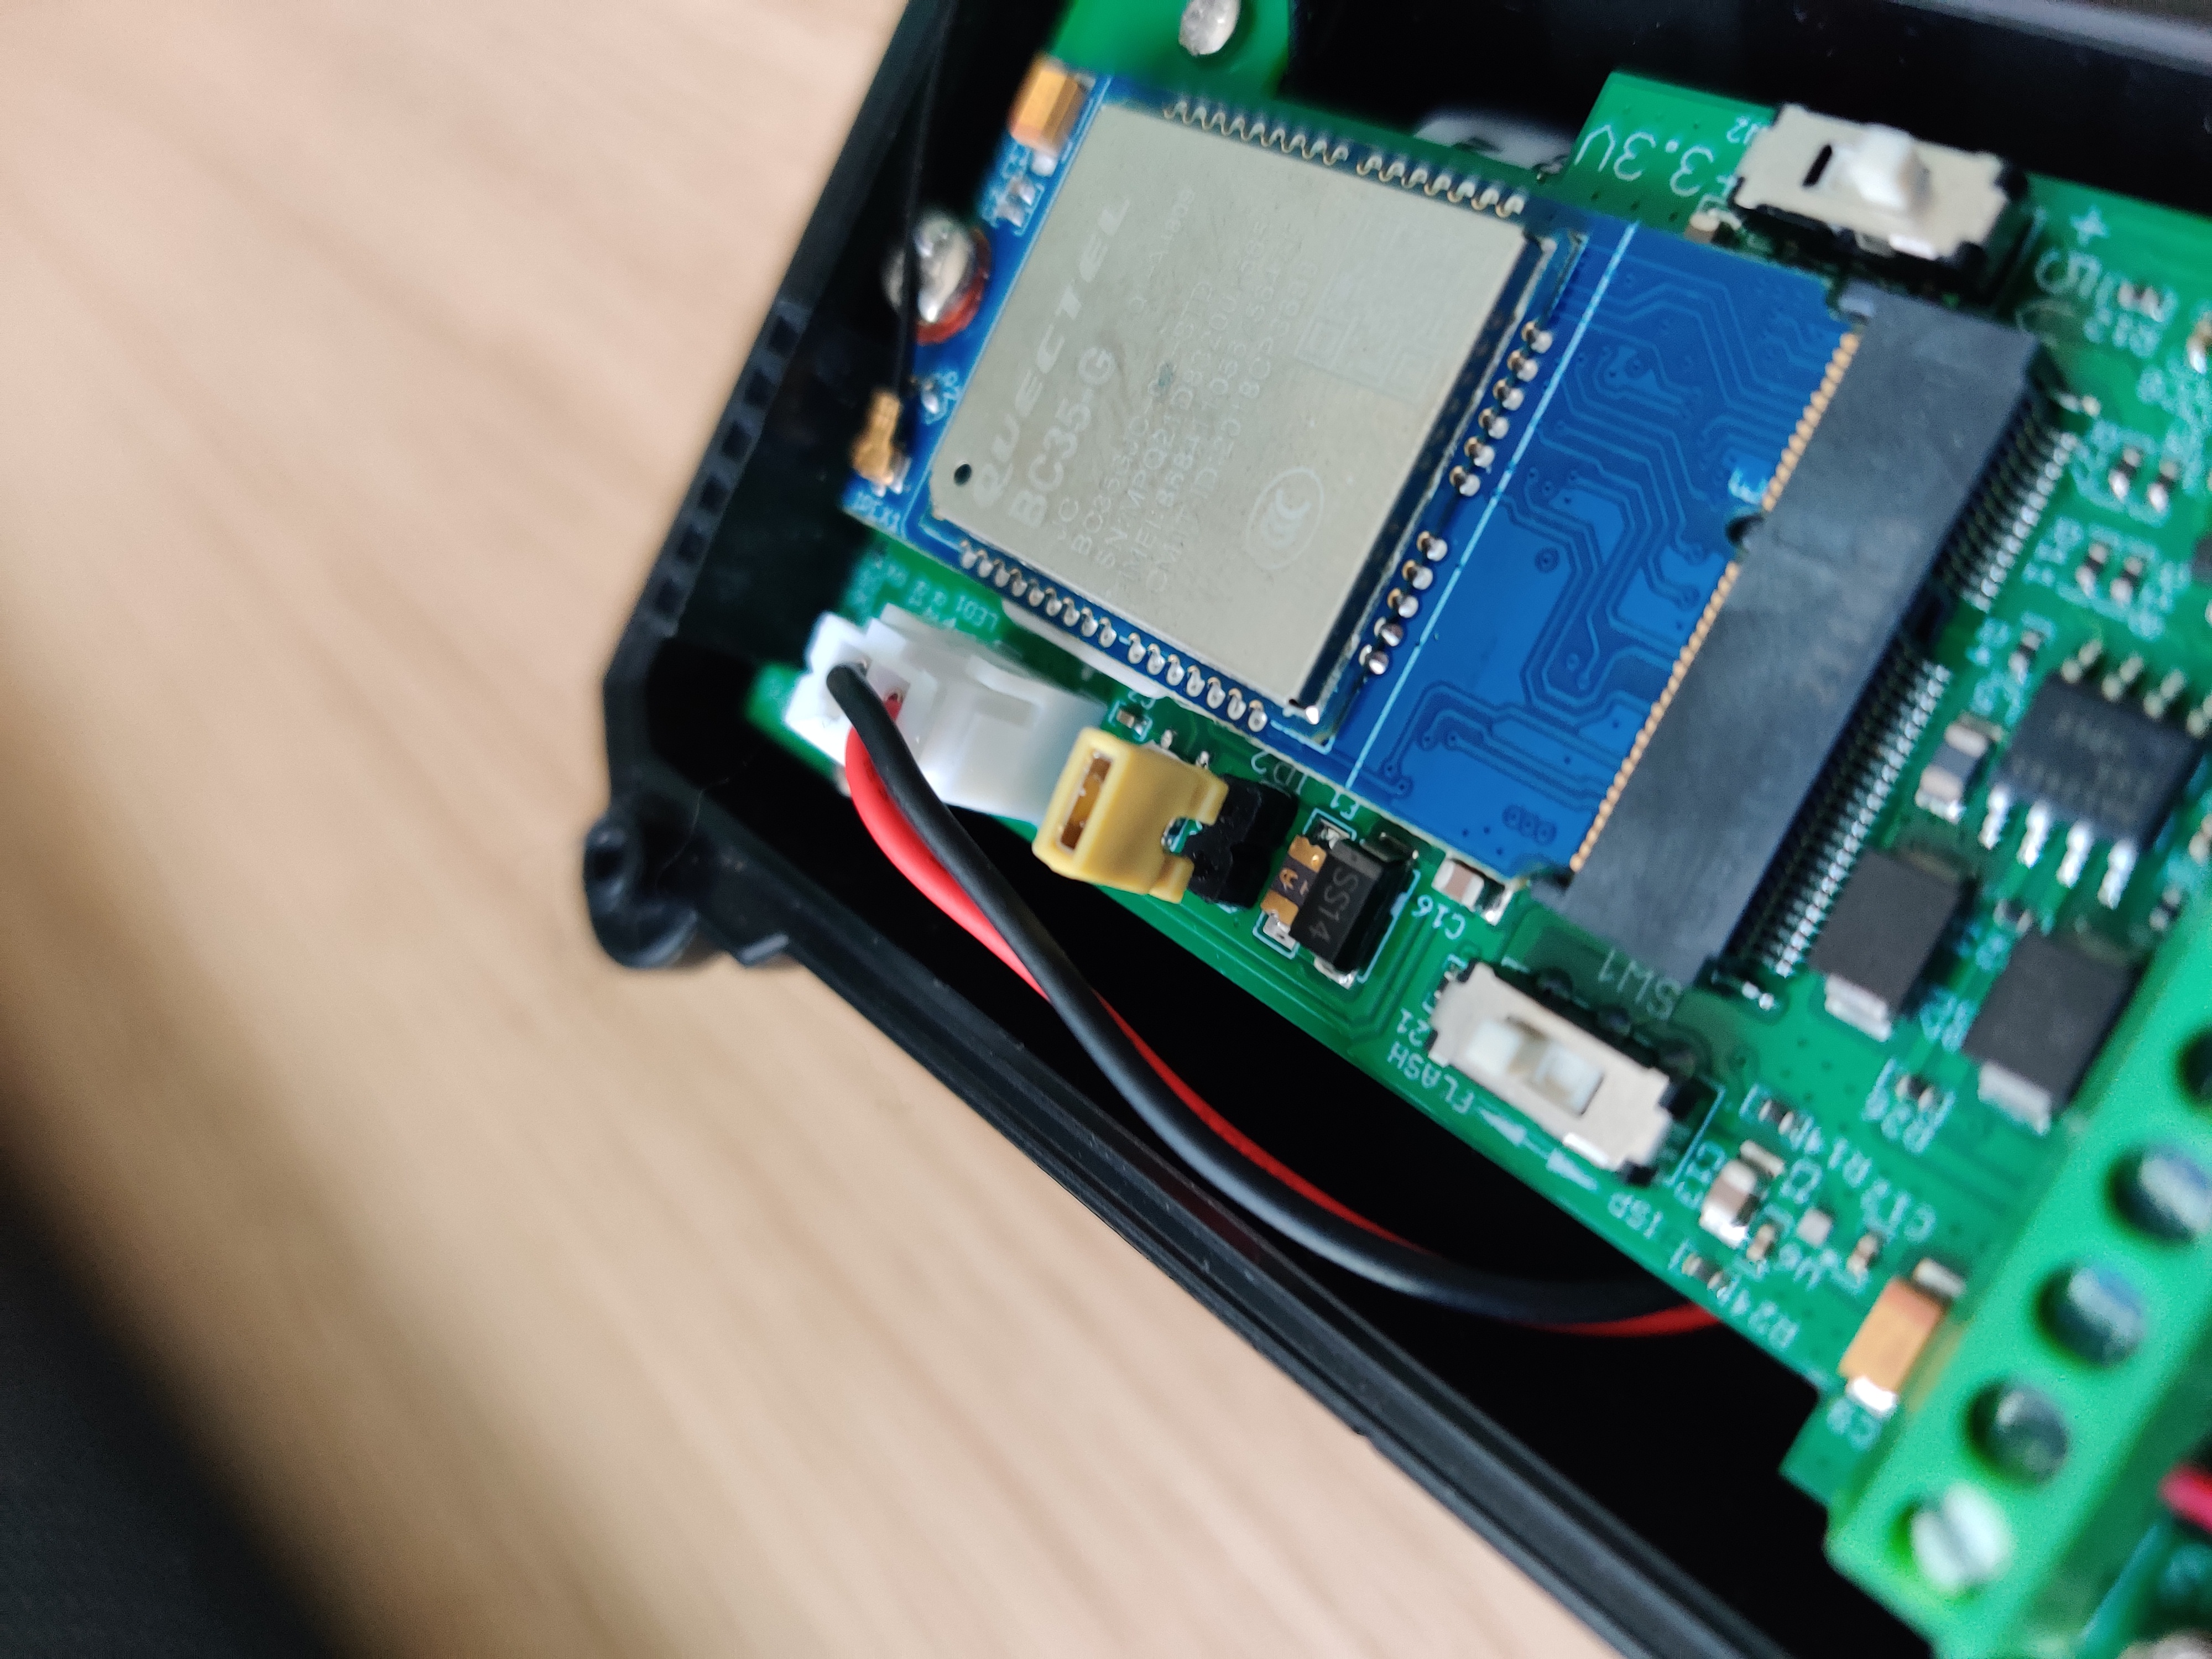
On the device side make sure the switches are in FLASH position and 5V position, then power on device by connecting the jumper on the NDDS75 as in the picture below (the yellow one).

You should now see info output in your terminal that looks something like this:
NDDS75 NB-IOT Distance Sensor

Image Version: v1.0.0

NB-IoT Stack : D-BC95-002

Protocol in Used: UDP

[10199]NBIOT has responded.

[11238]Echo mode turned off successfully.

[12327]The IMEI number is:868411056756471.

[13408]The IMSI number is:901405700024950.

[15558]Turn on PSM mode successfully.

Currently set frequency band:5,8,3
[17697]Signal Strength:3

[22430]*****Upload start:0*****

[27466]remaining battery =3283 mv

[29506]distance:2582

[30565]Open UDP port successfully

[34697]Sending data...

[37315]Datagram is sent by RF

[39386]Close the port successfully

[40426]*****End of upload*****
Before you can enter AT commands you have to authorize yourself with a password. To do this, simply type 12345678 into your Terminal and press enter.
12345678
[41463]Password Correct
Now we just need to execute the following two AT commands to define the IoT Creators Server.
AT+PRO=2
OK

AT+SERVADDR=172.27.131.100,15683
OK

AT+CFM=1
OK
Reboot and receive your data!
After rebooting the device with ATZ you should see the info like you did after the first boot.
Now you should already see the sensor data in your IoT Creators Portal project.
Updated almost 3 years ago
Now you know how to get the sensor data into your project and how to decode the data. But how do they get into your platform? These guides can answer the question:
