Quectel BC66-TE-B
Learn how to setup and integrate dev-kit Quectel BC66-TE-B with IoT Creators NB-IoT network and Data Provisioning Service (SCS)
Introduction
To help developers to start with the NB-IoT module BC66 from Quectel, Quectel
supplies the development board BC66-TE-B for testing and learning (see images below).
BC66-TE-B is Arduino-kompatibel and can be used either standalone or with a STM32 Nucleo-64 development board.
Top (left) and bottom (right) view of Quectel BC66-TE-B DVK.
Links
| Titel | URL |
|---|---|
| Where can I get from? | https://www.tekmodul.de/produkt/bc66-dvk/ |
| Product info page @quectel | www.quectel.com/product/bc66.htm |
| Product info package from Quectel | http://www.quectel.com/ProductDownload/BC66.zip |
| BC66-T-BE User Guide, Hardware Design, Application Notes - Download Zone | https://github.com/iotcreators/doclib-downloads/blob/master/device-integrations/Quectel/BC66/Quectel_BC66-TE-B_User_Guide_V2.1.pdf |
| BC66 & BC66-NA AT Commands Manual | https://github.com/iotcreators/doclib-downloads/blob/master/device-integrations/Quectel/BC66/Quectel_BC66_AT_Commands_Manual_V1.0.pdf |
All useful resources
Links to the AT command samples:
- Query device information
- Setup network configuration
- Send "Hallo World" via UDP
- Receive "Hallo Device" via UDP
BC66 useful official resources
https://github.com/iotcreators/doclib-downloads/tree/master/device-integrations/Quectel/BC66
Setup the Device
Access DevKit from your Computer

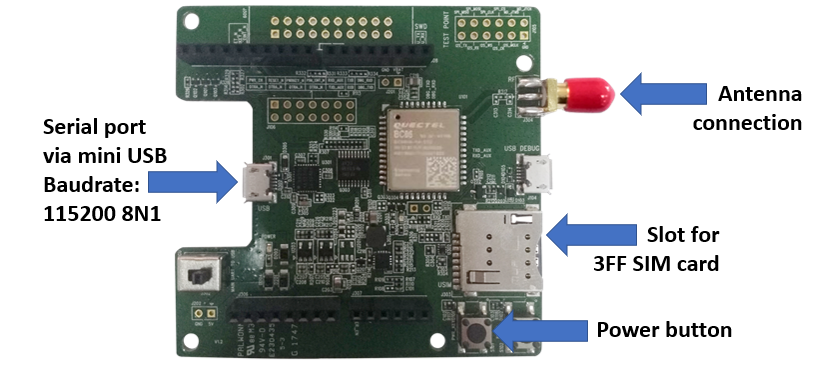
Parts of the Quectel BC66-TE-B
Enable your computer with "serial via USB"
To enable your windows box to with "serial via USB" you can install from https://www.exar.com/product/interface/uarts/usb-uarts/xr21v1412 the required drivers.
If you work with a standard Linux distribution such as Ubuntu it shouldn't be neccessary to install additional drivers to the OS. As soon you plug in the device cabel into the USB port of your computer a device file such as /dev/ttypUSB0 should appear in your file system.
Connect the antenna with the device. (the device shouldn't be connected via USB)
Insert NB-IoT SIM card into the card slot of the device. (the device shouldn't be connected via USB)
Connect the device with your computer via "serial" USB cabel and get access with terminal program.
After you connected the device with the computer via the USB cabel the device is set under power and a red LED is shining.
After the device is initialy power up it is in the status "switched off".
To get console access to the device you can use terminal program such as putty (for windows) or screen (on Linux: $ screen /dev/ttyUSB0 115200).
Linux
In case you have any problems to access the device file /dev/ttyUSB0 because you don't have enough access privilages for this file execute the following command
$ sudo usermod -a -G dialout
After you connected to the device with your terminal program it is in the status "switched off" and you will see no output (black terminal screen).
To switch on the device press the "on/off" button on the device (see image above).
As response you see the following output on the console:
F1: 0000 0000
V0: 0000 0000 [0001]
00: 0006 000C
01: 0000 0000
U0: 0000 0001 [0000]
T0: 0000 00B4
Leaving the BROM
By default the device falls after some seconds automatically into sleep. To stop the device before doing so input the following AT command.
Deactive auto-sleep: AT+QSCLK=0
AT+QSCLK=0
OK
Now the device stays awake and you can relax.
As next I recommand to active the echo of the AT commands. This simplifies working with the device.
Activate echo of console input: ATE1
ATE1
OK
👍 Congratulations 👍
Now you are ready to play arround with the BC66-T-BE DVK
AT Commands to query Device Information
With the following AT commands you can check your device and what is going on on it.
#Display product information
ATI
Quectel_Ltd
Quectel_BC66
Revision: BC66NBR01A10
OK

#Display IMEI of the device
AT+CGSN=1
+CGSN: 867997030586266
OK

#Query the code and the description of last error
AT+QIGETERROR
+QIGETERROR: 552,invalid parameters
OK
Attach to NB-IoT Network
This chapter explains how you can attach the BC66-T-BE DVK to the NB-IoT network. I recommend to read the chapter "Setup Quectel BC66-T-BE DVK" first.
If you are only interested in the conclusion of the AT commands to configure the network setup go to chapter "'AT Setup Commands".
In case you are looking for any documentation documents goto the setup chapter of the device.
After you switched on the device and deactivated the auto-sleep (AT+QSCLK=0) and activated the echo of inputs (ATE1) you can configure the network setup for the module with the following steps:
Set mobile operation band: AT+QBAND=1,8
AT+QBAND=1,8
OK
Swicht off radio functionality: AT+CFUN=0
AT+CFUN=0
OK
Setup the default APN: AT+QCGDEFCONT="IP","APN-Address""
Choosing the correct APN for your sim card
The command below represent an example, different sim cards can have different APNs, for the correct APN check this doc page here: https://docs.iotcreators.com/docs/general-settings
AT+QCGDEFCONT="IP","cdp.iot.t-mobile.nl"
Restart device after network setup
Some configurations of the network setup take only effect after the device has been restarted.
Restart device: AT+QRST=1
AT+QRST=1
F1: 0000 0000
V0: 0000 0000 [0001]
00: 0006 000C
01: 0000 0000
U0: 0000 0001 [0000]
T0: 0000 00B4
Leaving the BROM
Don't forget to disable auto-sleep and enable echo of inputs:
AT+QSCLK=0
OK

ATE1
OK
If everything works fine you shoul get displayed after 10-45 seconds the IP address which the device gets assigned by the network
+IP: 10.0.0.239
Yeah!! If you see the IP address on the console after starting up the device you did everything perfect and your are ready now to send and receive data.
In case of an failure and the device doesn't get an IP address the problem can be fixed sometimes by defining local operator explicity.
Configure operator manually: AT+COPS=1,2,"26201"
AT+COPS=1,2,"26201"
AT+COPS=1,2,"20416"
AT+COPS=1,2,"23203"
AT Commands to setup Network Configuration
# Deactivate auto-sleep
AT+QSCLK=0
OK

# Switch on echo mode
ATE1
OK

# Set the band to band 8 (900 MHz) for Telekom NB-IoT network
AT+QBAND=1,8
OK

# Turn off the radio
AT+CFUN=0
OK

# Setup APN for T-Mobile Netherland
AT+QCGDEFCONT="IP","cdp.iot.t-mobile.nl"

# Configure local operator manually: Germany, Telekom
AT+COPS=1,2,"26201"
# Configure local operator manually: Netherland, T-Mobile
AT+COPS=1,2,"20416"
# Configure local operator manually: Austria, T-Mobile
AT+COPS=1,2,"23203"

# Restart the module as some configurations only take place after a reboot
AT+QRST=1
F1: 0000 0000
V0: 0000 0000 [0001]
00: 0006 000C
01: 0000 0000
U0: 0000 0001 [0000]
T0: 0000 00B4
Leaving the BROM

# Deactivate auto-sleep
AT+QSCLK=0
OK

# Switch on echo mode
ATE1
OK

+IP: 10.0.0.239
Send and Receive via UDP
In the following chapters I will explain to you how you can send a "Hello World" message from the device to the IoT Creators SCS and how you can receive a a "Hello Device" message on your devkit from IoT Creators SCS.
Send "Hello World"
Preliminary Work
Register your device first!
Make sure that you have registered your device with its IMEI at the IoT Creators portal BEFORE you send your first message to the UDP or CoAP server of IoT Creators.
If you forget, you will have problems to register your device afterwards. In this case please get in contact with IoT Creators support team.
Before you can send a "Hello World" UDP message from your device to the IoT Creators make sure you did the following steps:
- Registered you device with the correct IMEI in the IoT Creators Portal.
To be sure that you used the correct IMEI you can query it with the AT command directly from the device. For BC66 device this command is: AT+CGSN=1 - Connect the device via USB cabel with your laptop.
- Start the terminal program such as putty (Windows) or screen (Linux) with a baudrate of 115200.
- Switch on the device by pushing the "switch on" button.
- Deactivate auto-sleep with AT command: AT+QSCLK=0
- Activate echo of console inputs with AT command: ATE1
- Wait until the device display the IP address of the network attachment such as +IP: 10.0.0.239
As the result you should see on your console an output like:
F1: 0000 0000
V0: 0000 0000 [0001]
00: 0006 000C
01: 0000 0000
U0: 0000 0001 [0000]
T0: 0000 00B4
Leaving the BROM

AT+QSCLK=0
OK
ATE1
OK

+IP: 10.128.1.98
You should only continue with the next steps if you have seen the IP address of the network attachment displayed on the console.
If you don't see the IP address unfortunatelly you have to start trouble shooting now 😢
As next you can open a UDP socket to the UDP server of the IoT Creators.
Open UDP socket to UDP server
AT+QIOPEN=1,1,"UDP","172.27.131.100",15683,1001,0,0
OK

+QIOPEN: 1,0
This AT command opens a UDP socket with:
- Context ID = 1,
- Connection ID = 1,
- Service type = UDP,
- Server IP address = 172.27.131.100,
- UDP port of the server = 15683
- UDP port of the device for responses of the server = 1001,
- Buffered access mode = Yes and
- Protocoll type = IPv4
In all other AT commands which are related to this socket connection you should use 1 as connection id.
In case your AT+QIOPEN command doesn't return OK or +QIOPEN: 1,0 something went wrong.
At first you should double check if you can reach the UDP server with the AT+QPING command.
PING Service
Check the correct ping address here: IoT Configuration Parameter
AT+QPING=1,"172.27.131.100"
OK

+QPING: 0,"172.27.131.100",32,3010,253
The ping result is returned by the first integer parameter of +PING: return. 0 means that every thing was fine. A value different 0 identies an error. You can use AT+QIGETERROR to get the error description.
Sending "Hello World" UDP Message to UDP Server
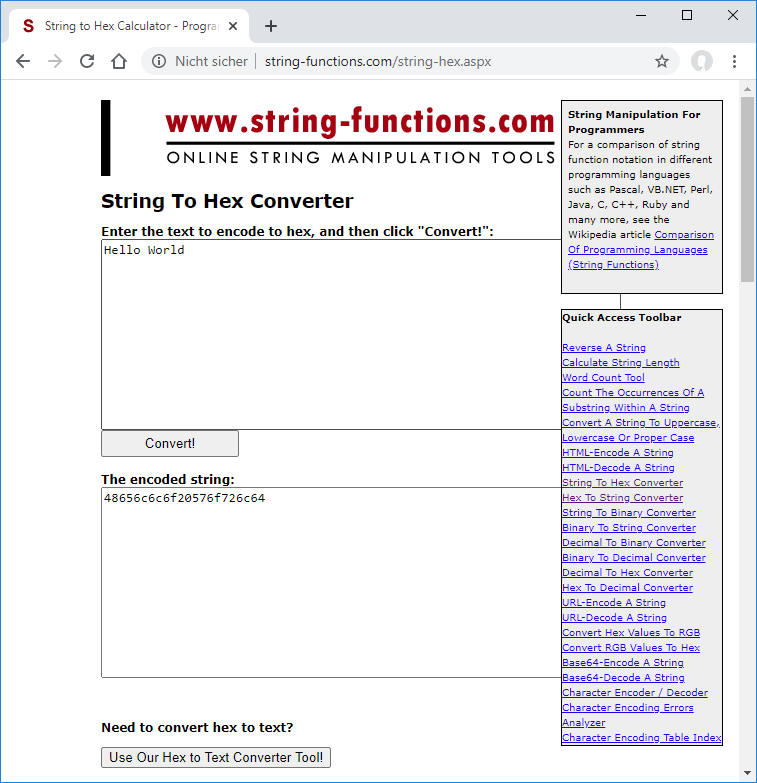
I recommand not to send plain text or binary data from the device to your backend applications or vice versa. You can use a hex or a base64 encoding format of data. In our sample we send Hello World as a hex converted string to the IoT Creators.
To convert Hello World you can use online tool http://string-functions.com/string-hex.aspx

The hex string for Hello World is 48656c6c6f20576f726c64.
To let your device sent this message via UDP to the UDP server of IoT Creators you can use the following AT command:
AT+QISENDEX=1,11,48656c6c6f20576f726c64
OK

SEND OK
This AT command sends via the connection with the id 1 the message 48656c6c6f20576f726c64 with a lenght of 11 bytes.
If you see SEND OK on the device console CONGRATULATIONS! you just send your first UDP message from your device to an UDP server of IoT Creators.
The message length which is assigned to the command AT+QISENDEX as second parameter describes the length of the original message. It does NOT desribes the length of the hex message which has a length of 22 bytes.
As next we can change back to the project space of the IoT portal to check what has been received.
View the received Messages in IoT Creators Portal
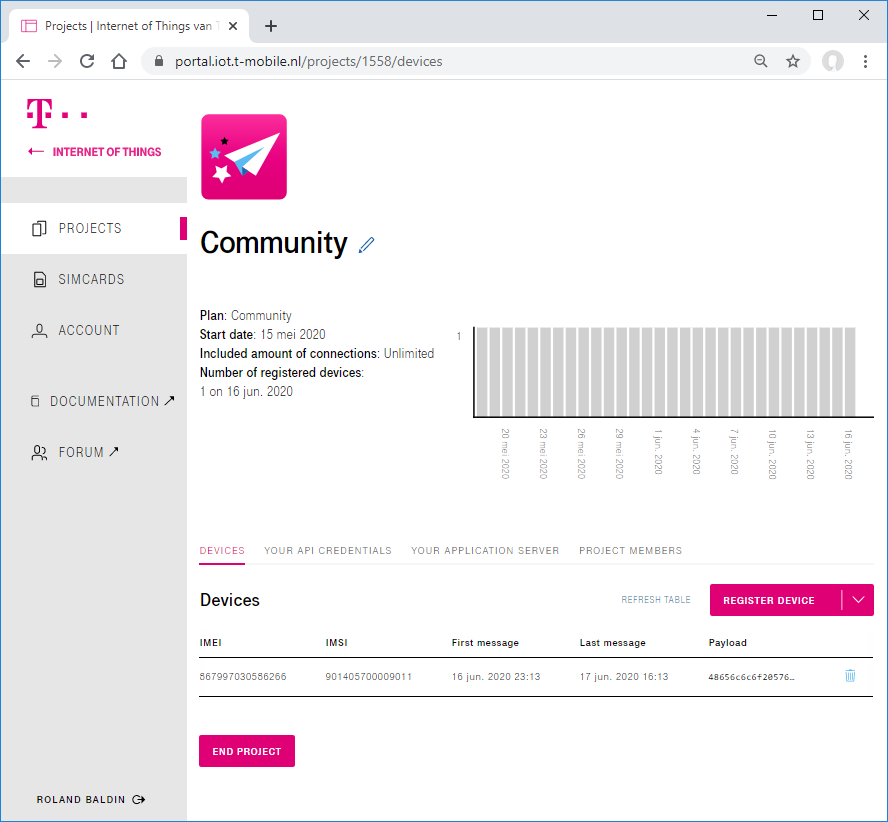
For each device the IoT Creators Portal makes the laste received message available by showing it in the Payload column. In case of our Hello World message

If you click on the payload the value of it is copied to the clipboard.
As already mentioned above it is a nice behaviour to transfer strings and binary data not as they are. It is better to encode them to hex or base64 for the transfer.
We sent our Hello World as hex encoded string on its way. Out if this reason we see in the IoT Creators Portal the string 48656c6c6f20576f726c64.
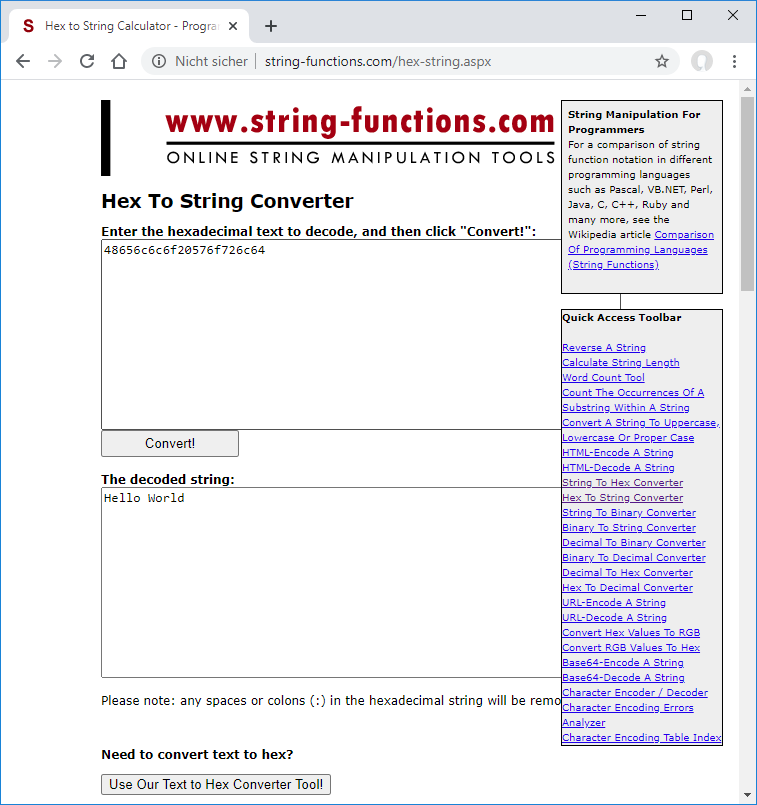
To decode the received message back from hex to a readable string we can use the online tool http://string-functions.com/hex-string.aspx.

If you can decode your received message to Hello World **CONGRATULATIONS**! You just sent and receceived your first UDP message via NB-IoT.
AT Commands to send Hello World
# Deactivate auto-sleep
AT+QSCLK=0
OK

# Switch on echo mode
ATE1
OK

# Open UDP socket to server
AT+QIOPEN=1,1,"UDP","172.27.131.100",15683,1001,0,0
OK

+QIOPEN: 1,0

# Send Hello World as hex
AT+QISENDEX=1,11,48656c6c6f20576f726c64
OK

SEND OK
Receive "Hello Device"
In this chapter you will receive the previous posted "Hello Device" downlink message with your device.
Preliminary Work
Before you can receive "Hello World" downlink message on your device make sure you did the following steps:
- Registered you device with the correct EMEI in the IoT Creators.
To be sure that you used the correct EMEI you can query it with the AT command directly from the device. For BC66 device this command is: AT+CGSN=1 - Connect the device via USB cabel with your laptop.
- Start the terminal program such as putty (Windows) or screen (Linux) with a baudrate of 115200.
- Switch on the device by pushing the "switch on" button.
- Deactivate auto-sleep with AT command: AT+QSCLK=0
- Activate echo of console inputs with AT command: ATE1
- Wait until the device display the IP address of the network attachment such as +IP: 10.0.0.239
- Open the UDP server of IoT Creators**
As the result you should see on your console an output like:
F1: 0000 0000
V0: 0000 0000 [0001]
00: 0006 000C
01: 0000 0000
U0: 0000 0001 [0000]
T0: 0000 00B4
Leaving the BROM

AT+QSCLK=0
OK
ATE1
OK

+IP: 10.128.1.98

AT+QIOPEN=1,1,"UDP","172.27.131.100",15683,1001,0,0
OK

+QIOPEN: 1,0
You should only continue with the next steps if you seen the IP address of the network attachment displayed on the console.
If you don't see the IP address unfortunatelly you have to start trouble shooting now :(
Post Downlink Message to the API of IoT Creators SCS
Before you can receive a message you have to Post the Downlink Message. To do so follow the steps in the Chapter Post Downlink Message to the API of IoT Creators SCS
Receive Downlink Message on the Device
As mentioned before IoT Creators queues the posted downlink messages for a device until the device sends an uplink message. After IoT Creators received the uplink message it delivers the queued downlink messages to the device.
Go to the console of the device and send "i am alive" heartbeat message to IoT Creators.
AT+QISENDEX=1,10,6920616d20616c697665
OK

SEND OK

+QIURC: "recv",1,24

AT+QIRD=1,24
+QIRD: 24,0
48656c6c6f20446576696365

OK
As you can see in the AT command console above it appears a +QIURC: "recv",1,24. This indicates that the device has received a message with 24 bytes on connection channel 1.
You can get the payload of the message with the AT command AT+QIRD=1,24. First the +QIRD: 24,0 is displayed to indicate that 24 are returned in the next line and that 0 data is available any more in the buffer.
If you decode the hex string 48656c6c6f20446576696365 you get your Hello Device again.
CONGRATULATIONS!! You send your first downlink message from the cloud to the device.
The whole story works exactly the same if you have your device switched off, and send first the downlink message. After this you can switch on your device, perform the alive-ping and get the received downlink message.
AT Commands to receive Hello Device
# Deactivate auto-sleep
AT+QSCLK=0
OK

# Activate echo of console input
ATE1
OK

+IP: 10.128.1.98

# Open UDP socket for communication with IoT Creators server
AT+QIOPEN=1,1,"UDP","172.27.131.100",15683,1001,0,0
OK

+QIOPEN: 1,0

# Send "i am alive" message
AT+QISENDEX=1,10,6920616d20616c697665
OK

SEND OK

+QIURC: "recv",1,24

# Retrieve the received downlink message
AT+QIRD=1,24
+QIRD: 24,0
48656c6c6f20446576696365

OK
Download files through HTTP
The BC66 does not natively support the HTTP protocol. Nevertheless, since HTTP is a text-based protocol running on TCP, with some work it can be supported on the bc66, we prepared a python application to demonstrate the http download here, running on the bc66:
HTTP download guide
https://docs.iotcreators.com/docs/file-download-server-quectel-bc66
Low power features
Check this guide for the BC66 low power features:
BC66 low power features
https://docs.iotcreators.com/docs/low-power-features#quectel-bc66
Other useful functions
Retrieve time from the network
You can retrieve the local time from the network (not all mobile networks support this command) by issuing:
AT+CCLK?

+CCLK: 2023/02/06,13:17:08GMT+1
Configuring DNS
DNS configuration
The DNS configuration only makes sense only when using the public APN to reach the external internet, when using the private APN, please use the direct IP for the service of your choice.
DNS should be automatically retrieved by the local network, just make sure that the ePCO (extended protocol configuration options) is enabled with command
AT+QCFG="epco",1
DNS not configured
If DNS are not automatically retrieved by the network, it couldbe possible that the local network is not providing those. In this case, configure them manually.
Configure DNS manually
Alternatively, you can explicitely configure the DNS with command
AT+QIDNSCFG=1,"primarydnsipv4","secondarydnsipv4"
Updated over 2 years ago
