Azure IoT Central
Tutorial to integrate IoT Creators with Microsoft Azure's IoT Central.
Introduction
In this tutorial you will implement a prototype of an end-to-end IoT solution with an integration between IoT Creators SCS and the IoT Application Microsoft Azure IoT Central.
To let the tutorial as concrete as possible I will explain how to integrate a NB-IoT sensor for CO2, Temperature and Humidity from IMBUILDING (https://www.imbuildings.com/nb-iot-comfort-sensor/). It uses raw UDP as IoT protocol and requires - as many other IoT devices in the market - a device specific data decoding to transform it into an easy-to-handle format. Of cause you can use a different device and implement a different device specific data decoding.
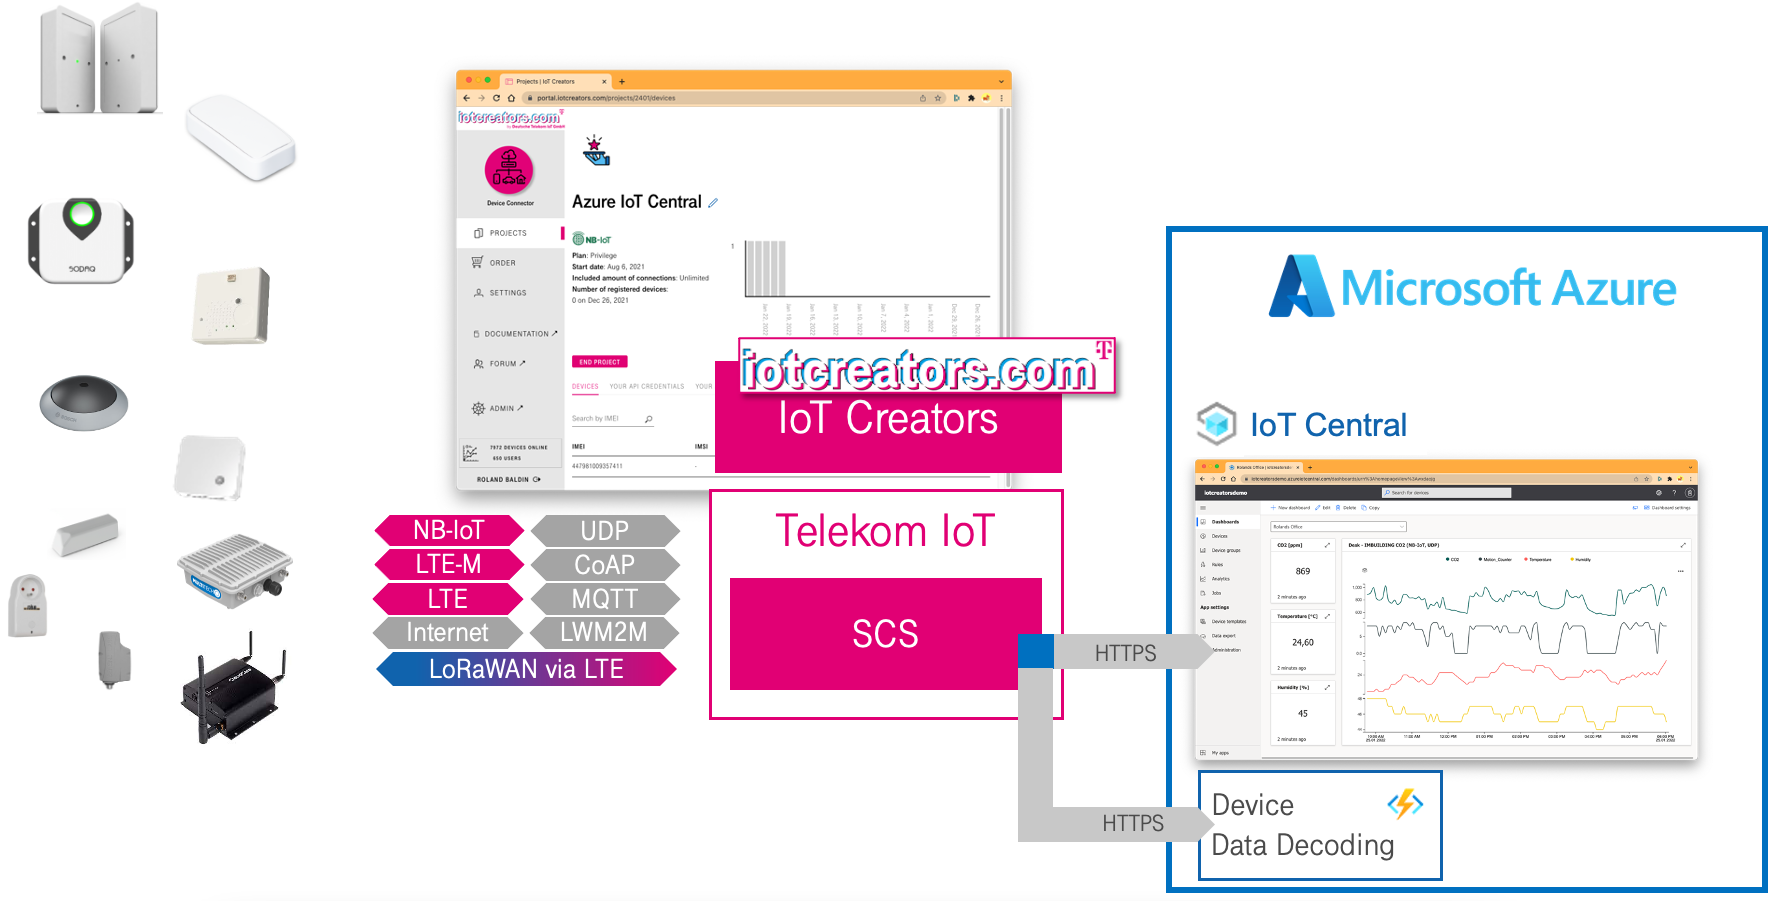
Highlevel architecture of the IoT Creators and Azure IoT Central
I recommend to prepare your-self with the following to be able to do the tutorial completely.
- IoT Creators account
- Device which you can integrate
- Azure IoT Central application with administration permissions.
- Azure permissions to create IoT Device Bridge and Azure Function.
In the following figure the high level integration architecture is shown. The major system components which are involved into the integration are
- SCS Data Collection Service which receives the messages from the devices from different IoT networks and protocols.
- SCS Azure IoT Central Application Adapter which controls the device specific data decoding, the Azure IoT Central specific message transformation and the integration into the Azure IoT Central via the Azure IoT Device Bridge.
- Azure IoT Central application.
- Azure IoT Device Bridge to integrate the IoT Creators application adapter with IoT Central.
- Customer Device Data Decoder to decode the sensor specific data format into the required JSON format of IoT Central.
- Device Data Decoder within SCS which which can be used alternatively to decode the data of some standard sensors.
During this tutorial you will customize all involved system components step-by-step to establish such end-to-end IoT solution.
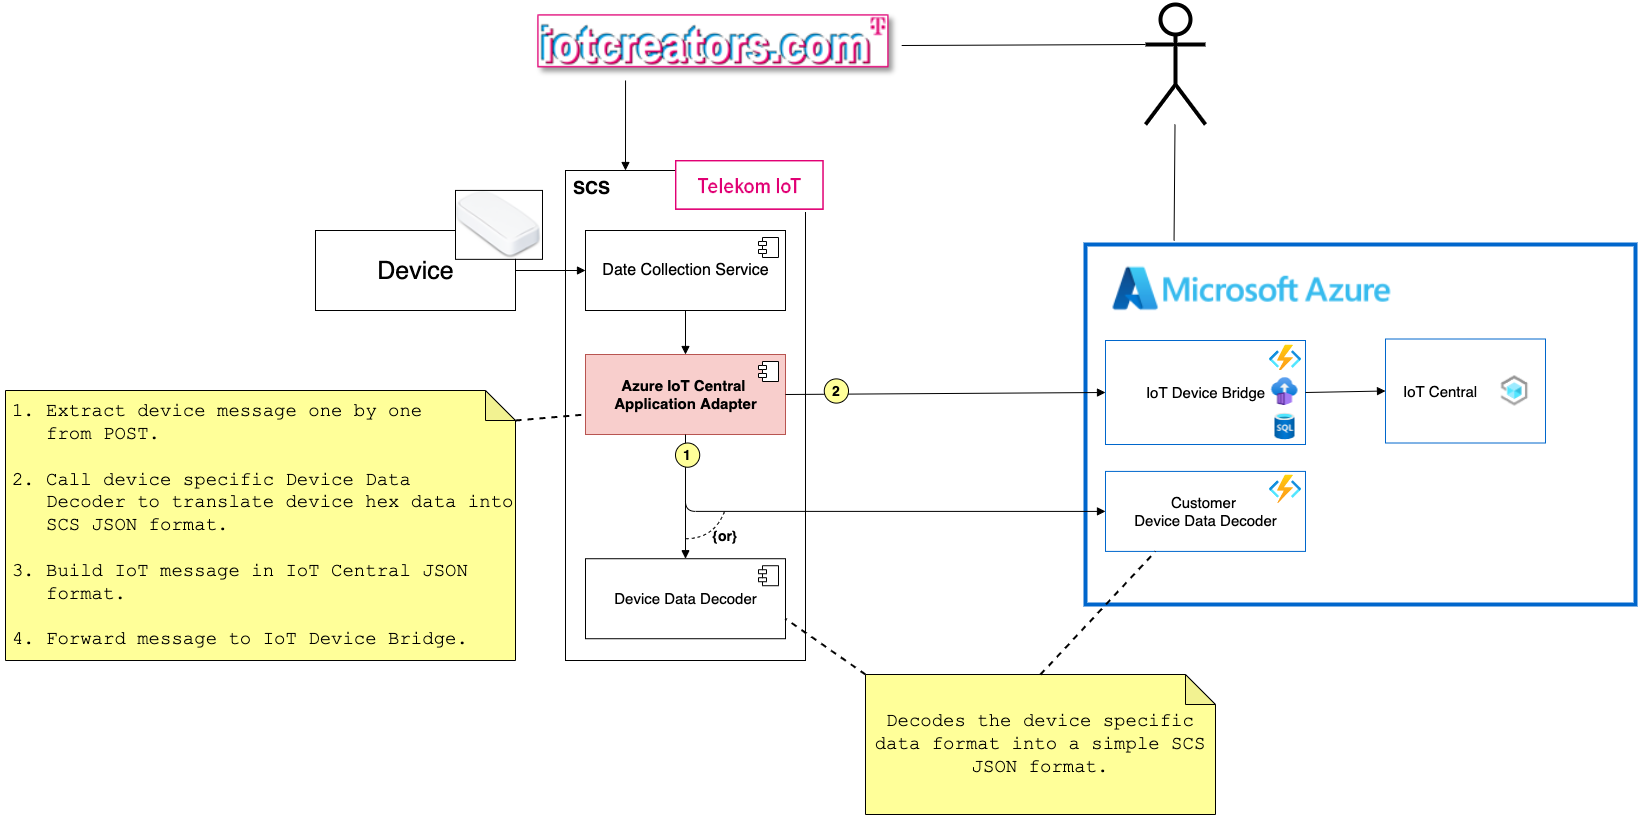
Integration architecture of IoT Creators' SCS platform with Azure IoT Central
With the following steps we will walk together through this tutorial
Step1: Register sensor device in IoT Creators platform
In our sample I will integrate a NB-IoT off-the-shelf sensor from IMBUILDING (https://www.imbuildings.com/nb-iot-comfort-sensor/). This sensor is a NB-IoT comfort sensor which measures CO2, temperature, humidity and presence. It uses raw UDP as IoT communication protocol.
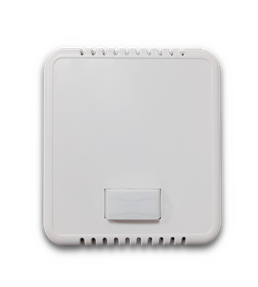
NB-IoT device with CO2, temperature, humidity and presence sensors from IMBUILDING.
To integrate the sensor with IoT Creators platform you simple register the sensor within the IoT Creators project by pushing the REGISTER DEVICE button.
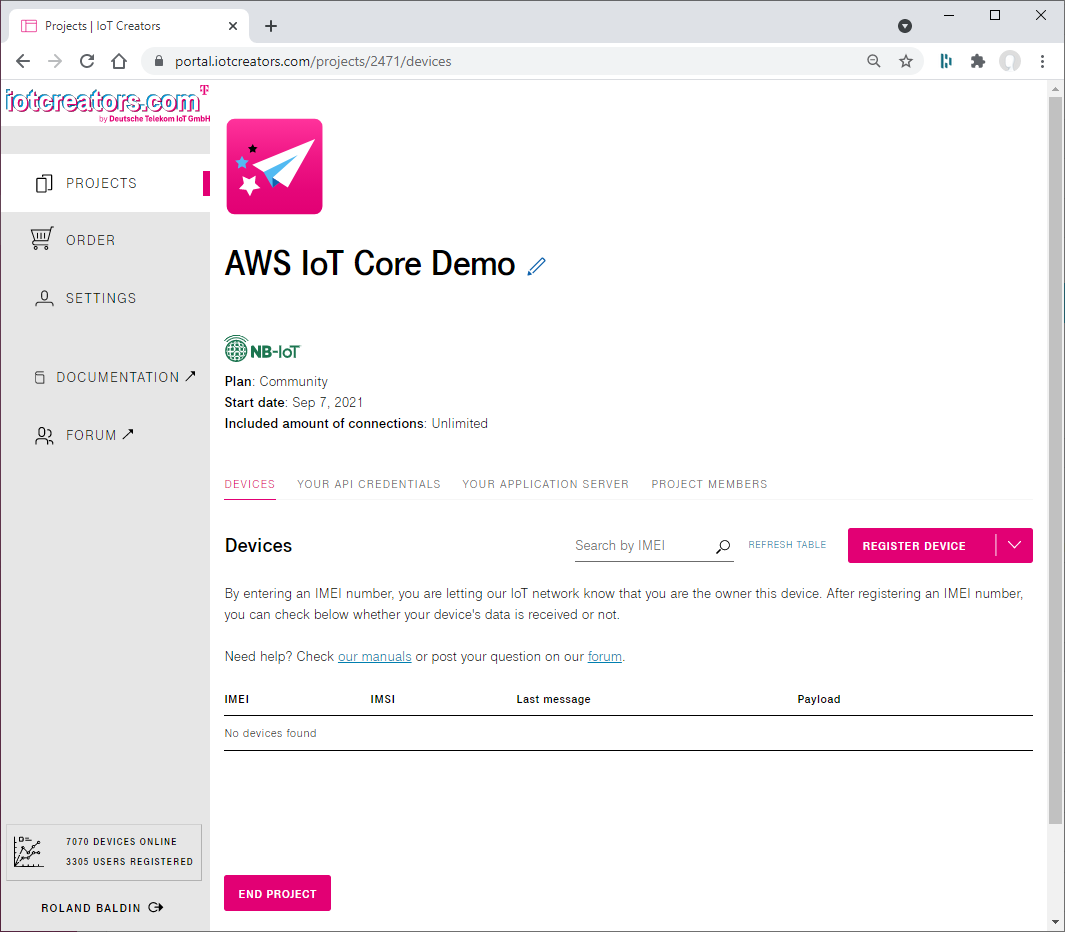
To integrate the device with IoT Creators just register it within the project.
After you pushed the REGISTER DEVICE button the dialog window to register new devices is opened.
Input the IMEI of the device and select UDP as IoT protocol.
To make device data decoding easier for you, you should know from which type of device a message comes from. IoT Creators provides the possibility to define for each device Uplink message tags. Those tags are attached to each uplink message of the device when it is forwarded to your application URL. To do so click Advanced Settings and then the +ADD button. As name for the for tag choose deviceType and as value IMBUILDING CO2".
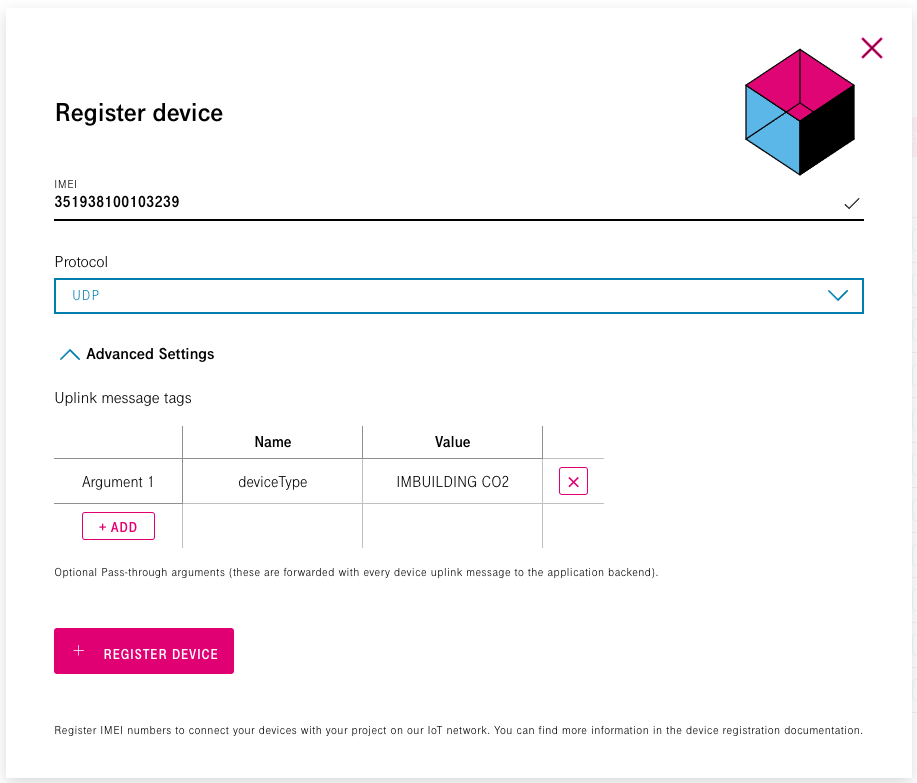
Input IMEI of the device and select UDP as IoT protocol. Use "IMBUILDING CO2" as deviceType for uplink message tag.
Push REGISTER DEVICE to perform the actual device registration.
After this you should see registered device in the device list of the project.
Step 2: Register sensor device in Azure IoT Central
To register your sensor in Azure IoT Central you need to perform the following three steps:
- Register new Device template for the type of your sensor in IoT Central.
- Register new device object in IoT Central for your sensor.
Register new Device Template in Azure IoT Central
IoT Central manages Device templates for the different types of devices. In our case we need to create a new Device template for the CO2 sensor from IMBUIILDING.
To do so perform the following steps:
- On the left side of IoT Central application click Device templates section.
- Click the button +New button above the list of available Device templates.
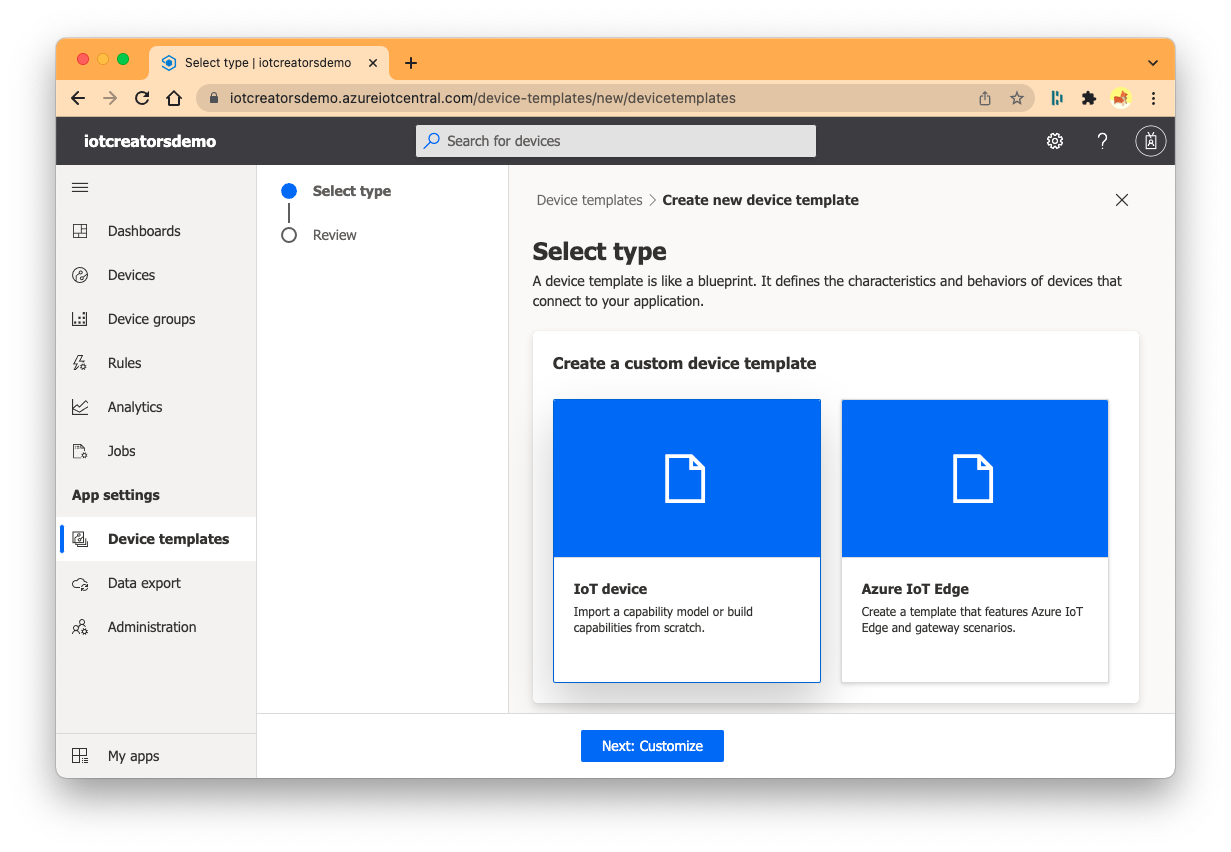
- Select the tile IoT device and click the button Next: Customize at the bottom of the window.
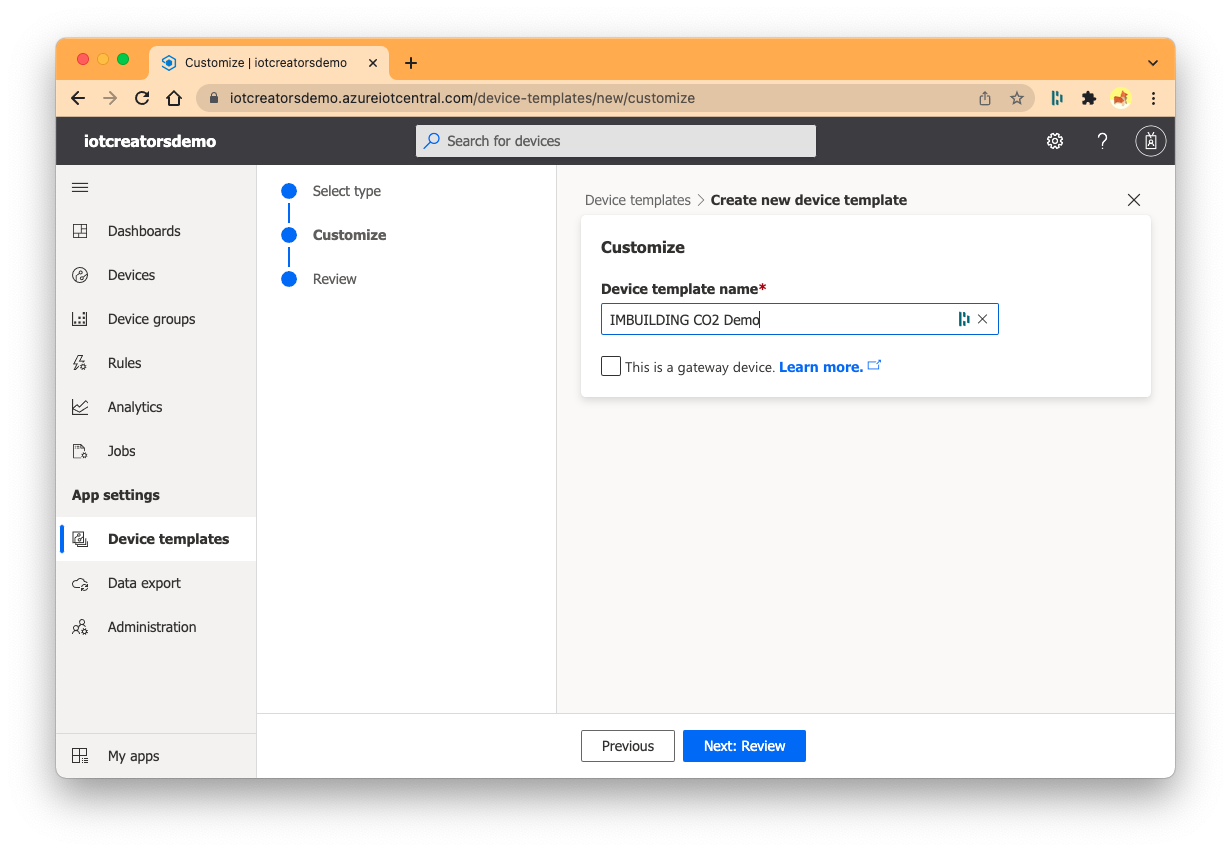
- In the Customize screen input IMBUILDING CO2 as name for the new Device template and push the Next: Review button.
- In the next review screen push the Create button at the bottom of the window.
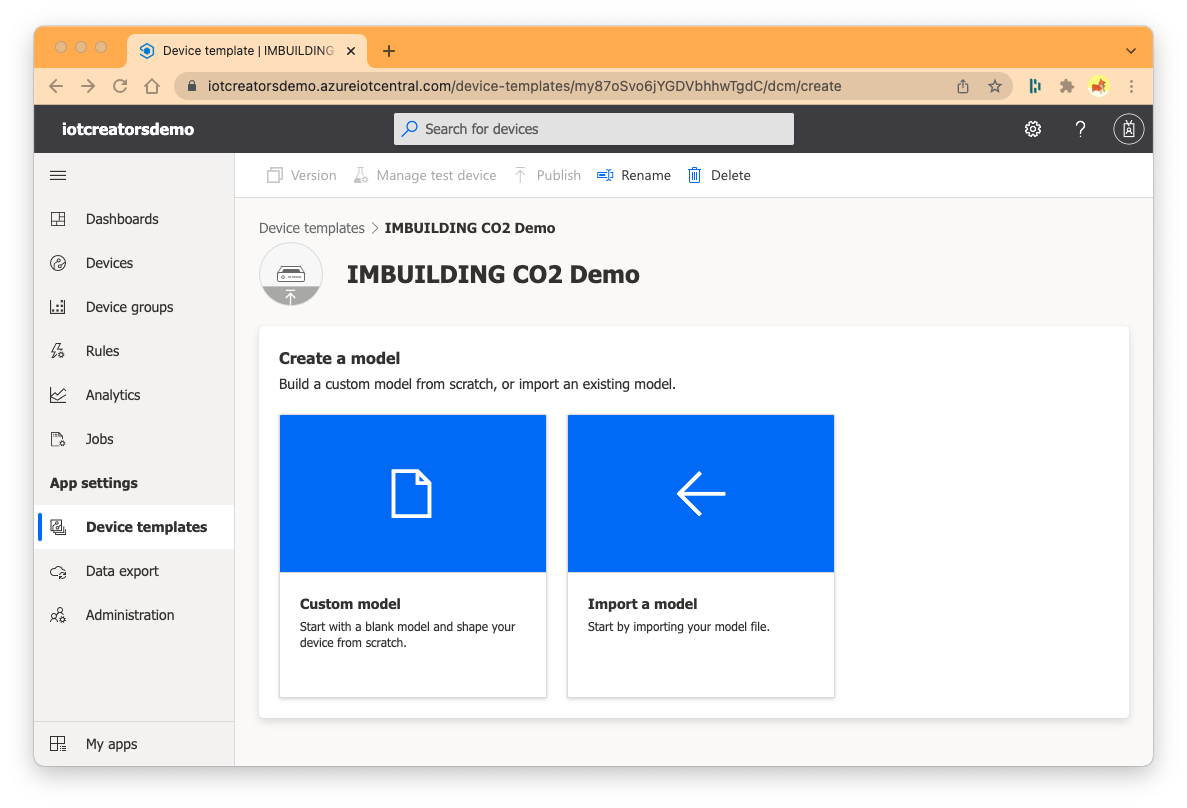
- To configure the data model of the sensor click on the tile Custom model.
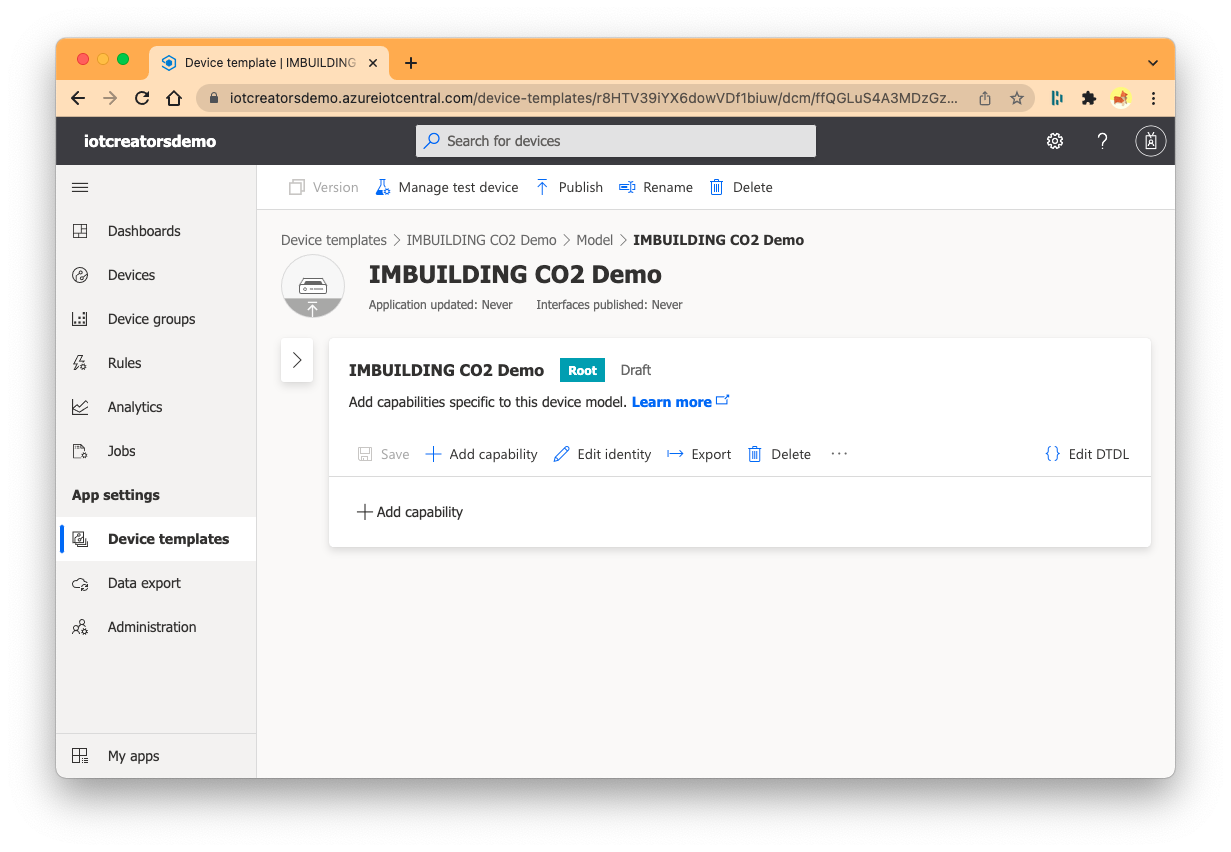
As next you will add for each of the sensor measurements
- CO2
- Temperature
- Humidity
- Presence
- Battery
a capability for the device template by clicking + Add capability button at bottom of the window.
The following table contains the values you can add for capabilities.
| Display name | Name | Capability type | Semantic type | Schema | Unit | Display unit |
|---|---|---|---|---|---|---|
| CO2 | CO2 | Telemetry | Double | ppm | ||
| Temperature | Temperature | Telemetry | Temperature | Double | Degree celsius | °C |
| Humidity | Humidity | Telemetry | Relative Humidity | Double | Percent | % |
| Presence | Presence | Telemetry | Integer | None | ||
| BatteryV | BatteryV | Telemetry | Double | Volt | V |
After you added for each measurement element of the sensor a capability it should look like the following image.
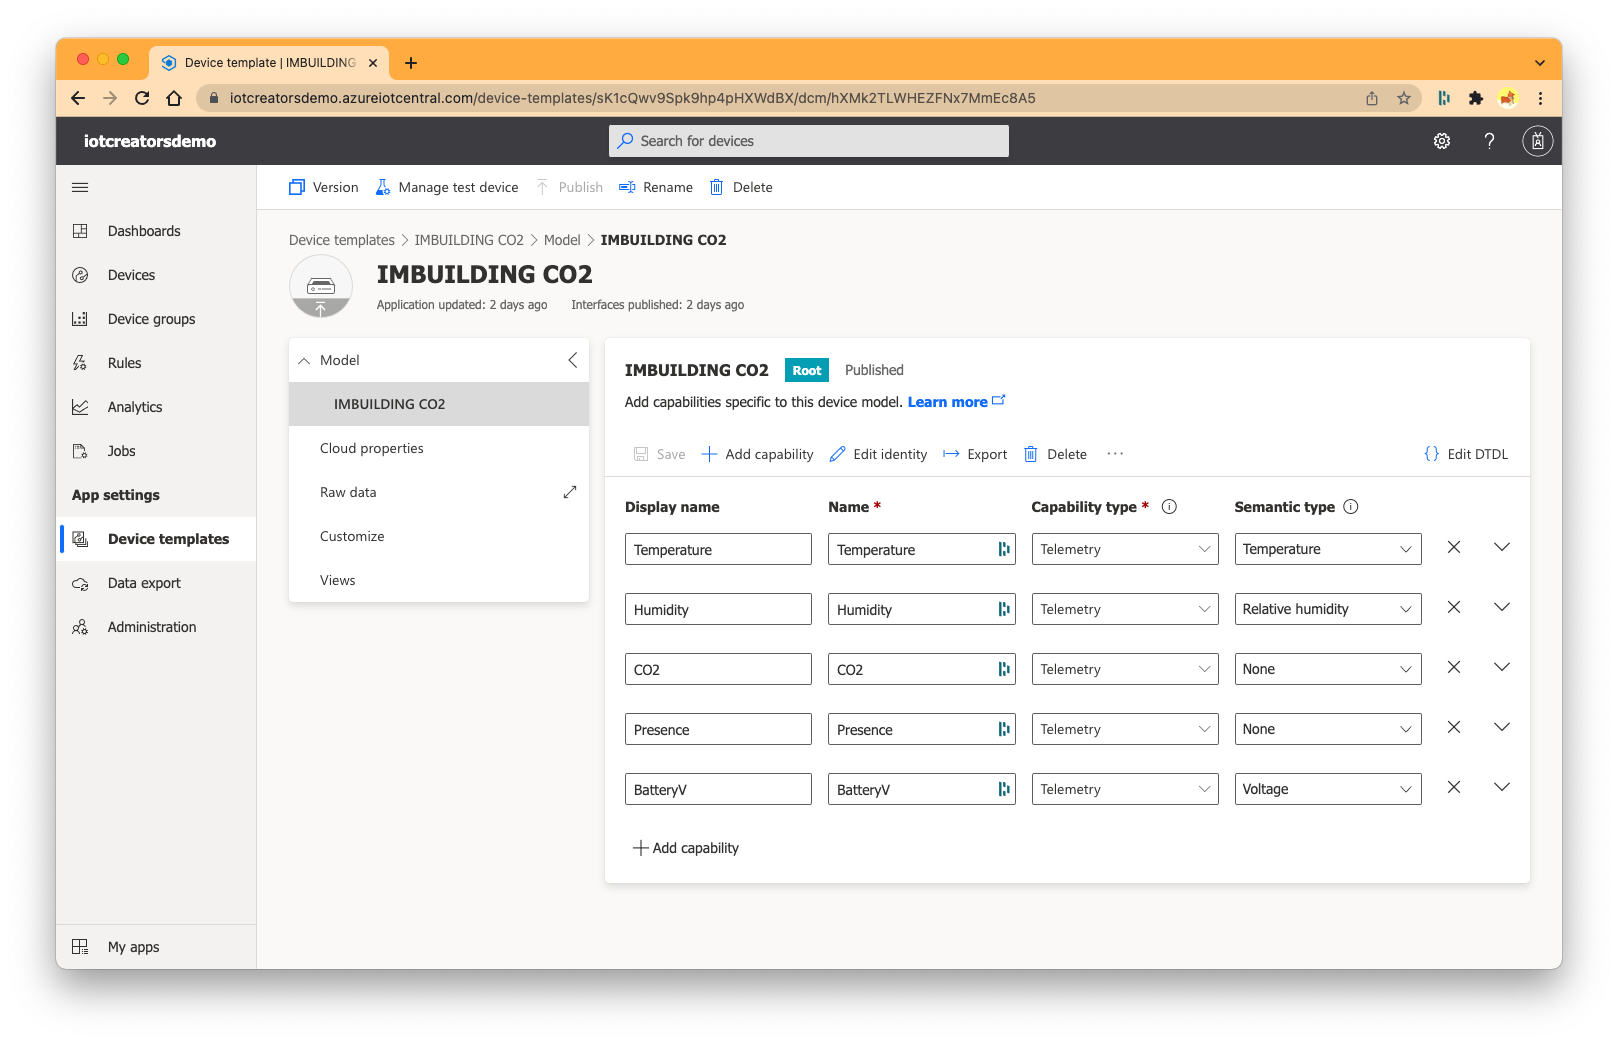
To configure the unit of measurements for the capability you can click on down arrow right to the capability. By this the input area of the Schema is opened (see image below). In this you can define the data type and the unit according to the table above.

After you configured the Device template for your device DON'T forget to push the Save button above your capabilities.
After you saved your Device template it needs to be published in order to be able to register devices with it.
To publish the Device template push the Publish button at top of the window.
Register new device object in IoT Central for your sensor
After you configured a new Device template you can register your device in Azure IoT Central.
Perform the following Steps:
- Click Devices section on the left side of the window and click the + New button above the list of devices.
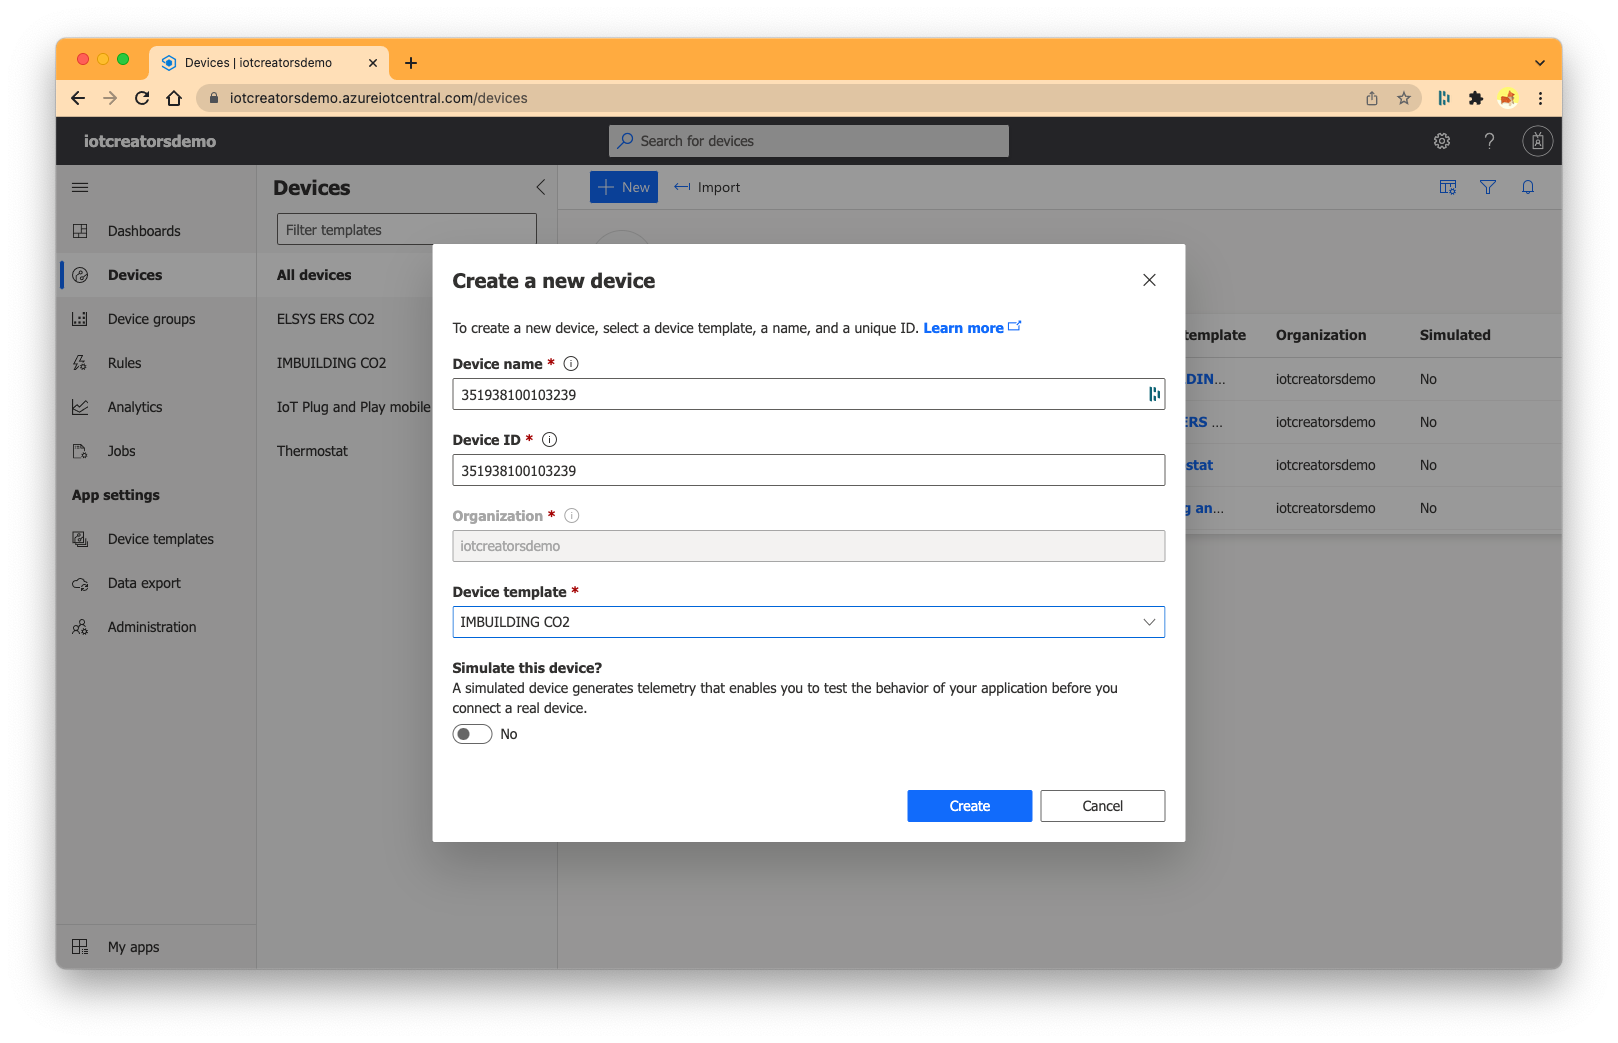
- In the Create a new device dialog window:
- Input for both the Device name and the Device ID the IMEI which you used as device id in IoT Creators portal before.
- Select your previous configured Device template
- Click the Create button
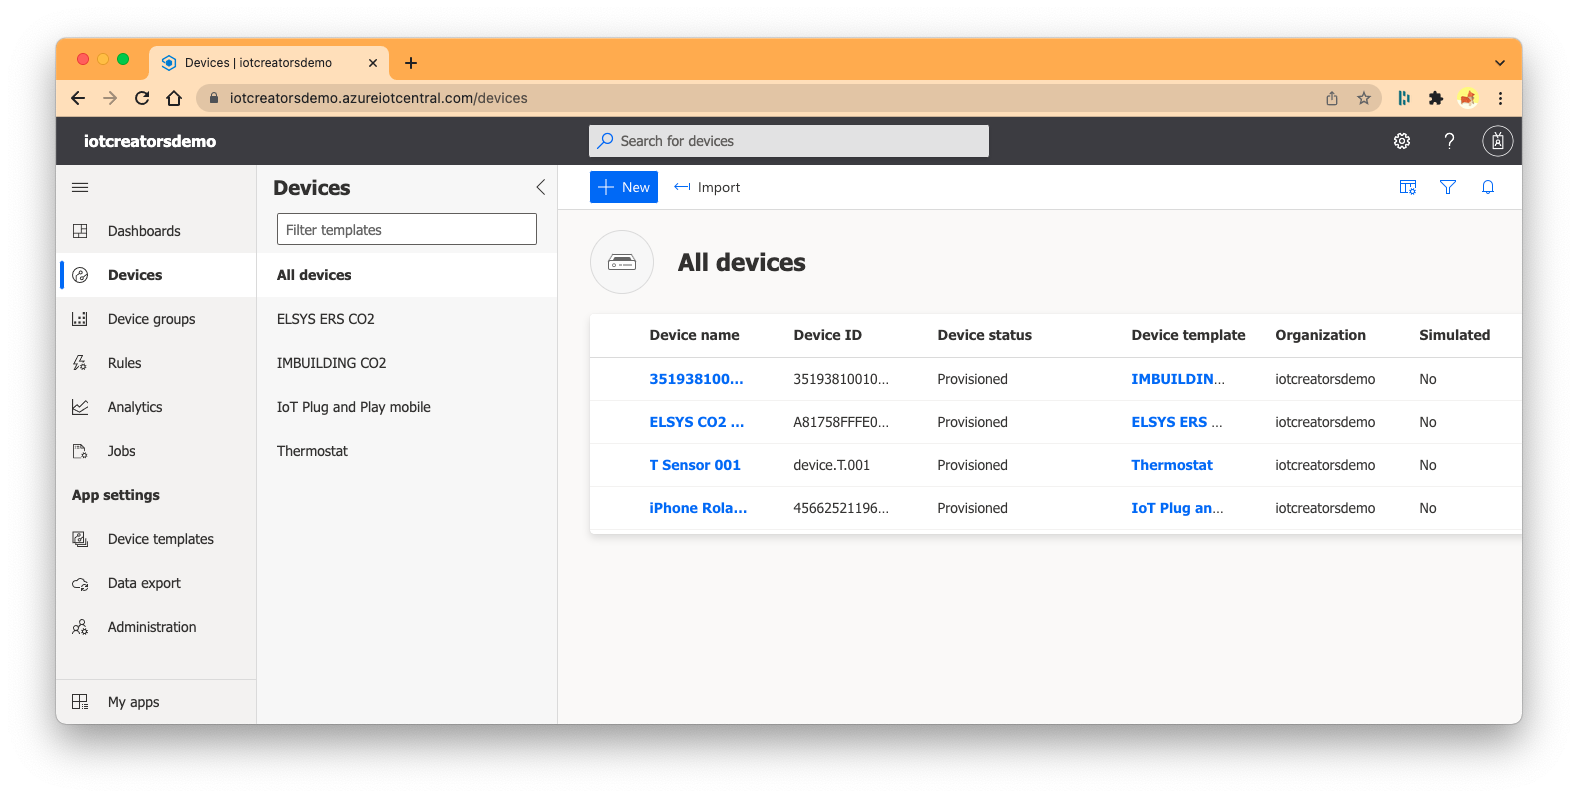
By this you registered a new device and it should appear in the list of devices.
Step 3: Implement simple Device Data Decoding Service
So far you registered your NB-IoT sensor in the IoT Creators and in the Azure IoT Central application. Before you can link both systems together you will implement a simple Device Data Decoding Service (DDD Service) as an Azure Function. The DDD server decodes the device specific HEX data into a very simple IoT Creators intermediate JSON format. The intermediate JSON format can be easily translated into the IoT Central format by the SCS Azure IoT Central Application Adapter of IoT Creator's.
To let decode the device data by the customer implemented Device Data Decoding service the Azure IoT Central Application Adapter from SCS calls the configured customer DDD service URL by a HTTP GET request.
The following JSON is a sample body of the GET request to the DDD server:
{
    "device": {
        "type": "IMBUILDING CO2",
        "id": "351938100103239"
    },
    "data": {
        "encoded": "01015410ec9ab71400014bad09251006044a01"
    }
}
The DDD service shall enrich the received request body with the element data.decoded element and return it to the requestor along with the status code 200.
{
    "device": {
        "type": "IMBUILDING CO2",
        "id": "351938100103239"
    },
    "data": {
        "encoded": "01015410ec9ab71400014bad09251006044a01",
        "decoded": {
          	"BatteryV": 3.31,
          	"Temperature": 23.41,
          	"Humidity": 41.02,
          	"CO2": 1098,
          	"Presence": 1
        }
    }
}
| Element | Description |
|---|---|
| device.type | Type of the device. The device type can be configured by the uplink message tag deviceType in the IoT Creators portal when you register the device (Register sensor device in IoT Creators platform ). If no deviceType as uplink message tag is configured the value is null. |
| device.id | IMEI with which the device has been registered in the IoT Creators portal. |
| data.encoded | The encoded payload of the message which shall be decoded. |
| data.decoded | The decoded payload from the DDD service. The Azure IoT Central Application Adapter expects the customer DDD service to store back decoded data to this element and return the complete body back. |
To implement your own DDD service as Azure Function you will perform the following steps:
- Create new Azure Function from a HTTP trigger template
- Paste sample code for DDD service into the Azure Function
- Test your DDD service
Create new Azure Function from a HTTP trigger template
- Open the list of Function Apps in Azure portal.
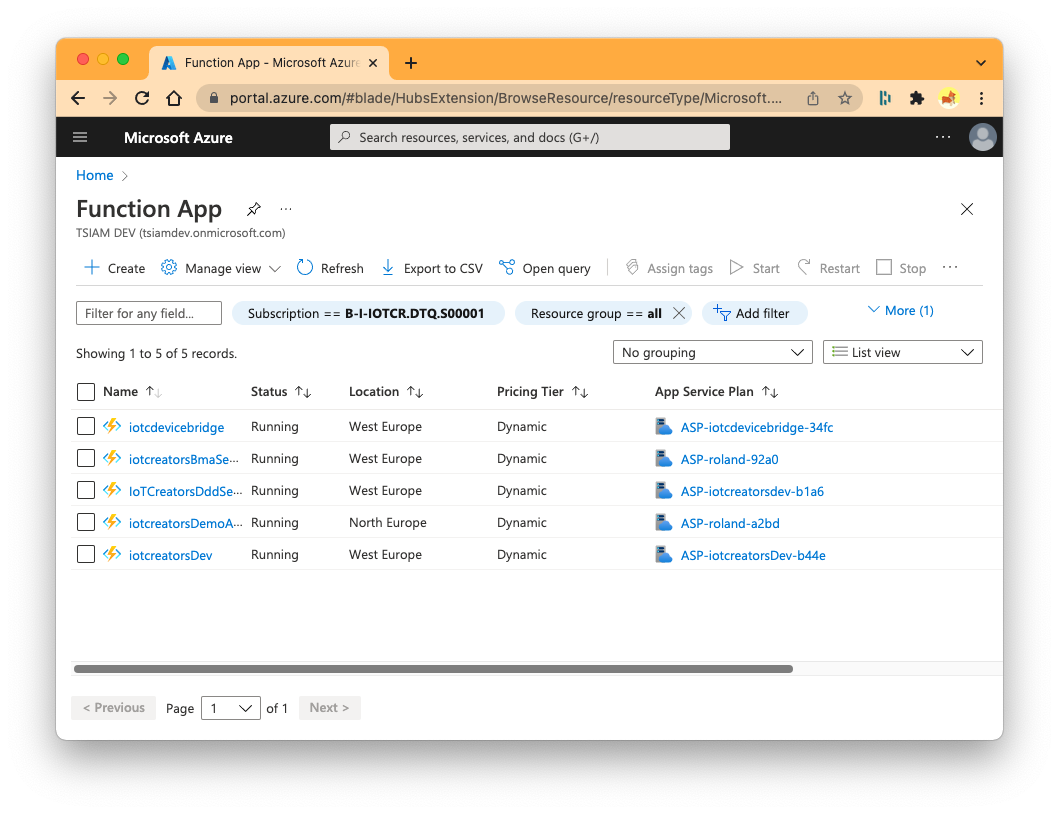
- Click the + Create button on the left top of window and fill out the Basics screen as shown below. For Subscription, Resource Group and Region use your own settings.
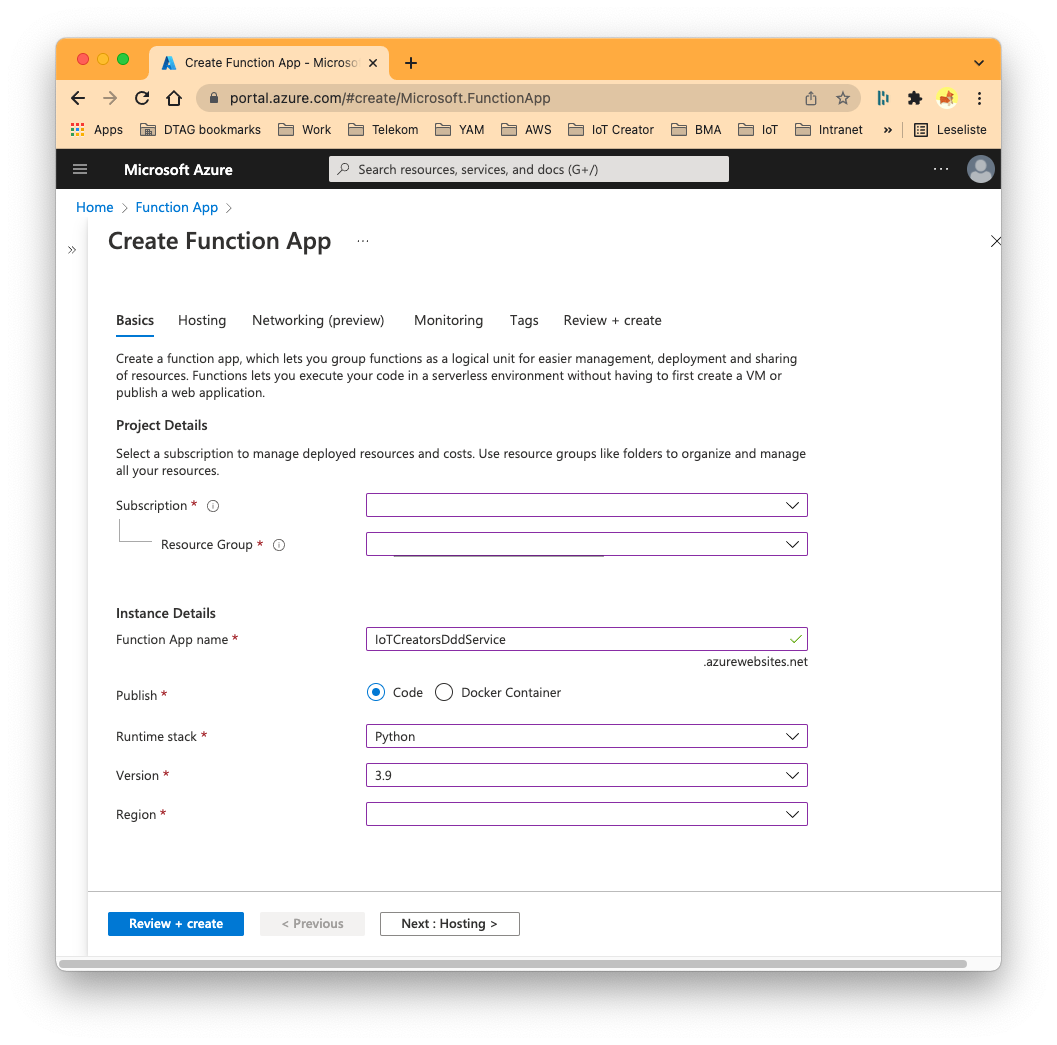
- In the Basics screen push the button Next: Hosting > and fill out the Hosting screen according to the sample below. For Storage account use your own settings.
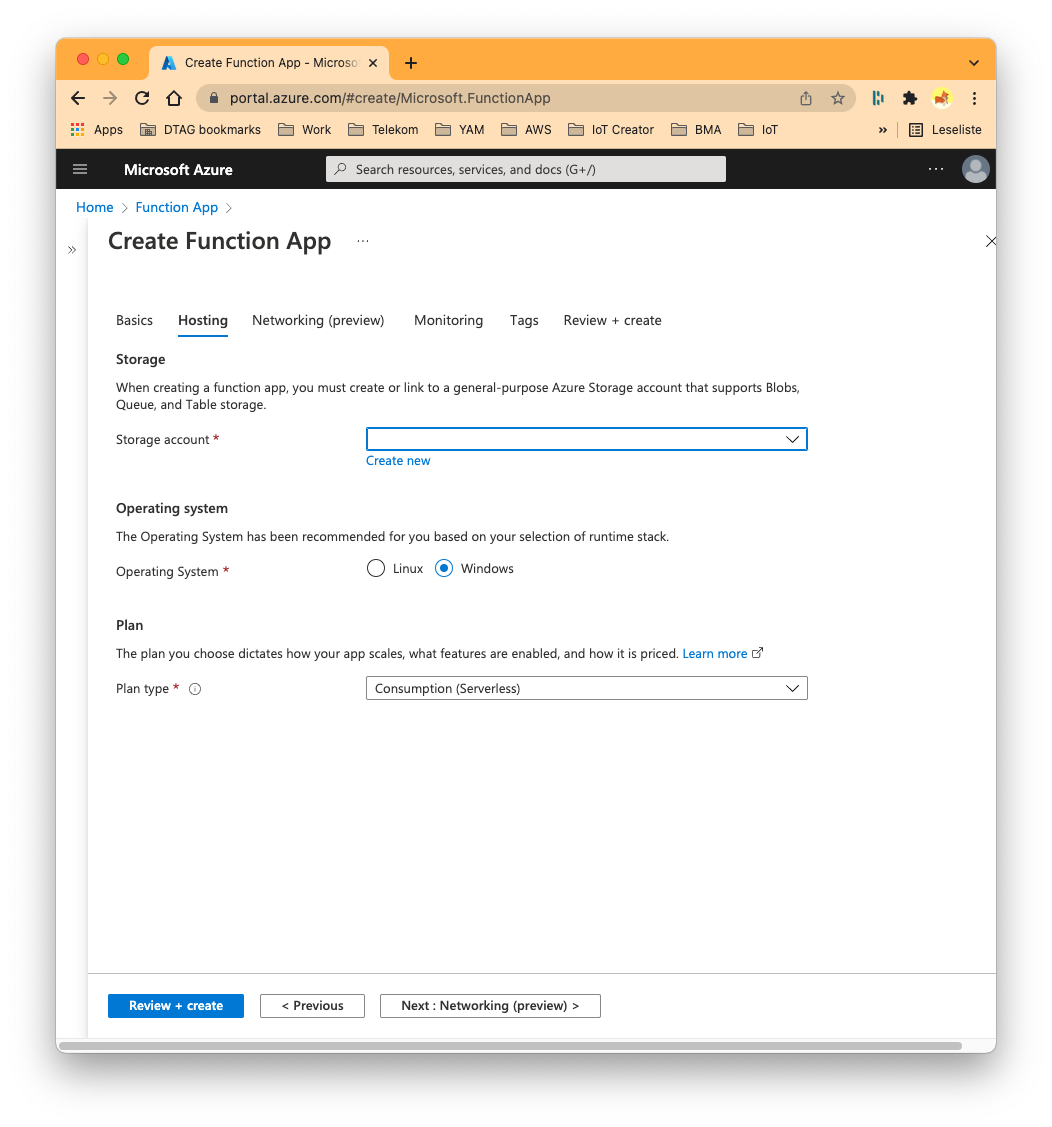
- Push the button Next: Networking > in the current Hosting screen and
- push the button Next: Monitoring > in the Networking screen.
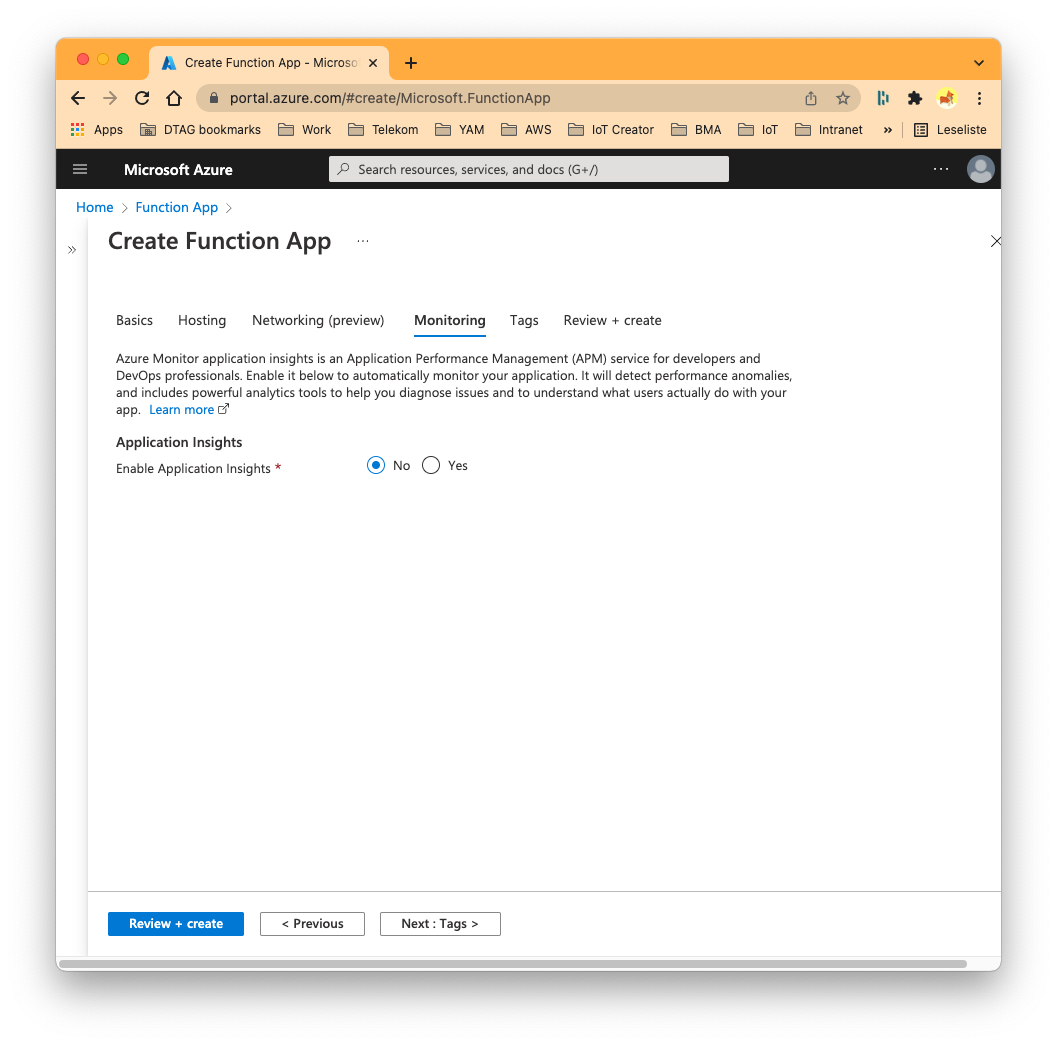
- Deactivate Application Insights by selecting the No radio button.
- Push the button Next: Tags > in the Monitoring screen.
- Push the button Next: Review + create >
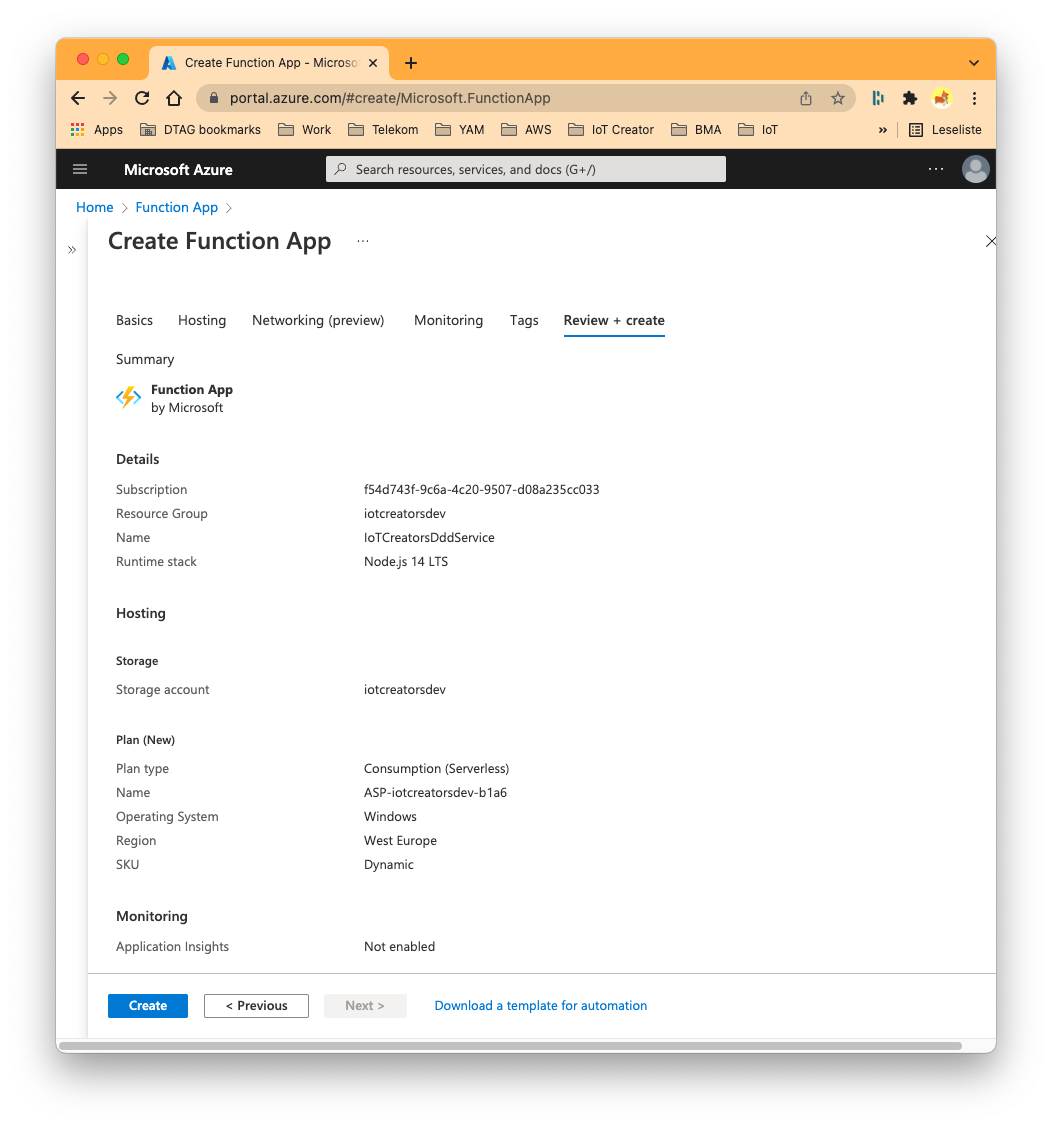
- In the review page check your input. If you are fine with it push the button Create
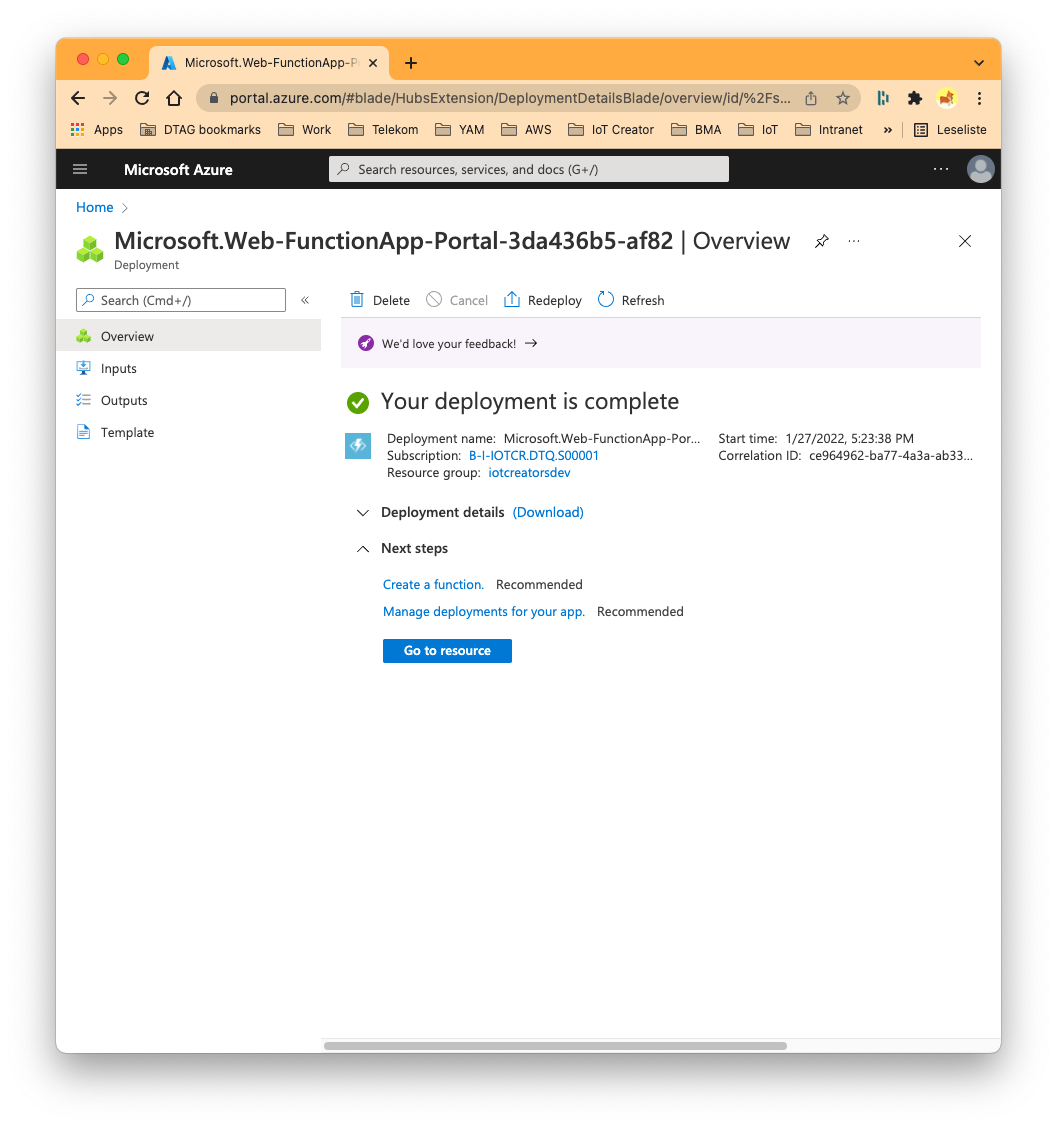
If you see the screen above you successfully created the Azure Function App which you will use to implement your Device Data Decoding service in the next steps.
- To open your Azure Function click the button Go to resource and select Functions in the panel on the left side of the window.
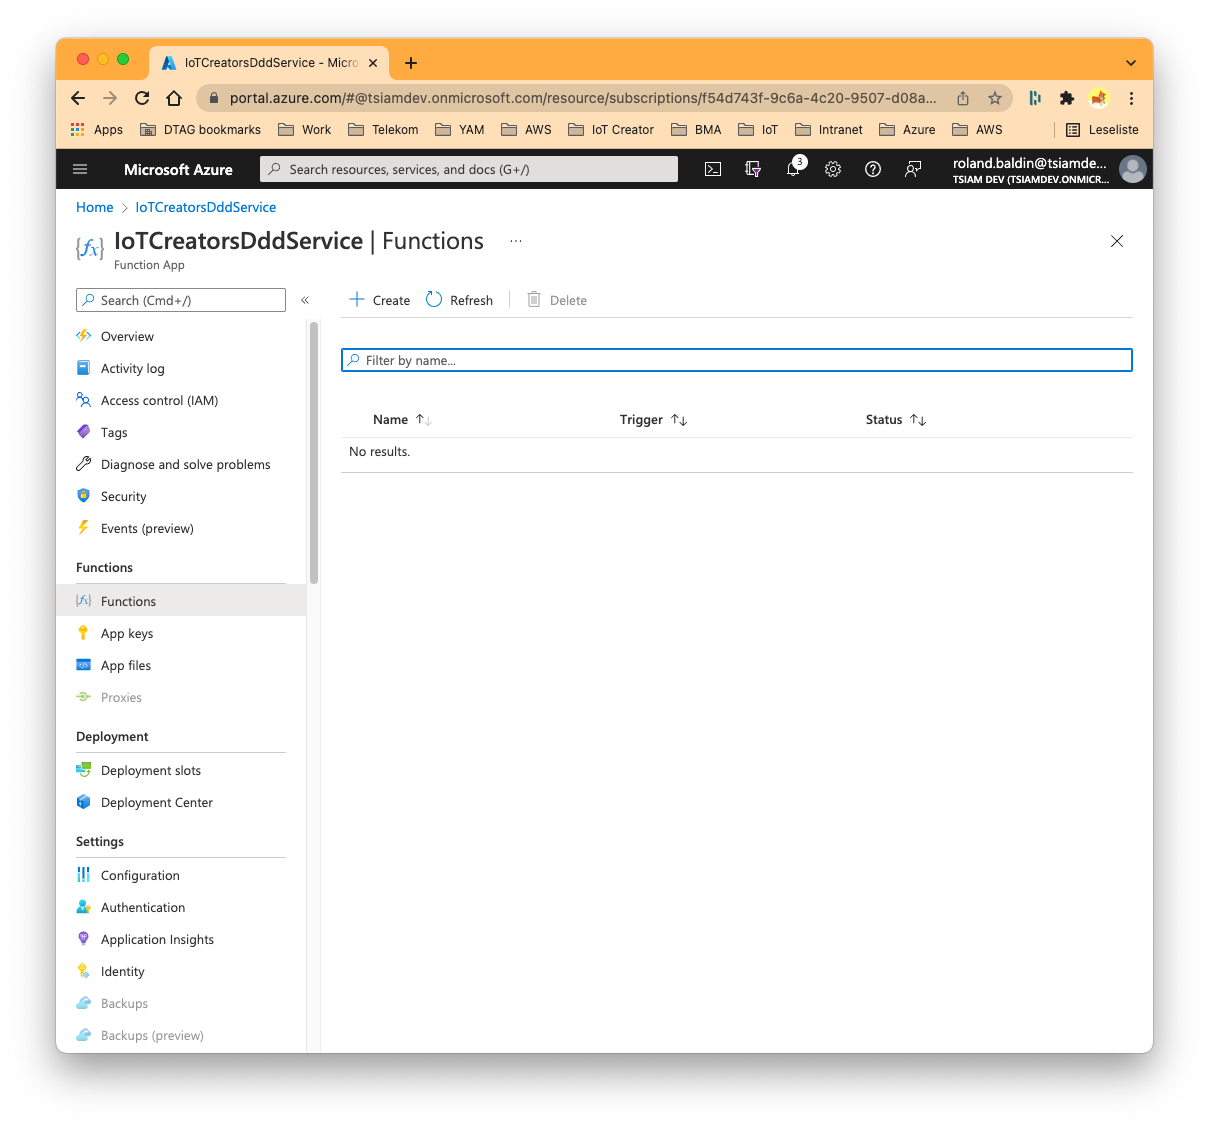
- To create the function for your DDD service push the + Create button on the left side above the list of functions.
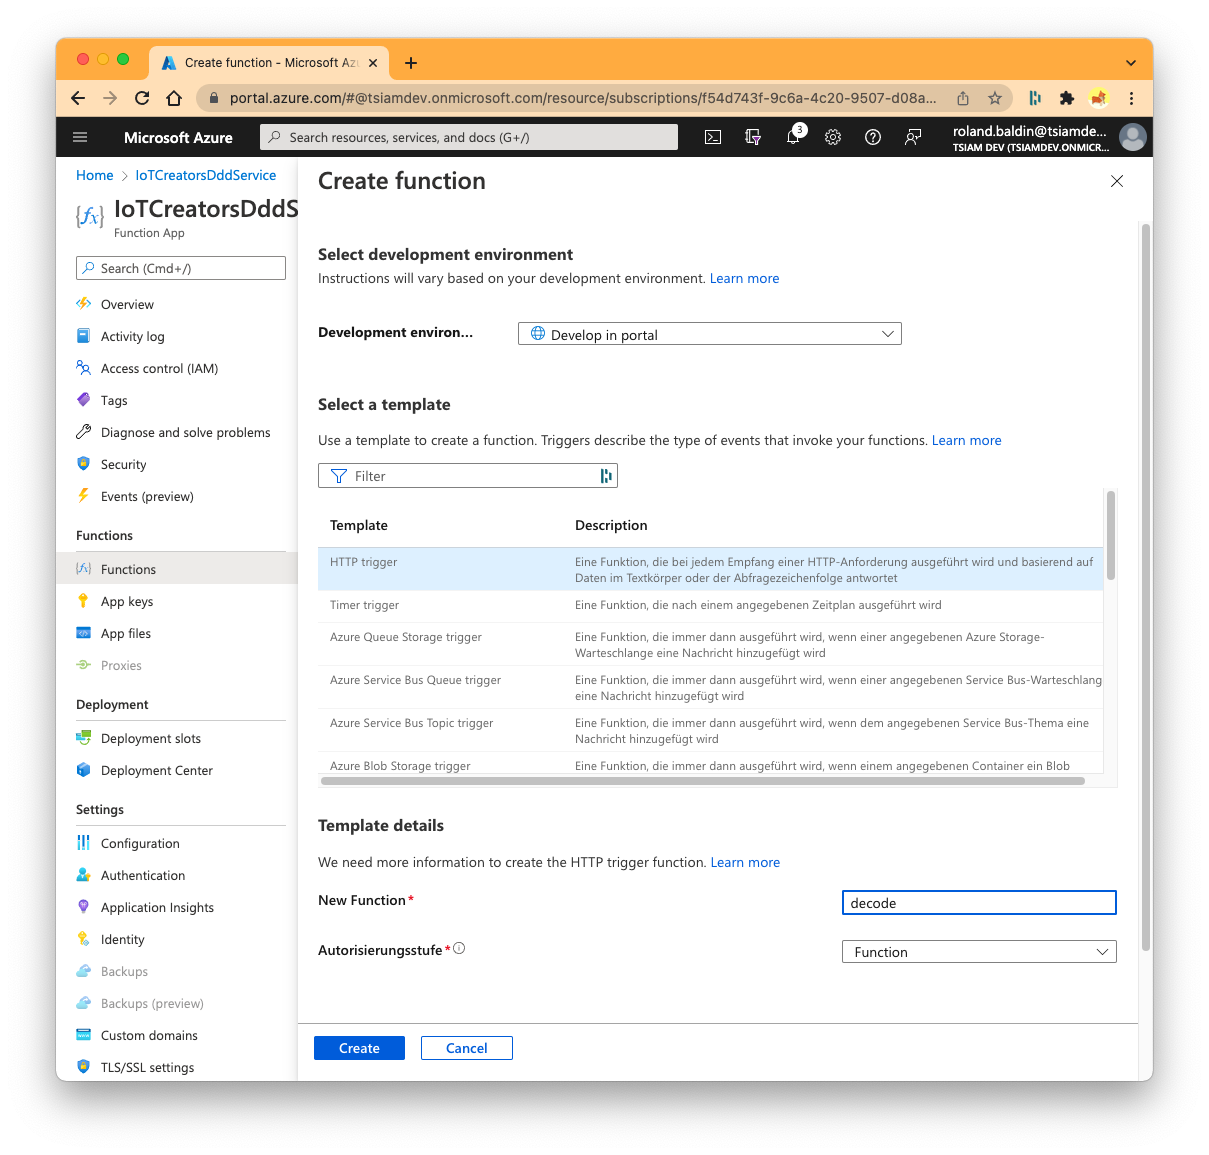
- In the Create function screen select and input
- Development environment: Develop in portal
- Template: HTTP trigger**
- New Function: decode
- Authorization: Function
- To let Azure create the function push the button Create. The screen of your newly created decode function is opened automatically.
- In the screen of your decode function select Code + Test in the panel on the left side. You will see the default JavaScript code of the template.
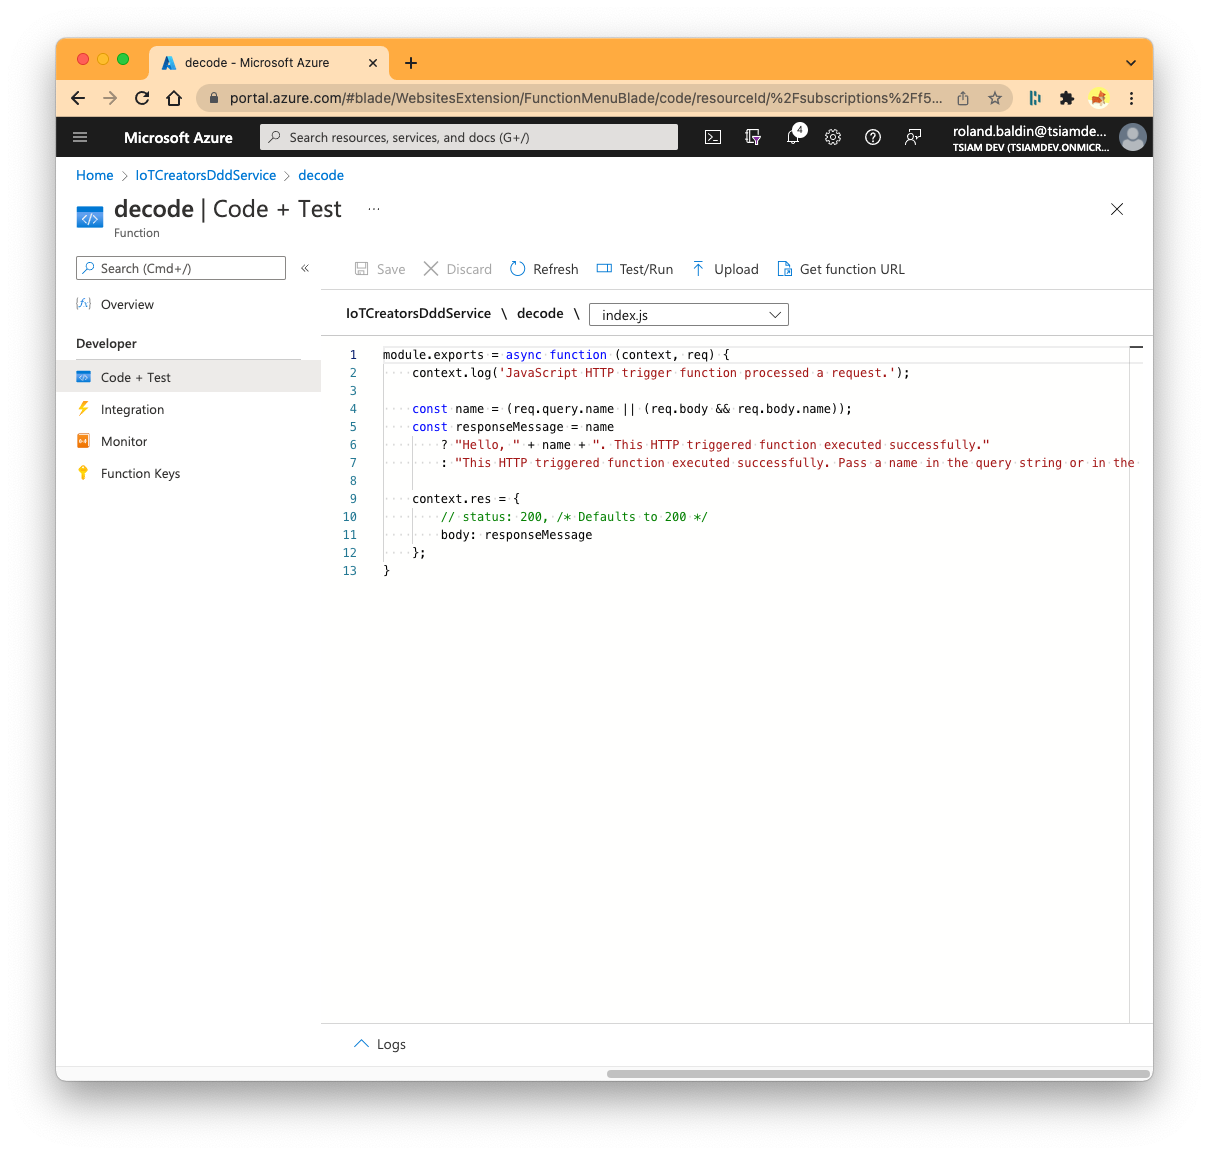
Paste sample code for DDD service into the Azure Function
As next you can replace the default JavaScript of the template with the JavaScript code below. This code decodes the payload of the IMBUILDING CO2 sensor to a simple JSON structure containing the elements CO2, Temperature, Humidity, Presence and BatteryV.
In case you do the tutorial with your own device you have to use a different implementation for the decoding function.
function decode(hexString) {
	var d = {};
	var hexData = hexString.match(/..?/g);
	var typeVersion = hexData[0] + hexData[1];

	if (typeVersion == '0101') {

		d.Status = parseInt(hexData[8], 16);
		d.BatteryV = parseInt(hexData[9] + hexData[10], 16) / 100;
		d.Temperature = parseInt(hexData[12] + hexData[13], 16) / 100;
		d.Humidity = parseInt(hexData[14] + hexData[15], 16) / 100;
		d.CO2 = parseInt(hexData[16] + hexData[17], 16);
		d.Presence = parseInt(hexData[18], 16);

	} else {
        throw "Unsupported type-version " + typeVersion;
  }

  return d;
}

module.exports = async function (context, req) {
    context.log.info("### BEGIN #########################################################")
    context.log.info("Triggered by HTTP request");
    context.log.info("REQUEST BODY: " + JSON.stringify(req.body, null, 4));

    let responseBody = null;
    let responseStatus = 200;

    try {
        // If no data element in the body can be found return with error.
        if (!req.body || !req.body.data || !req.body.data.encoded) {
            throw "No encoded data found in body."
        }

        // Decode the data
        req.body.data.decoded = decode(req.body.data.encoded);

        // We return the input body enriched with the decoded data.
        responseBody = req.body;

      	context.log.info("DECODED MSG: " + JSON.stringify(req.body.data.decoded, null, 4));

    } catch (err) {
        responseStatus = 400;
        responseBody = err

    } finally {
        context.res = {
            status: responseStatus,
            body: responseBody
        };
    }
		context.log.info("### END #########################################################")
    context.log.info("")
    context.log.info("")

}
As next you will test your DDD server.
Test your DDD service
To verify your DDD service you should test it at first from inside of the Azure Function portal and as seconde from outside of Azure.
To test your DDD service from inside perform the following steps:
- Select Code + Test on the left side within the Developer menu and push the Test/Run button above the code window.
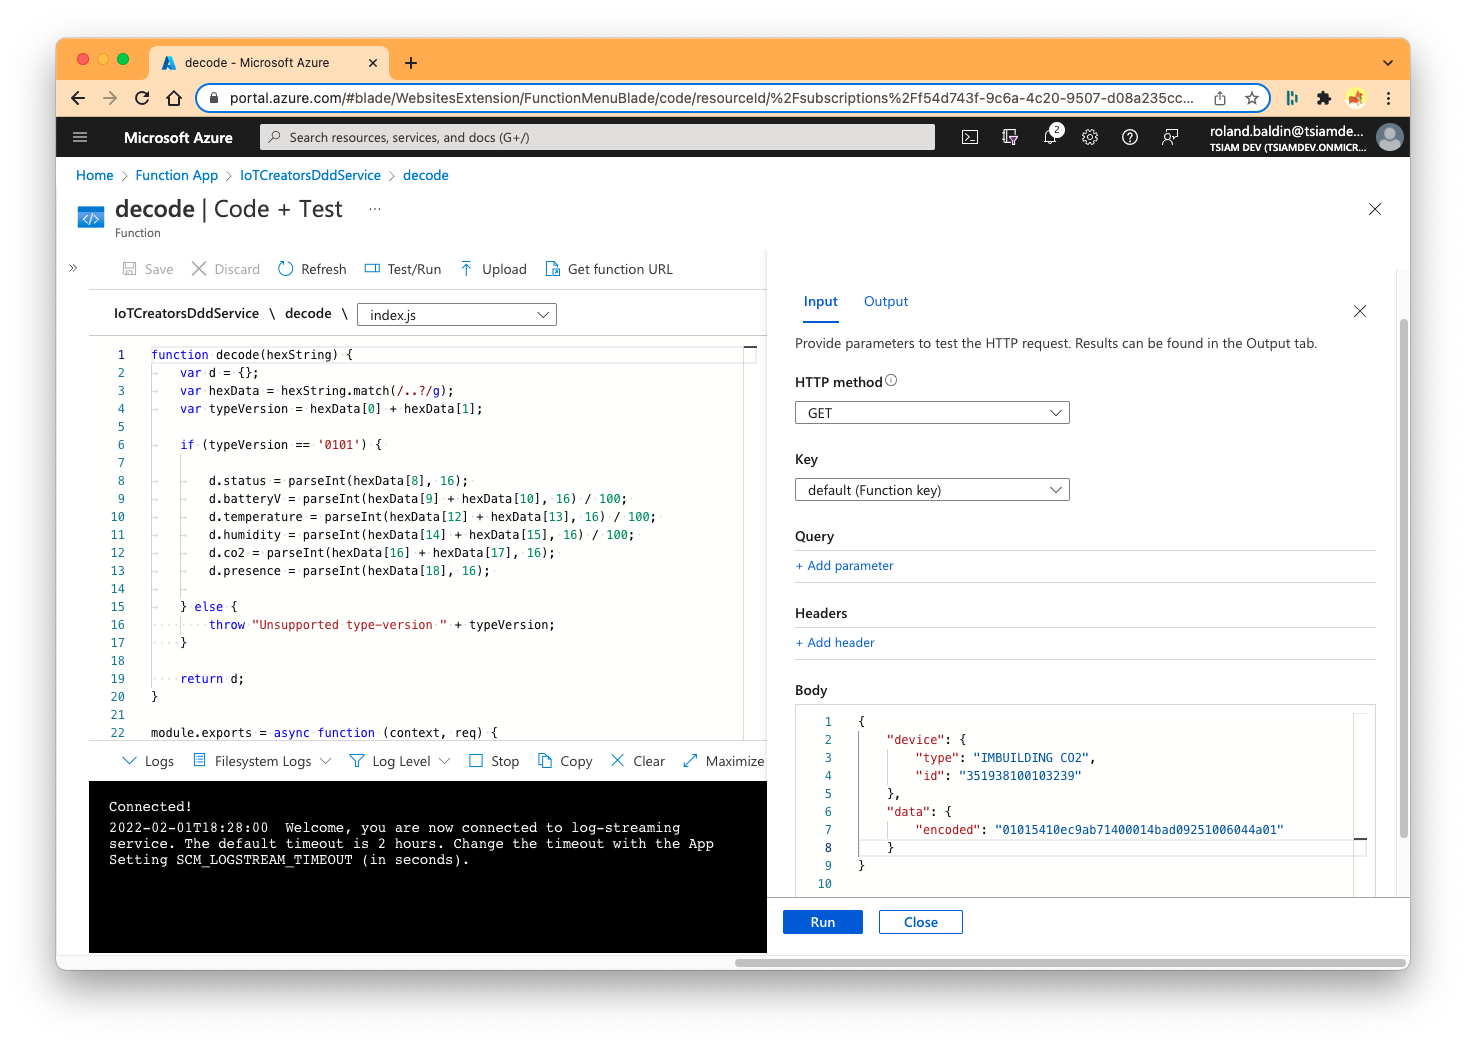
- In the test screen on the right side of the window do the following inputs
- HTTP method: GET
- Key: default (Function key)
- Body: see JSON body below.
{
    "device": {
        "type": "IMBUILDING CO2",
        "id": "351938100103239"
    },
    "data": {
        "encoded": "01015410ec9ab71400014bad09251006044a01"
    }
}
In case you do the tutorial with your own device you have to use a different value for the type of your device and different value for the encoded element.
- Click the Run button at the bottom of the test screen.
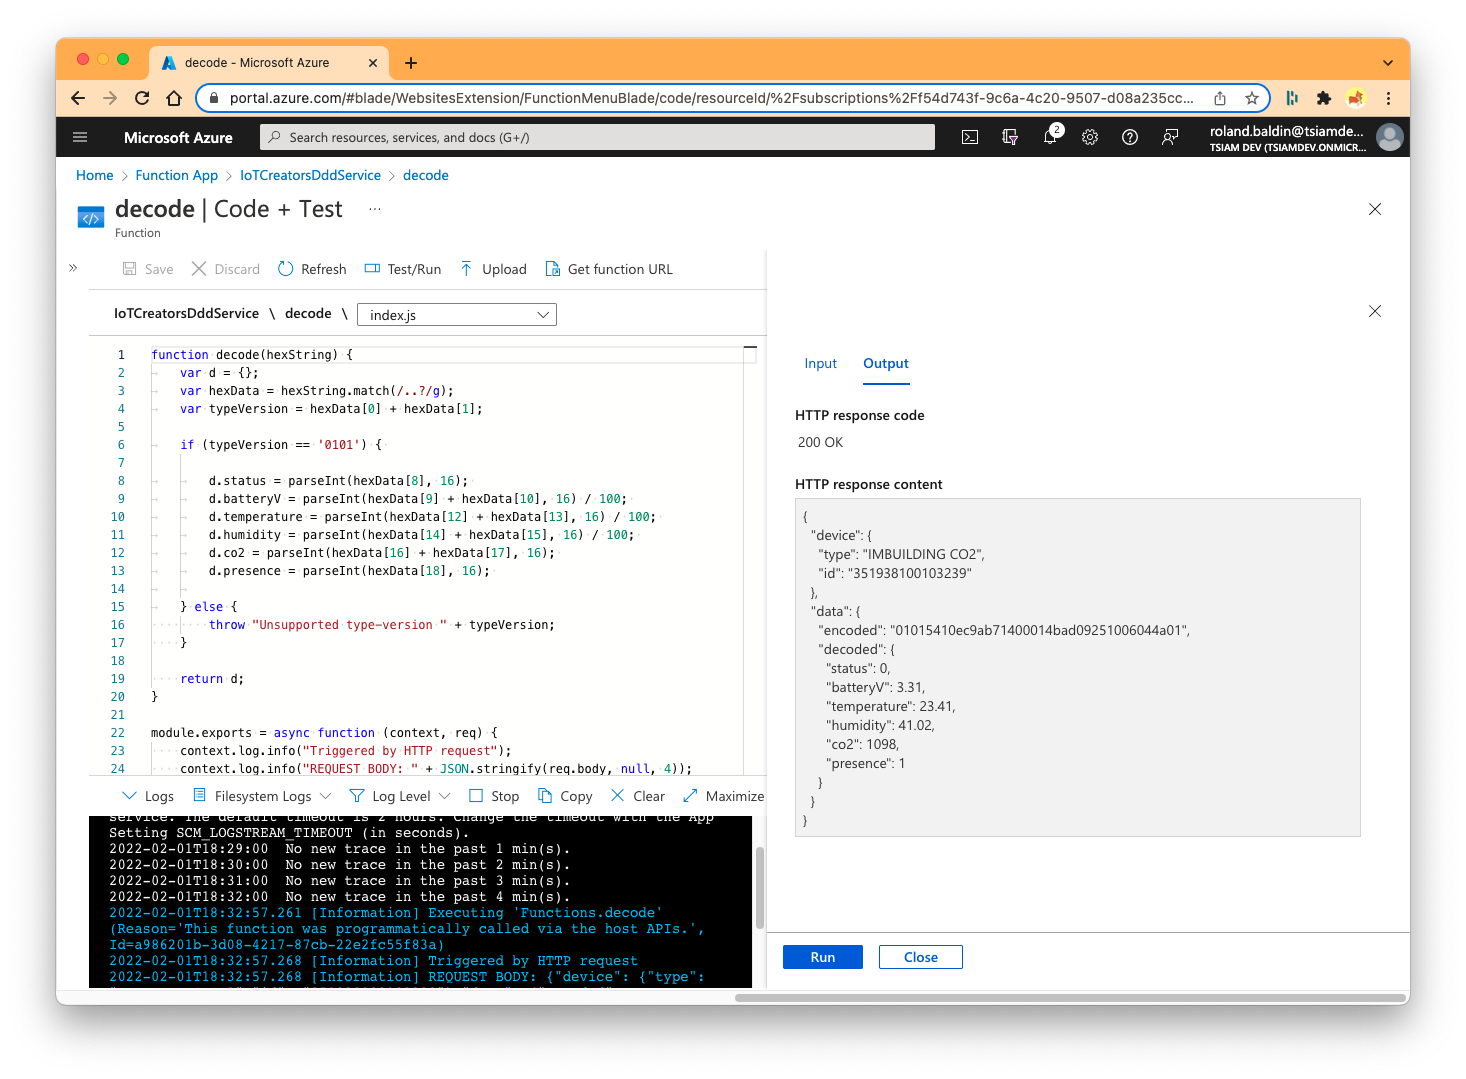
If you can see in the Output tab of the test screen that your DDD Azure Function returns 200 as HTTP code and a meaningful body your test have been successfully.
As next you can request your Azure Function from outside Azure via the internet. To do so you can use the shell command curl or Postman web application.
To get the URL of your DDD Azure Function you need to open it, select Code + Test screen in the Developer section and copy the URL into your clipboard.
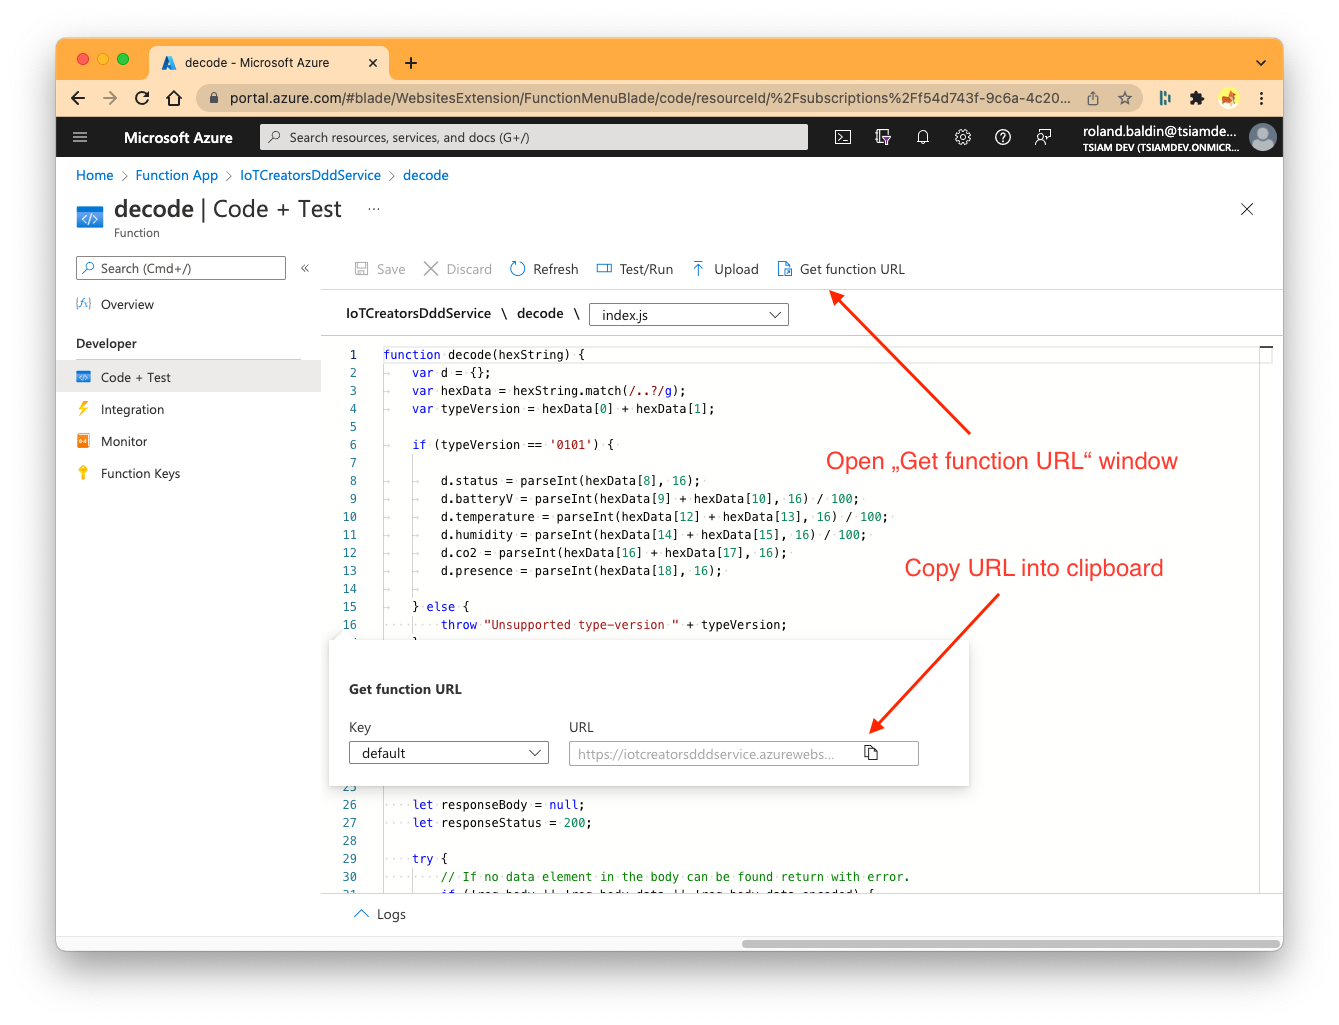
As next you can request your DDD service with curl. It should look like this:
curl --request GET \
     --url 'https://iotcreatorsdddservice.azurewebsites.net/api/decode?code=a0meXGbTastsSKFa3pr7Ax4LA==' \
     --header 'Accept: application/json' \
     --header 'Content-Type: application/json' \
     --data '
{
    "device": {
        "type": "IMBUILDING CO2",
        "id": "351938100103239"
    },
    "data": {
        "encoded": "01015410ec9ab71400014bad09251006044a01"
    }
}
'
If everything works fine you should get as response some like this:
{
  "device": {
    "type": "IMBUILDING CO2",
    "id": "351938100103239"
  },
  "data": {
    "encoded": "01015410ec9ab71400014bad09251006044a01",
    "decoded": {
      "status": 0,
      "batteryV": 3.31,
      "temperature": 23.41,
      "humidity": 41.02,
      "co2": 1098,
      "presence": 1
    }
  }
}
Great !! 👏 👏 You just created your first tested DDD service. 👍👍
You are now in a good shape to continue with the integration of Azure IoT Central and IoT Creators.
Step 4: Integrate IoT Creators platform with Azure IoT Central
So far you performed the following steps:
- Register your device in IoT Creators platform
- Register the type of your device as a device template in Azure IoT Central
- Register your device in Azure IoT Central
- Implement your customer DDD service for your device as an Azure Function
The last step to build your end-to-end IoT solution is the actual integration of IoT Creators SCS platform with your Azure IoT Central.
To integrate IoT Creators with Azure IoT Central it is required to in install the Azure IoT Device Bridge in your Azure subscription. As the name already suggests the Azure IoT Device Bridge bridges over from external device message sources like IoT Creators SCS platform to Azure IoT Central. The Azure IoT Device Bridge exposes a single HTTP endpoint to which the uplink messages of all devices can be posted. By this it is possible to inject uplink messages to Azure IoT Central without the need of using the Azure Device SDK on the devices.
In the following you will perform the following two major tasks
- Install Azure IoT Device Bridge for your Azure IoT Central
- Configure IoT Creators to integrate with Azure IoT Device Bridget
Install Azure IoT Device Bridge for your Azure IoT Central
Azure provides two different types of IoT Devices Bridges:
- a unidirectional one which supports only to post uplink messages into IoT Device Bridge (https://github.com/Azure/iotc-device-bridge)
- a bidirectional one which supports the bidirectional communication of uplink and downlink messages. Beside this it supports also the access to device tween via the endpoint (https://github.com/Azure/iot-central-bidirectional-device-bridge).
In this tutorial you will install the simple unidirectional IoT Device Bridge to post uplink messages from IoT Creators.
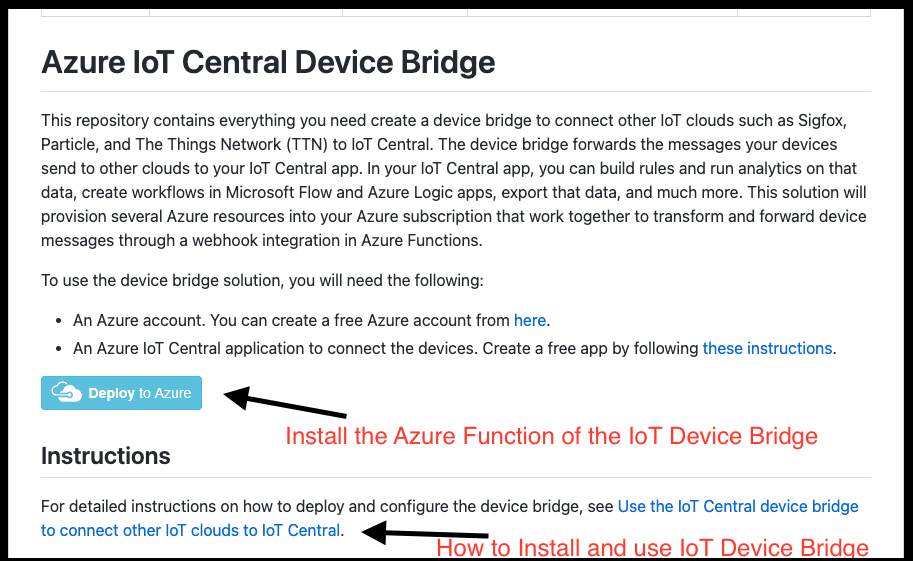
You can find the Microsofts' installation guide for the IoT Device Bridge at https://github.com/Azure/iotc-device-bridge. In this documentation you will find the link to deploy the Azure Function of the IoT Device Bridge. Additionally you will find some infos how to install the IoT Device Bridge at https://docs.microsoft.com/en-us/azure/iot-central/core/howto-build-iotc-device-bridge .
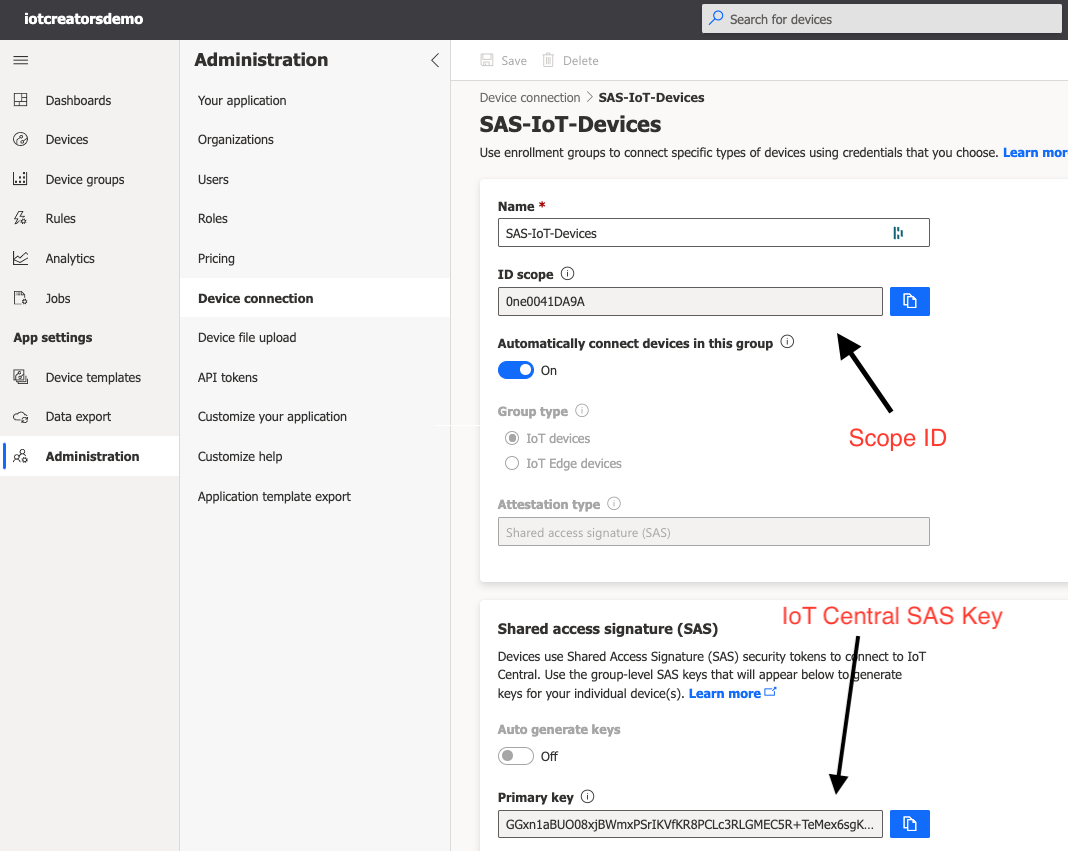
In the deployment form you are asked to input the two fields Scope ID and IoT Central SAS Key. Unfortunately it is not intuitive from where those information shall be taken from. To find it you have to got into your IoT Central and select *Administration/Device connection/SAS-IoT-Devices. In this screen you can find the required info as shown below.
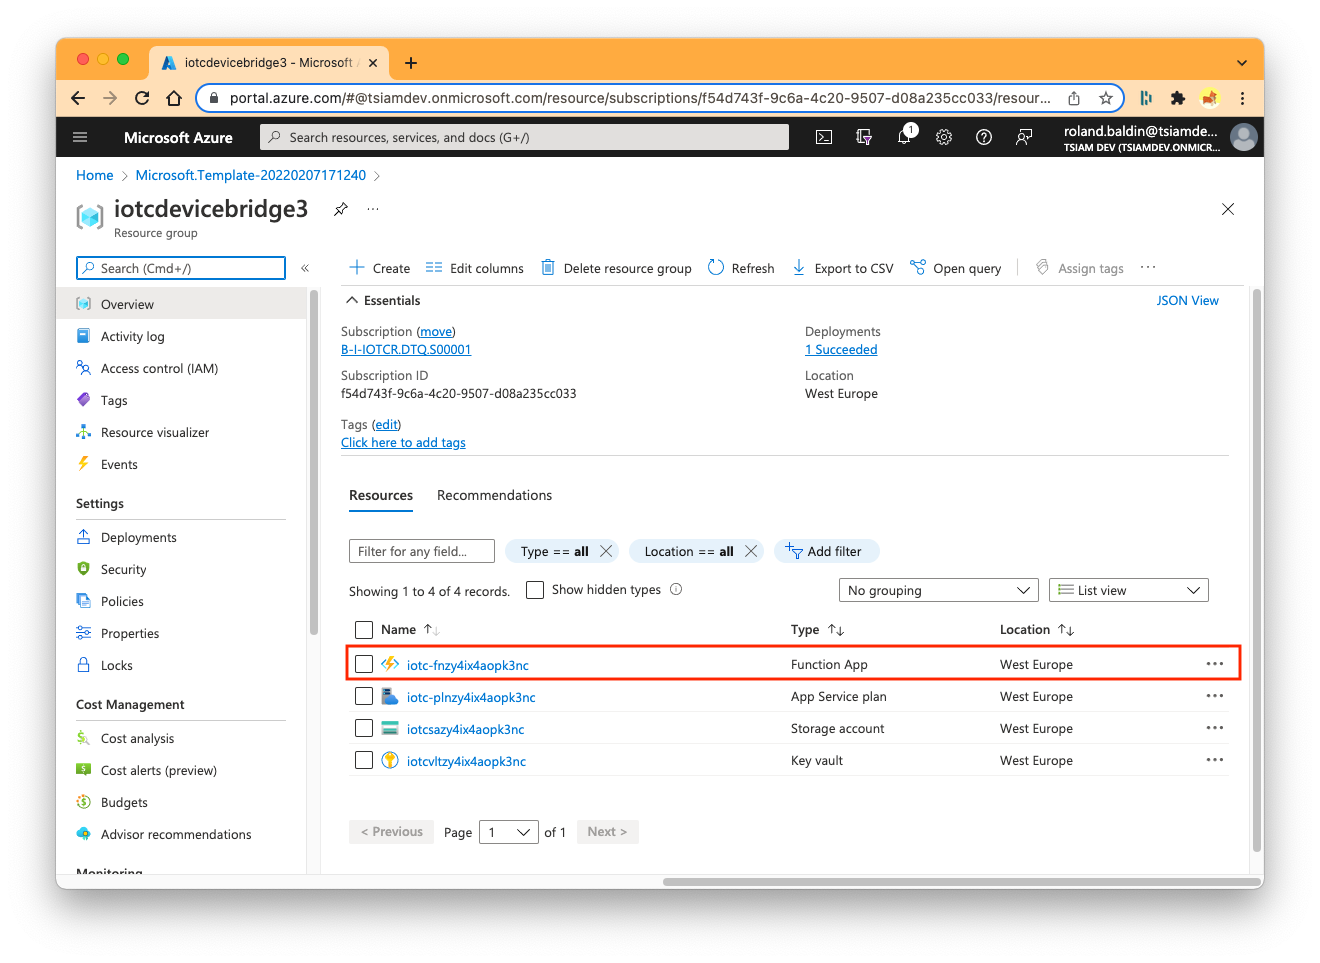
In case your deployment of the IoT Device Bridge has been successfully you should find the following components in the Azure Resource Group of your deployment:
In the next step you need to install all required JavaScript/nodejs packages to your Function. To do so open the newly created Function App select in the section Development Tools* the point Console**.
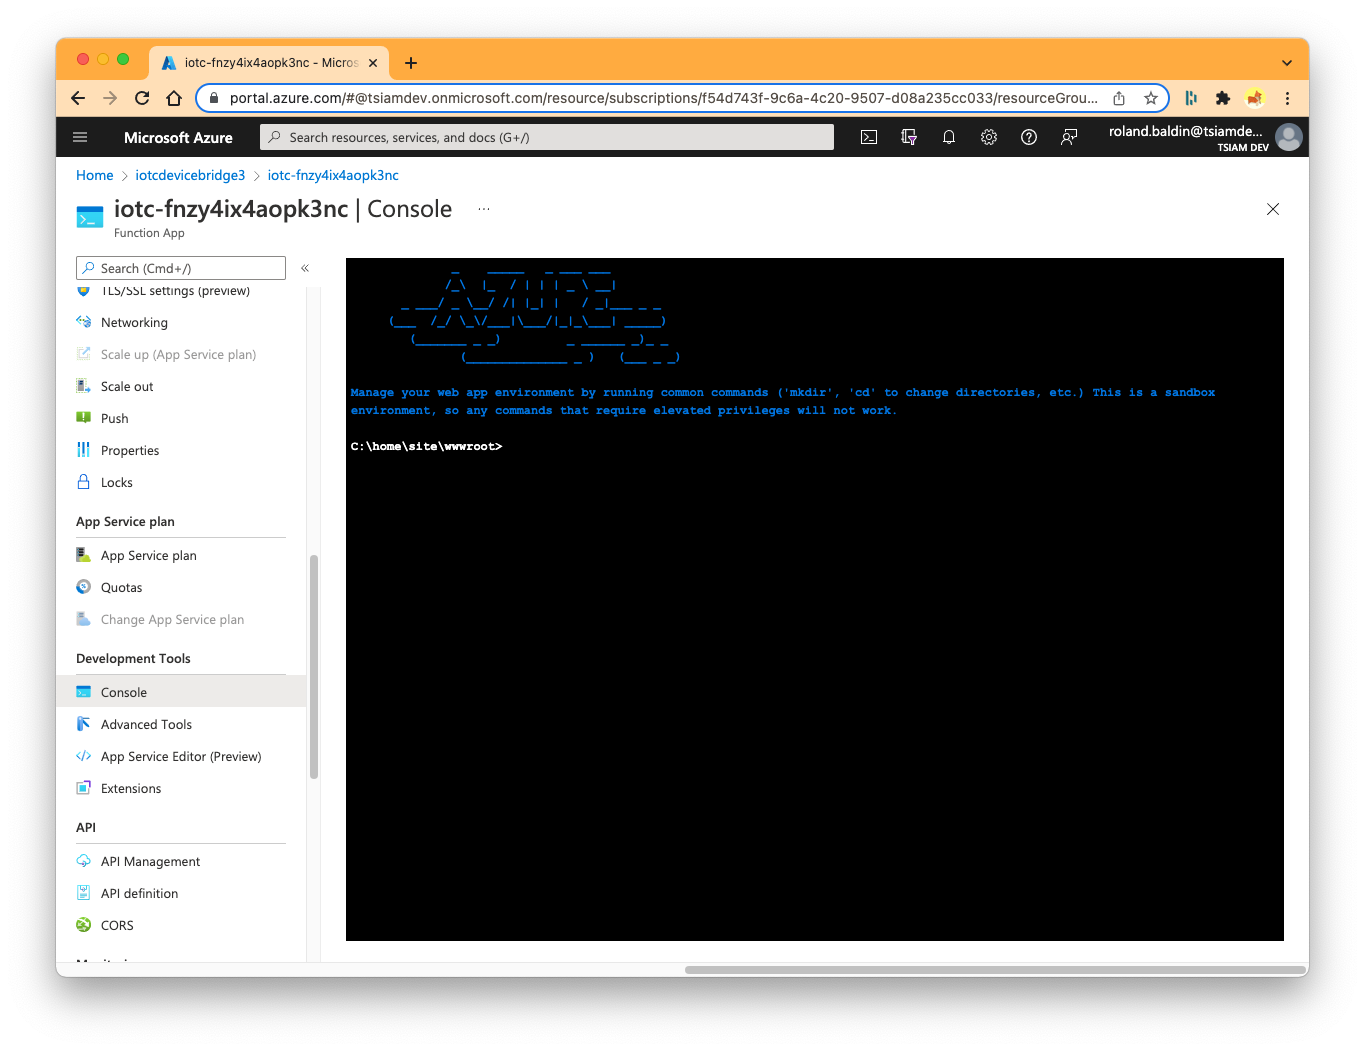
To install all JavaScript/nodejs package run the following commands on console
cd IoTCIntegration
npm install
npm audit fix
After you installed the required packages you should restart the Function IoTCIntegration by disabeling and re-enabeling it again.
After this you can test the IoT Device Bridge with the following steps:
- Open the Function IoTCIntegration
- Select Code + Test function in the Developer section.
- Open the Logs screen by clicking Logs at the bottom of the code screen.
- Click the Test/Run button above the code screen.
- In the Body of the Input tab input the following test body:
{
    "device": {
        "deviceId": "351938100103239"
    },
    "measurements": {
        "CO2": 100,
        "Temperature": 30.33
    }
}
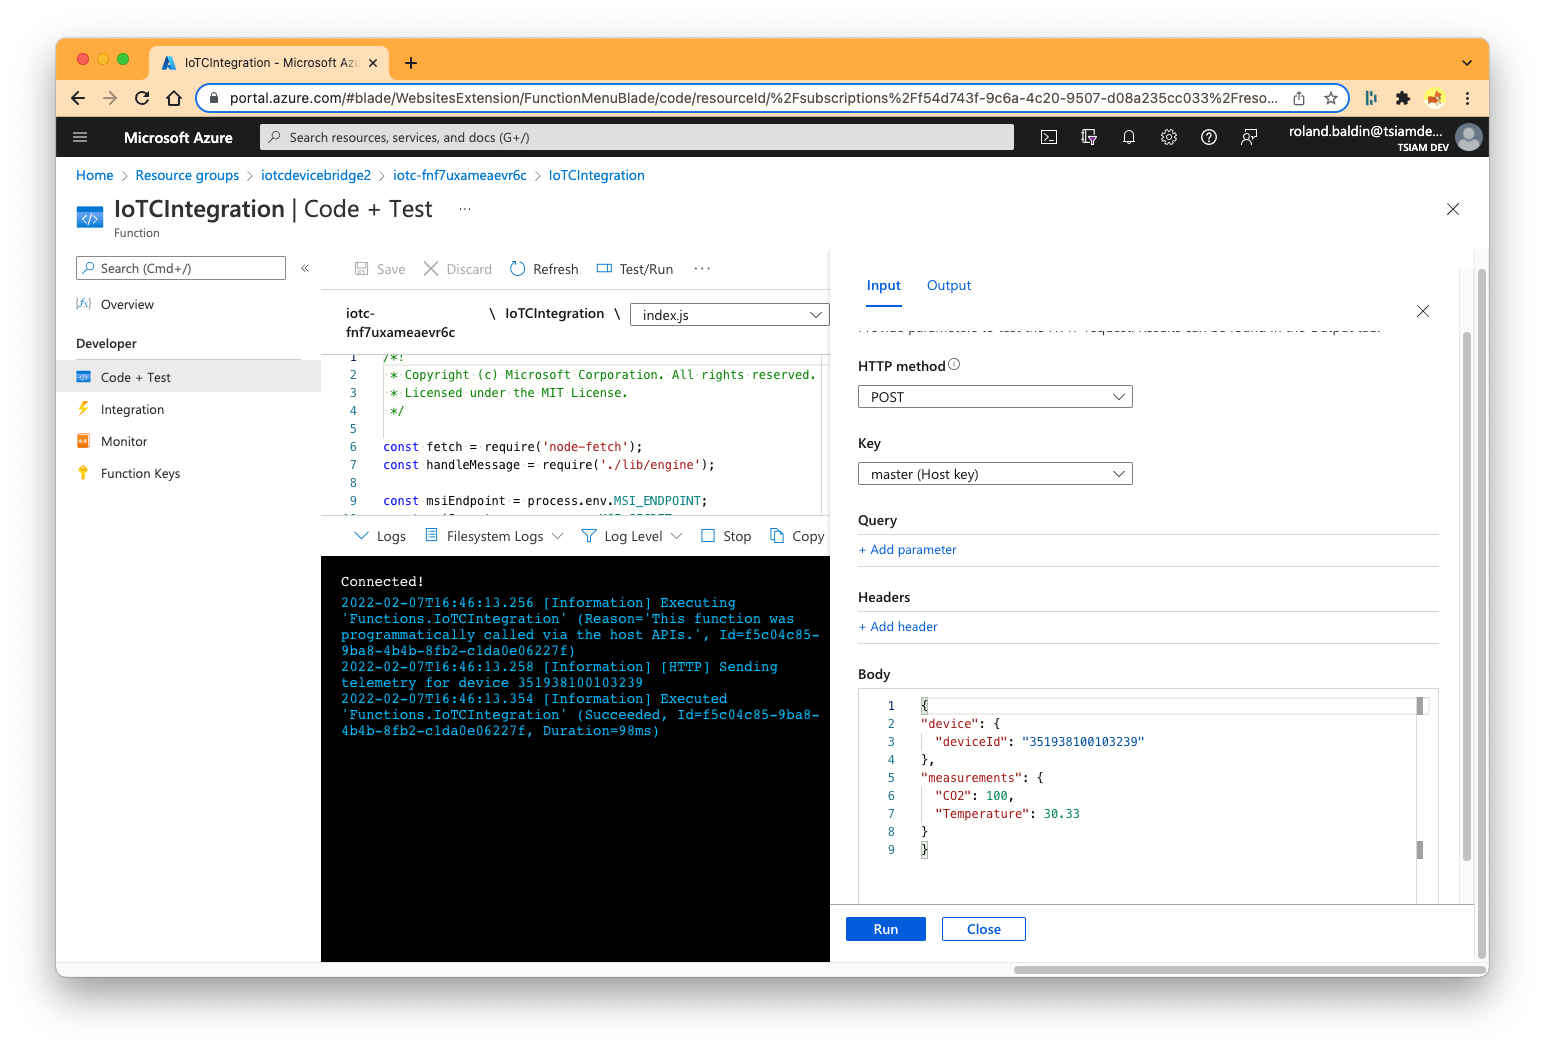
To execute the test push the Run button.
If your IoT Device Bridge has been executed successfully you should see 200 OK as HTTP response code in the Output tab of the test screen.
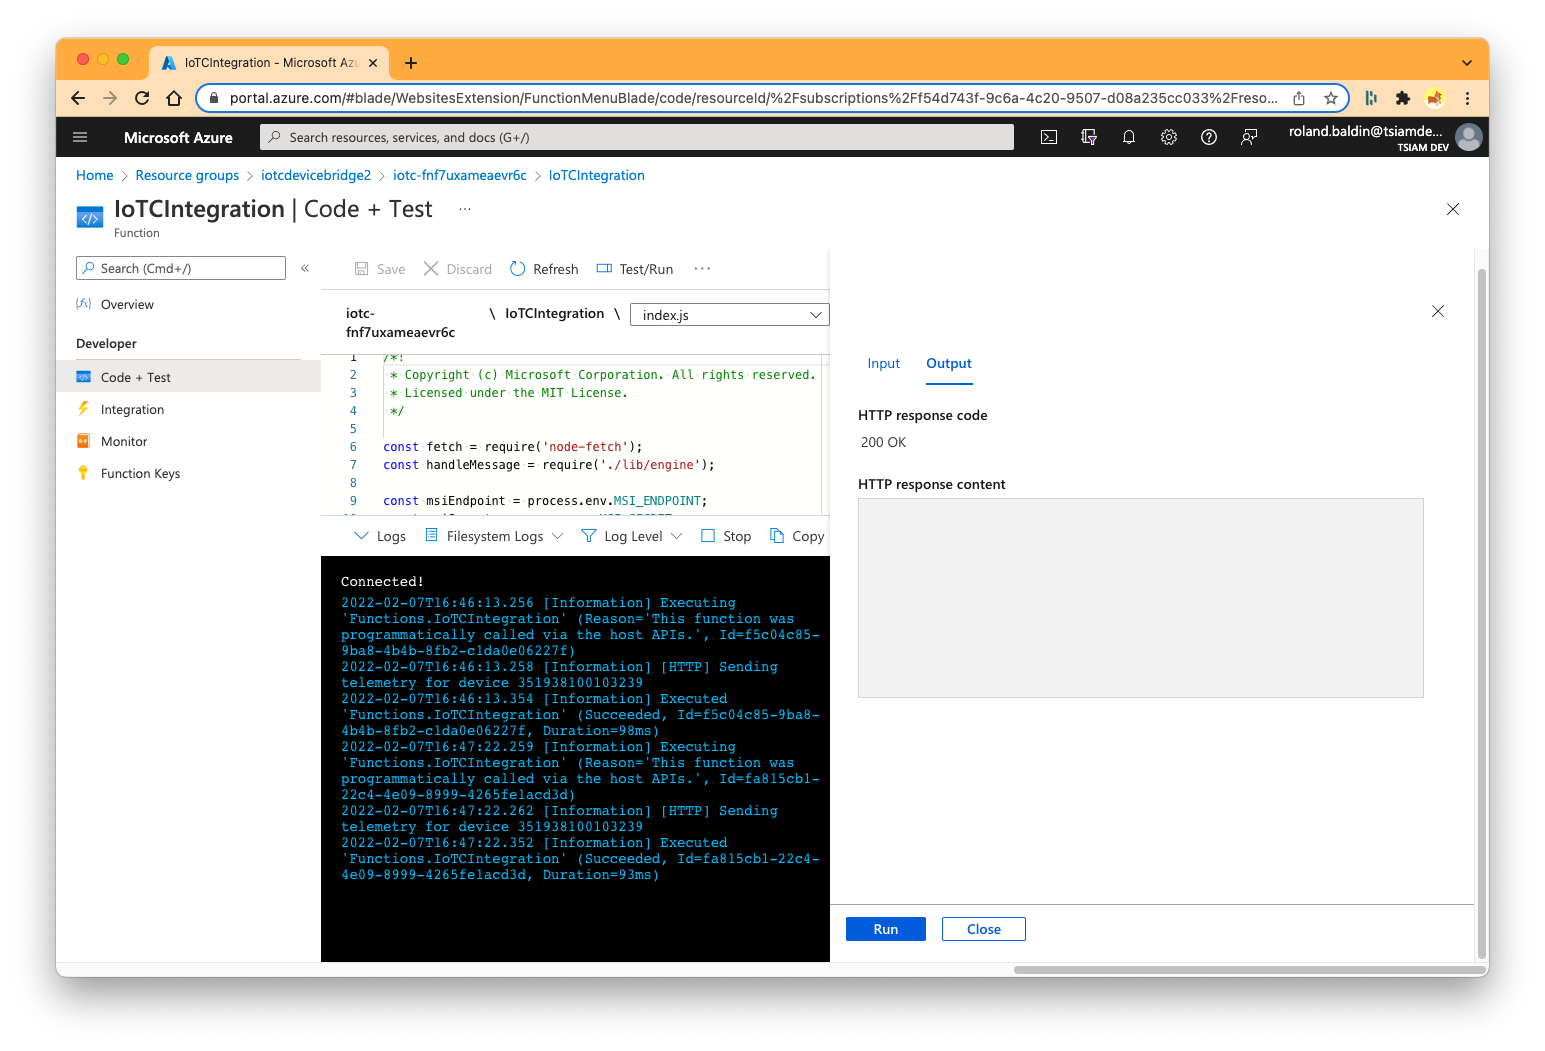
As next you can request your IoT Device Bridge from outside Azure via the internet. To do so you can use the shell command curl or Postman web application.
To get the URL of IoT Device Bridge you need to open its Azure Function, select Code + Test screen in the Developer section and copy the URL into your clipboard.
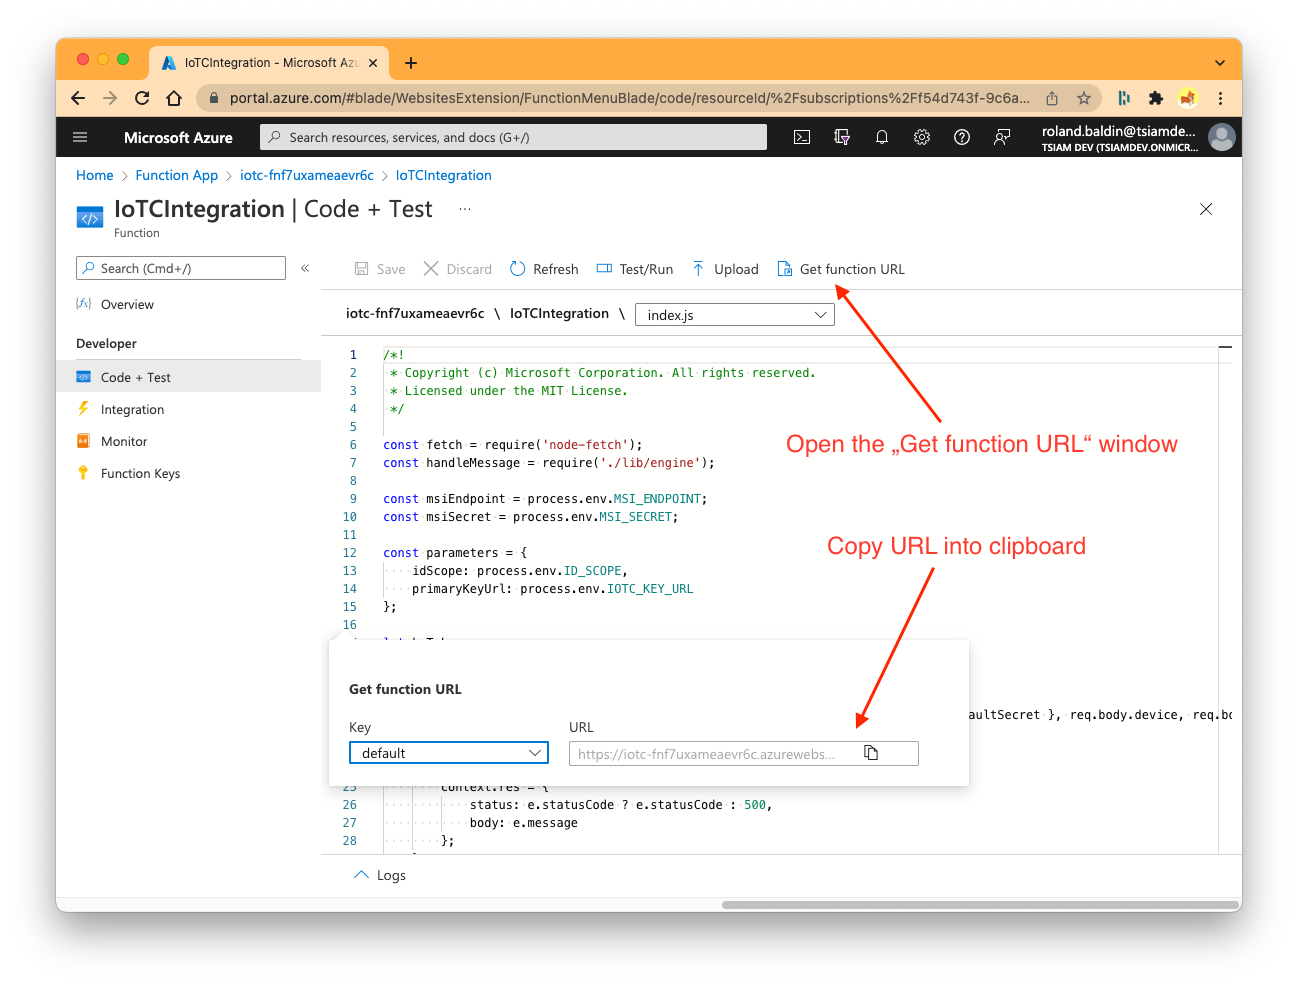
As next you can request your IoT Device Bridge with curl. It should looks like this:
curl --request POST \
     --url 'https://iotc-fnf76c.azurewebsites.net/api/IoTCIntegration?code=sag34pa12HHGgvXGDnD8AK/g5fg==' \
     --header 'Accept: application/json' \
     --header 'Content-Type: application/json' \
     --data '
{
  "device": {
    "deviceId": "351938100103239"
  },
  "measurements": {
    "CO2": 999,
    "Temperature": 9.99,
    "BatteryV":3.33,
    "Humidity": 77,
    "Presence":1
  }
}
'
If everything works fine you shouldn't see anything on your console but you should see a new telemetry record for your test device in Azure IoT Central.
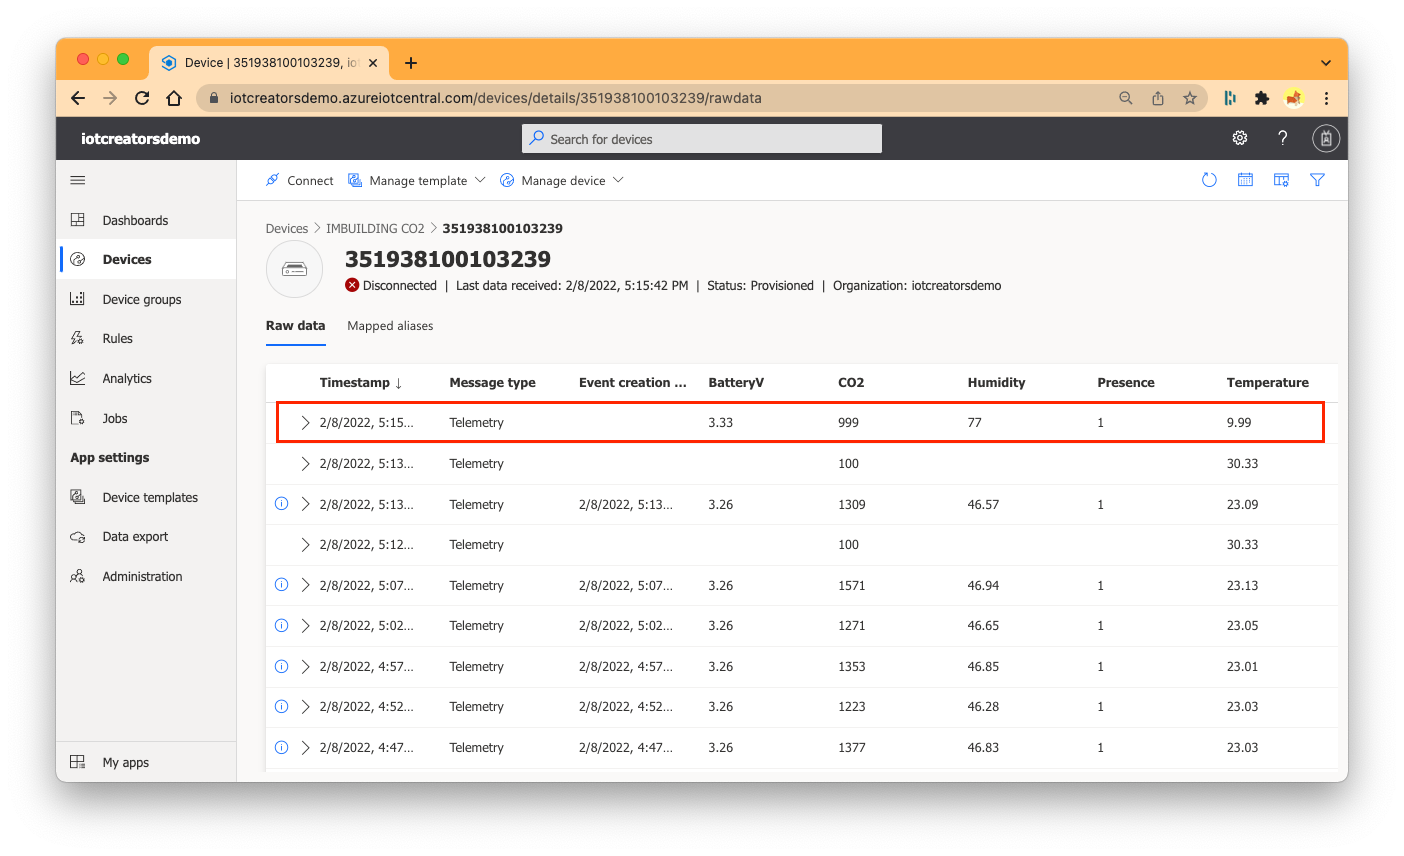
If you reached this point you implemented 90% of your complete end-to-end IoT solution. 👏 👏 👏
You are ready now to link your IoT Creators device project together with your Azure IoT Device Bridge.
Configure IoT Creators to integrate with Azure IoT Device Bridget
In the next steps you will link together your IoT Creators device project and your Azure IoT Device Bridge.
This will be done by configuring the URL https://dev-integr.scs.iot.telekom.com/az-iot-device-bridge-uplink-adapter/ along with some specific header fields of the Azure IoT Central Application Adapter to your IoT Creators device project.
- Log into IoT Creators platform and open the project into which you registered your device before.
- Activate the tap YOUR APPLICATION SEVER
- Input the required callback url and headers fields as described below
- Push the SAVE button.
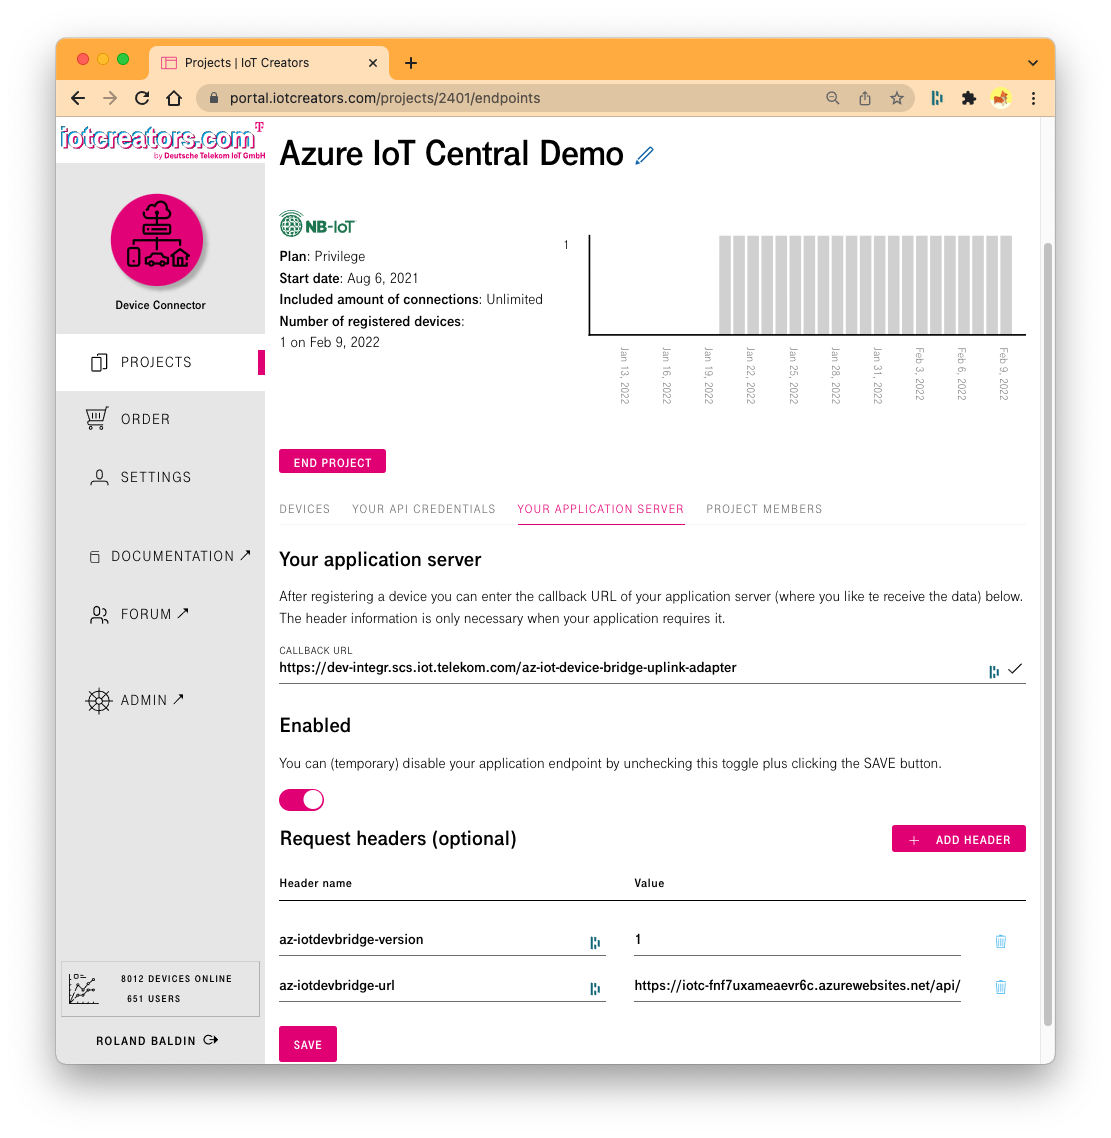
By pushing the SAVE button not only the URL and the header fields are stored, they are tested. If something is wrong the test returns with error and you cannot store your settings.
Callback URL
The CALLBACK URL is the url of your application endpoint to which all messages of the devices in the project are forwarded as HTTP POST request (a sample body of such a HTTP POST request is given below).
Use https://dev-integr.scs.iot.telekom.com/az-iot-device-bridge-uplink-adapter as URL. This is our integration service for Azure IoT Central via IoT Device Bridge.
Header Fields
| Name | Description / Sampe |
|---|---|
| az-iotdevbridge-version | Description: Version of the Azure IoT Device bridge. Use 1 in case you are using the simple one-way version of Device Bridge. Use 2 in case you are using the bidirectional version of Device Bridge. |
| az-iotdevbridge-url | Description URL to the HTTP interface of the Azure IoT Device Bridge. Sample for V1 device bridge: https://iotc-fnf7uxameaevr6c.azurewebsites.net/api/IoTCIntegration?code=sag34S30Oxfjah/FO21cY....K/g5fg== Sample for V2 device bridge: https://iotcreatorsdemo.westeurope.azurecontainer.io/ |
| az-iotdevbridgel-v2auth | Description: The Azure IoT Device Bridge V2 requires an additional application key which is defined during its creation. This key is added as header field x-api-key to the request for the adapter to the Device Bridge. |
| decoder-url | Description: Azure IoT Device Bridge requires that the messages which are sent to the HTTP interface are compliant to the JSON format which is configured to IoT Central. By the field decoder-url you can provide a web-hook url to which the messages are sent for translation before they are sent to Azure IoT Device Bridge. |
| decoder-auth | Description: In case your decoder-url requires authorization you can it to the field decoder-auth. This value of this field as used as value in the field Authorization when the decoder-url is requested. Sample: decoder-auth: Basic am9ubnk6bWN3aWZl |
😃😃😃😃😃😃😃
If you reached this point - Congratulation !! Your done with building your end-to-end IoT Solution.
As the very last step you will verify in Azure if everything works fine by answering the following questions:
- does the Azure Function of your DDD service receives requests and doesn't create errors?
- does the Azure Function of your IoT Device Bridge receives requests and doesn't create errors?
- does your device in Azure IoT Central received messages in the Raw data screen?
Step 5: Verification in Azure
To verify if all decoding and integration functions you just implemented in Azure are triggered and working fine you need to check the Azure function of both your custom DDD service and the IoT Device Bridge.
If you cannot see any errors in the functions your uplink messages should be visible in the Raw data screen of your device in IoT Central.
Check Custom DDD Service
- Open the function decode in your Azure Function you created to implement your custom DDD service.
- Select Code + Test in the Developer section.
- Click on Logs button at the bottom of the code screen.
- Click on Maximize above the console window.
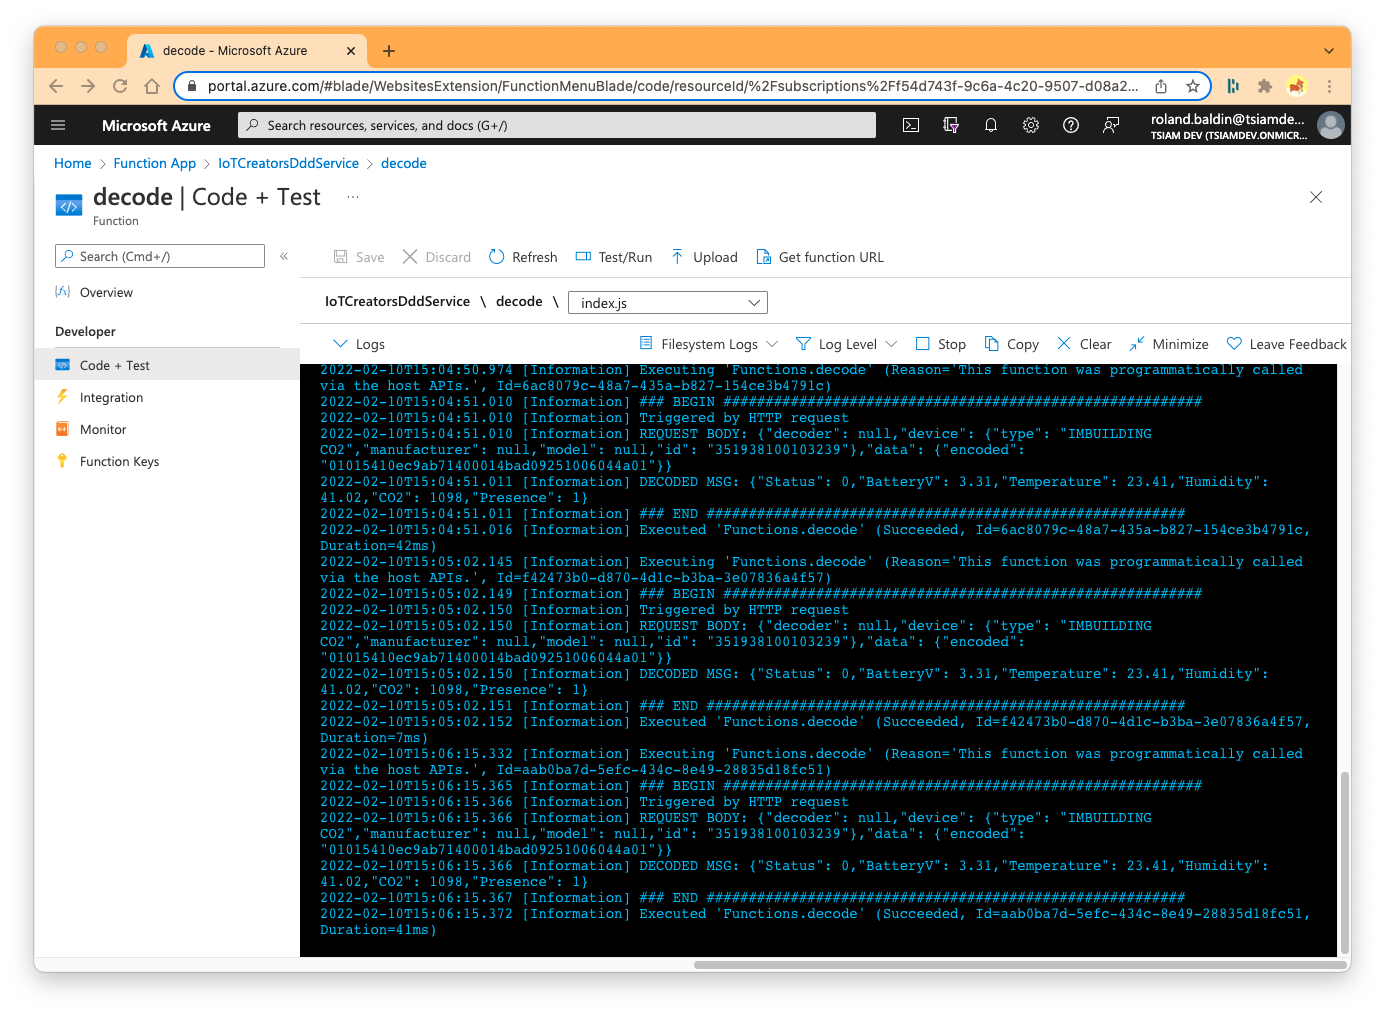
If your custom DDD service has been triggered and processed correctly you shouldn't see any error output on the console and for each call you should see a line like this:
2022-02-10T15:06:15.366 [Information] DECODED MSG: {"Status": 0,"BatteryV": 3.31,"Temperature": 23.41,"Humidity": 41.02,"CO2": 1098,"Presence": 1}
If you are sure that your custom DDD service is triggered by IoT Creators SCS application adapter correctly and performing without any errors you can continue to check the IoTCIntegration function within the Azure Function of your IoT Device Bridge.
In case your custom DDD service is not called by IoT Creators SCS application adapter or creates errors I recommend to use the command line tool curl or the web-application Postman to verify if your configuration in the IoT Creators device project is ok.
Execute the following command on your local console.
curl --request POST \
     --url 'https://dev-integr.scs.iot.telekom.com/az-iot-device-bridge-uplink-adapter' \
     --header 'Accept: application/json' \
     --header 'Content-Type: application/json' \
     --header 'az-iotdevbridge-version: 1' \
     --header 'az-iotdevbridge-url: <REPLAYS WITH YOURS>' \
    --header 'decoder-url: <REPLAYS WITH YOURS>' \
     --data '
{
    "reports":[
        {
            "serialNumber":"IMEI:351938100103239",
            "subscriptionId":"1131dad4-563e-4099-8c93-5410761f950a",
            "resourcePath":"uplinkMsg/0/data",
            "value":"01015410ec9ab71400014bad09251006044a01",
            "customAttributes": {
                "deviceType":"IMBUILDING CO2"
            }
        }
    ],
    "registrations":[],
    "deregistrations":[],
    "updates":[],
    "expirations":[],
    "responses":[]
}
'
Check IoT Device Bridge
- Open the function IoTCIntegration in your Azure Function of IoT Device Bridge..
- Select Code + Test in the Developer section.
- Click on Logs button at the bottom of the code screen.
- Click on Maximize above the console window.
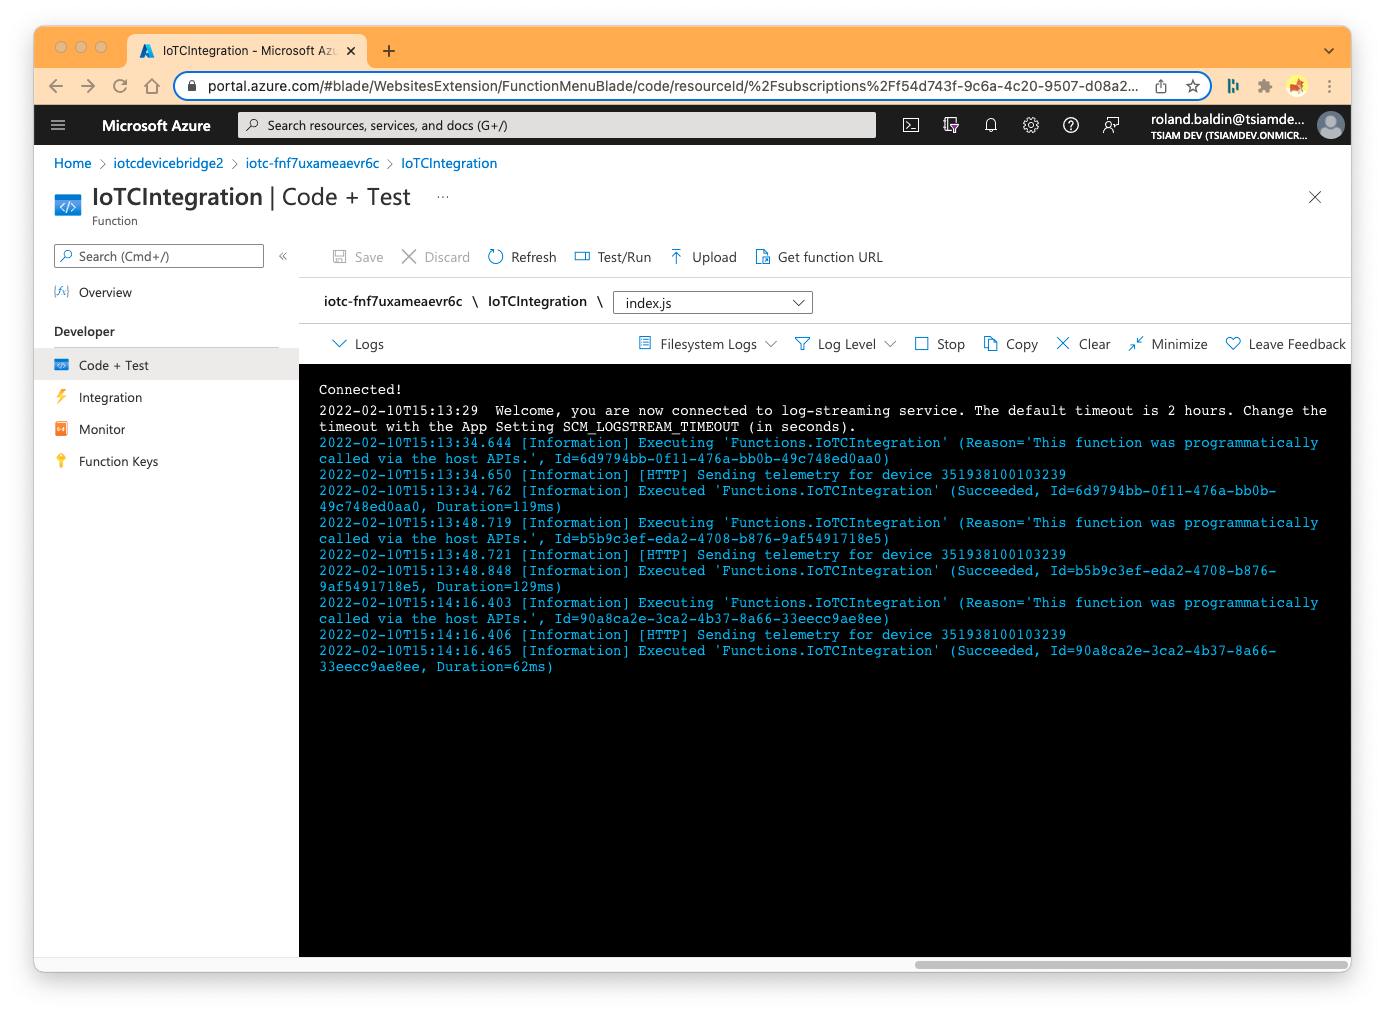
If your IoT Device Bridge works fine you shouldn't see any error outputs on the console and some beeing called notifications such as
2022-02-10T15:13:34.644 [Information] Executing 'Functions.IoTCIntegration' (Reason='This function was programmatically called via the host APIs.', Id=6d9794bb-0f11-476a-bb0b-49c748ed0aa0)
2022-02-10T15:13:34.650 [Information] [HTTP] Sending telemetry for device 351938100103239
2022-02-10T15:13:34.762 [Information] Executed 'Functions.IoTCIntegration' (Succeeded, Id=6d9794bb-0f11-476a-bb0b-49c748ed0aa0, Duration=119ms)
In case your IoT Device Bridge is not called by IoT Creators SCS application adapter or creates errors I recommend to use the command line tool curl or the web-application Postman to verify if your configuration in the IoT Creators device project is ok. You can use the the same command as described above.
Check IoT Central
If your custom DDD service and your IoT Device Bridge are called by IoT Creators SCS application adapter and working fine you can check if the device uplink messages are arriving in your IoT Central.
Perform the following steps:
- Open your IoT Central
- Select Devices in the main function bar on the left side of the window.
- Select All devices in the Devices section and open your device by clicking on the Device name.
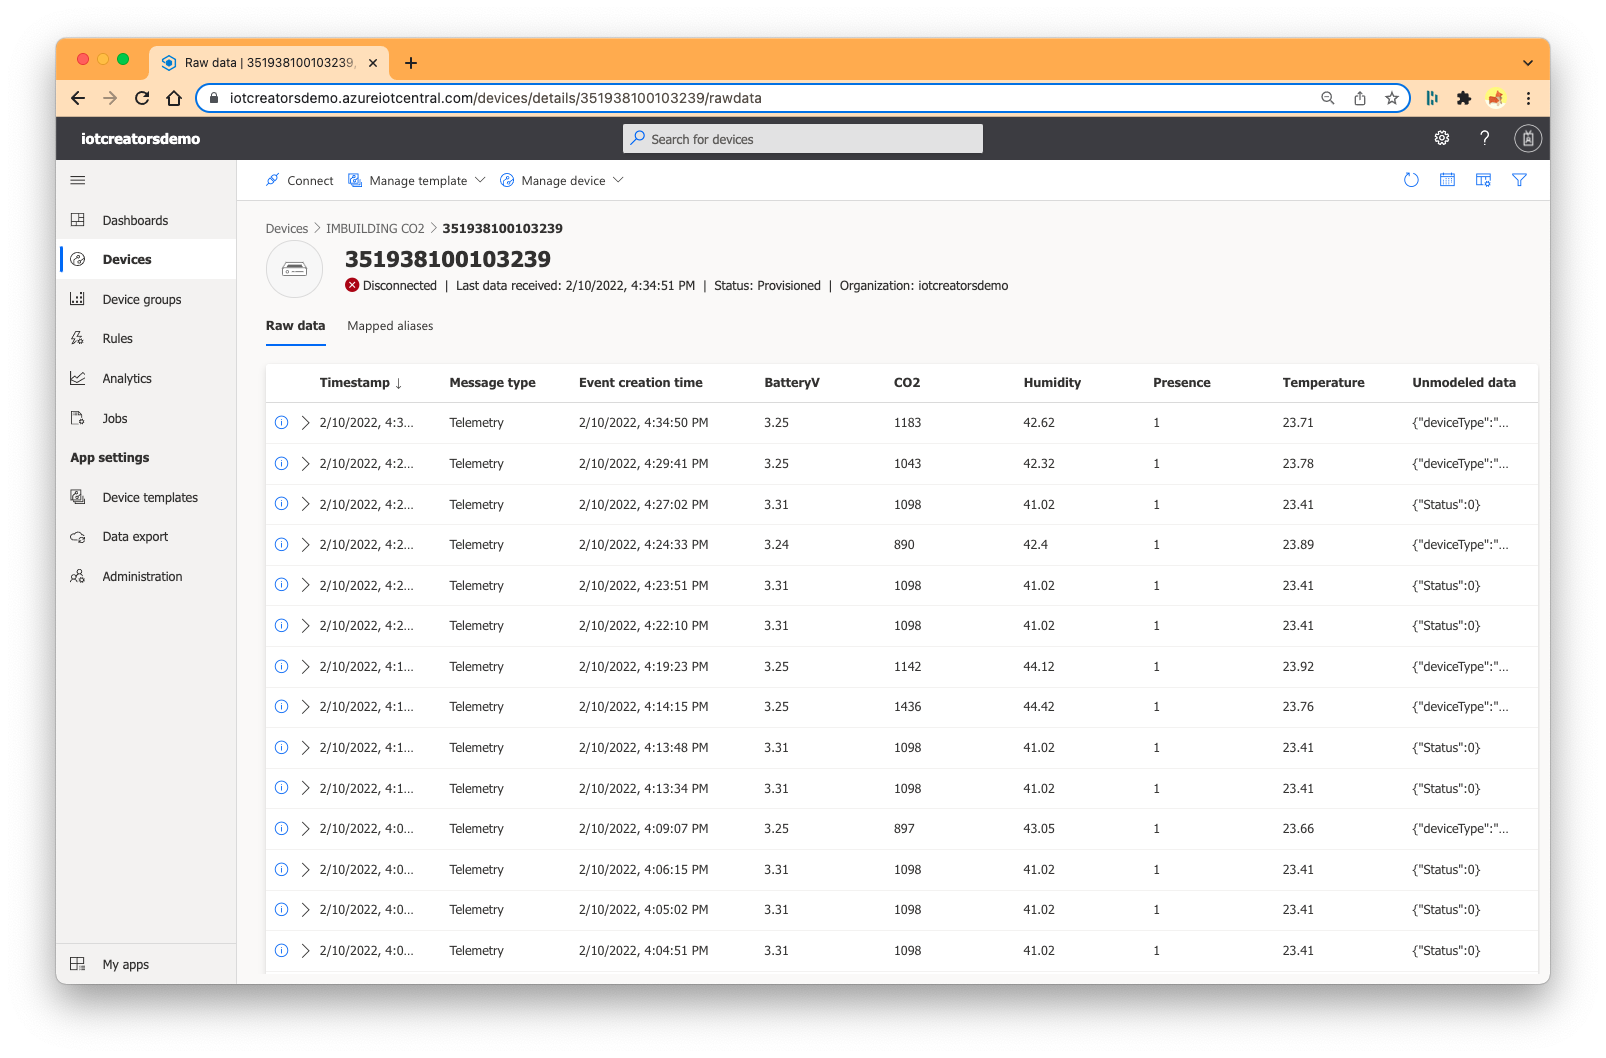
By default the main screen of the device displays the list of *Raw data of the device. If everything works fine you should see all the uplink messages which have been sent from your device or from your test calls with curlor Postman.
Thanks
👏 YOU ARE DONE 👏
If you walked through all the steps of building your own IoT end-to-end solution and ending up here you did a great job! Congratulations, your are a Start ⭐ .
Thank you very much for taking the time to work through this tutorial. Hopefully it helped you to understand things in the field of IoT and you also had a little fun.
If you have any suggestions or corrections to improve the tutorial, I would appreciate you contacting us at support @ iotcreators.com.
Updated almost 4 years ago
