PIKK Systems PIKKSENSE PS-280

The PIKKSENSE PS-280 is a multi protocol multi sensor system. It features a temperature and humidity sensor onboard.
Due to it modular concept and construction it´s extremely versatile and adaptable to customers´ special requirements as well.
It features:
- Enclosure shaply: ABS white RAL9016, Dimensions (L x W x D): 140 x 65 x 26 mm
- Power supply reliable: External 5-36VDC or internal 4 Li 3.6V, AA, >=10.000 mAh for up to 10 years stable operation
- Communication through NB-IOT (or wifi)
- Protocols standardized: LwM2M
Useful resources
Find here the useful resources:
| Title | Link |
|---|---|
| General information | https://www.pikk-systems.com/products/pikksense/index.htm |
Configuring the device
Register the device
The imei can be found on the top cover of the device, please register the device in your iotcreators project before attempting to connect the device to the network. The device must be registered through the API, since the portal does not support LWM2M registration yet.
Register the device
After registering the device, create a subscription in order for the data to be delivered to your application endpoint.
Create subscription for uplinks and downlinks
Then, create subscriptions for these three events: update, registration and deregistration.
Update, registration and deregistration subscription creation
Opening the device
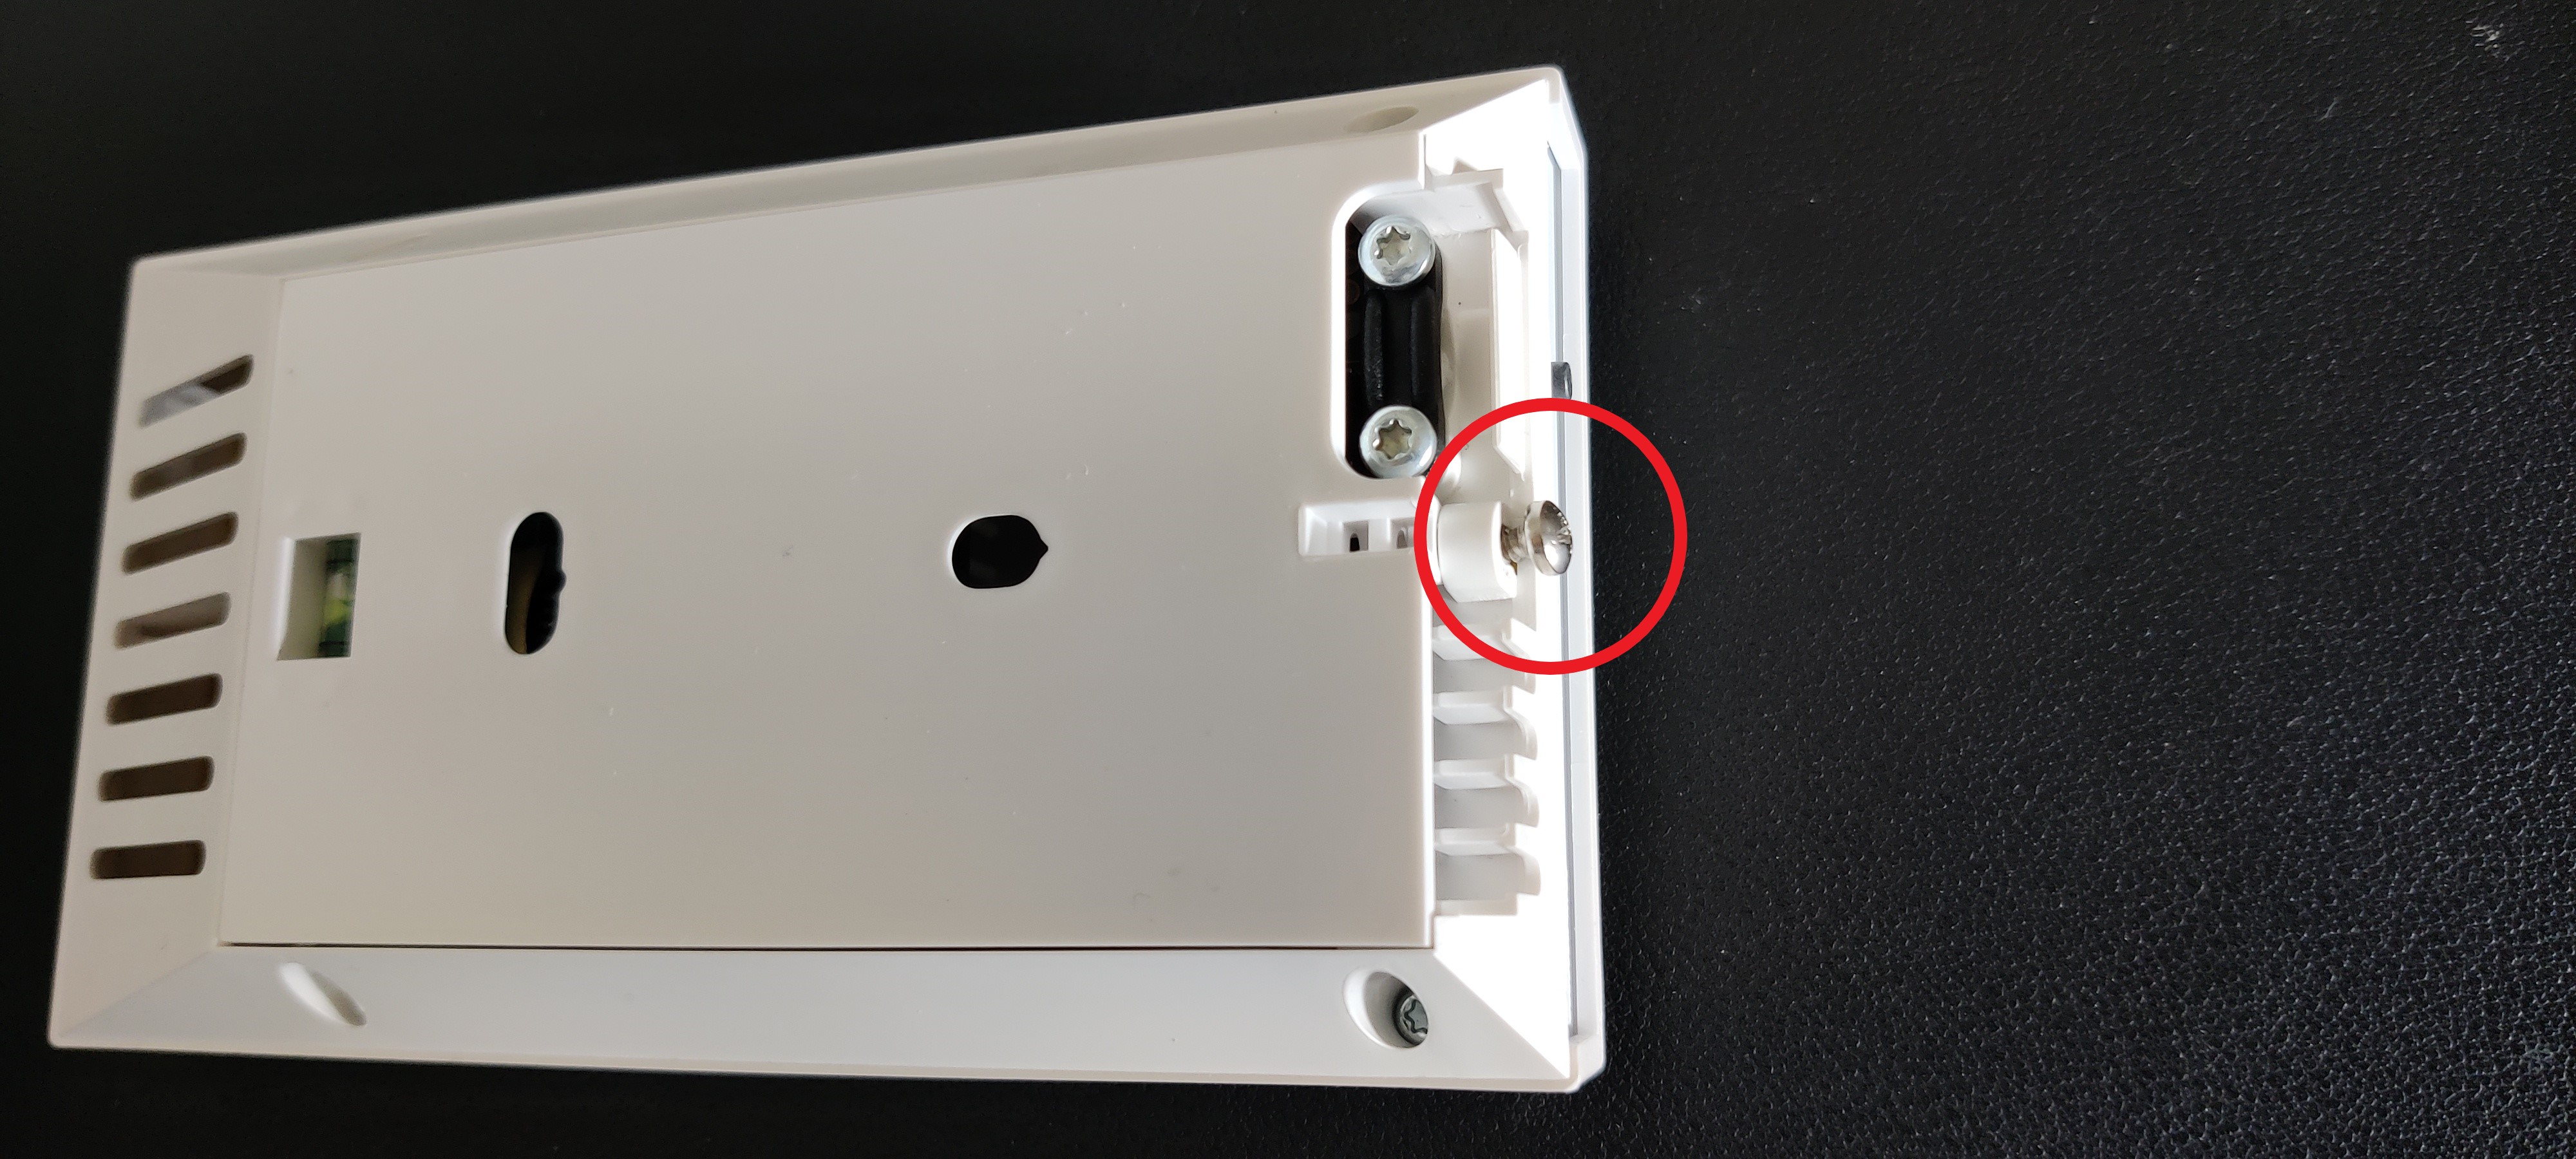
Unscrew the screw that hold the cover in place. This is the top view of the board:

Inserting the sim card
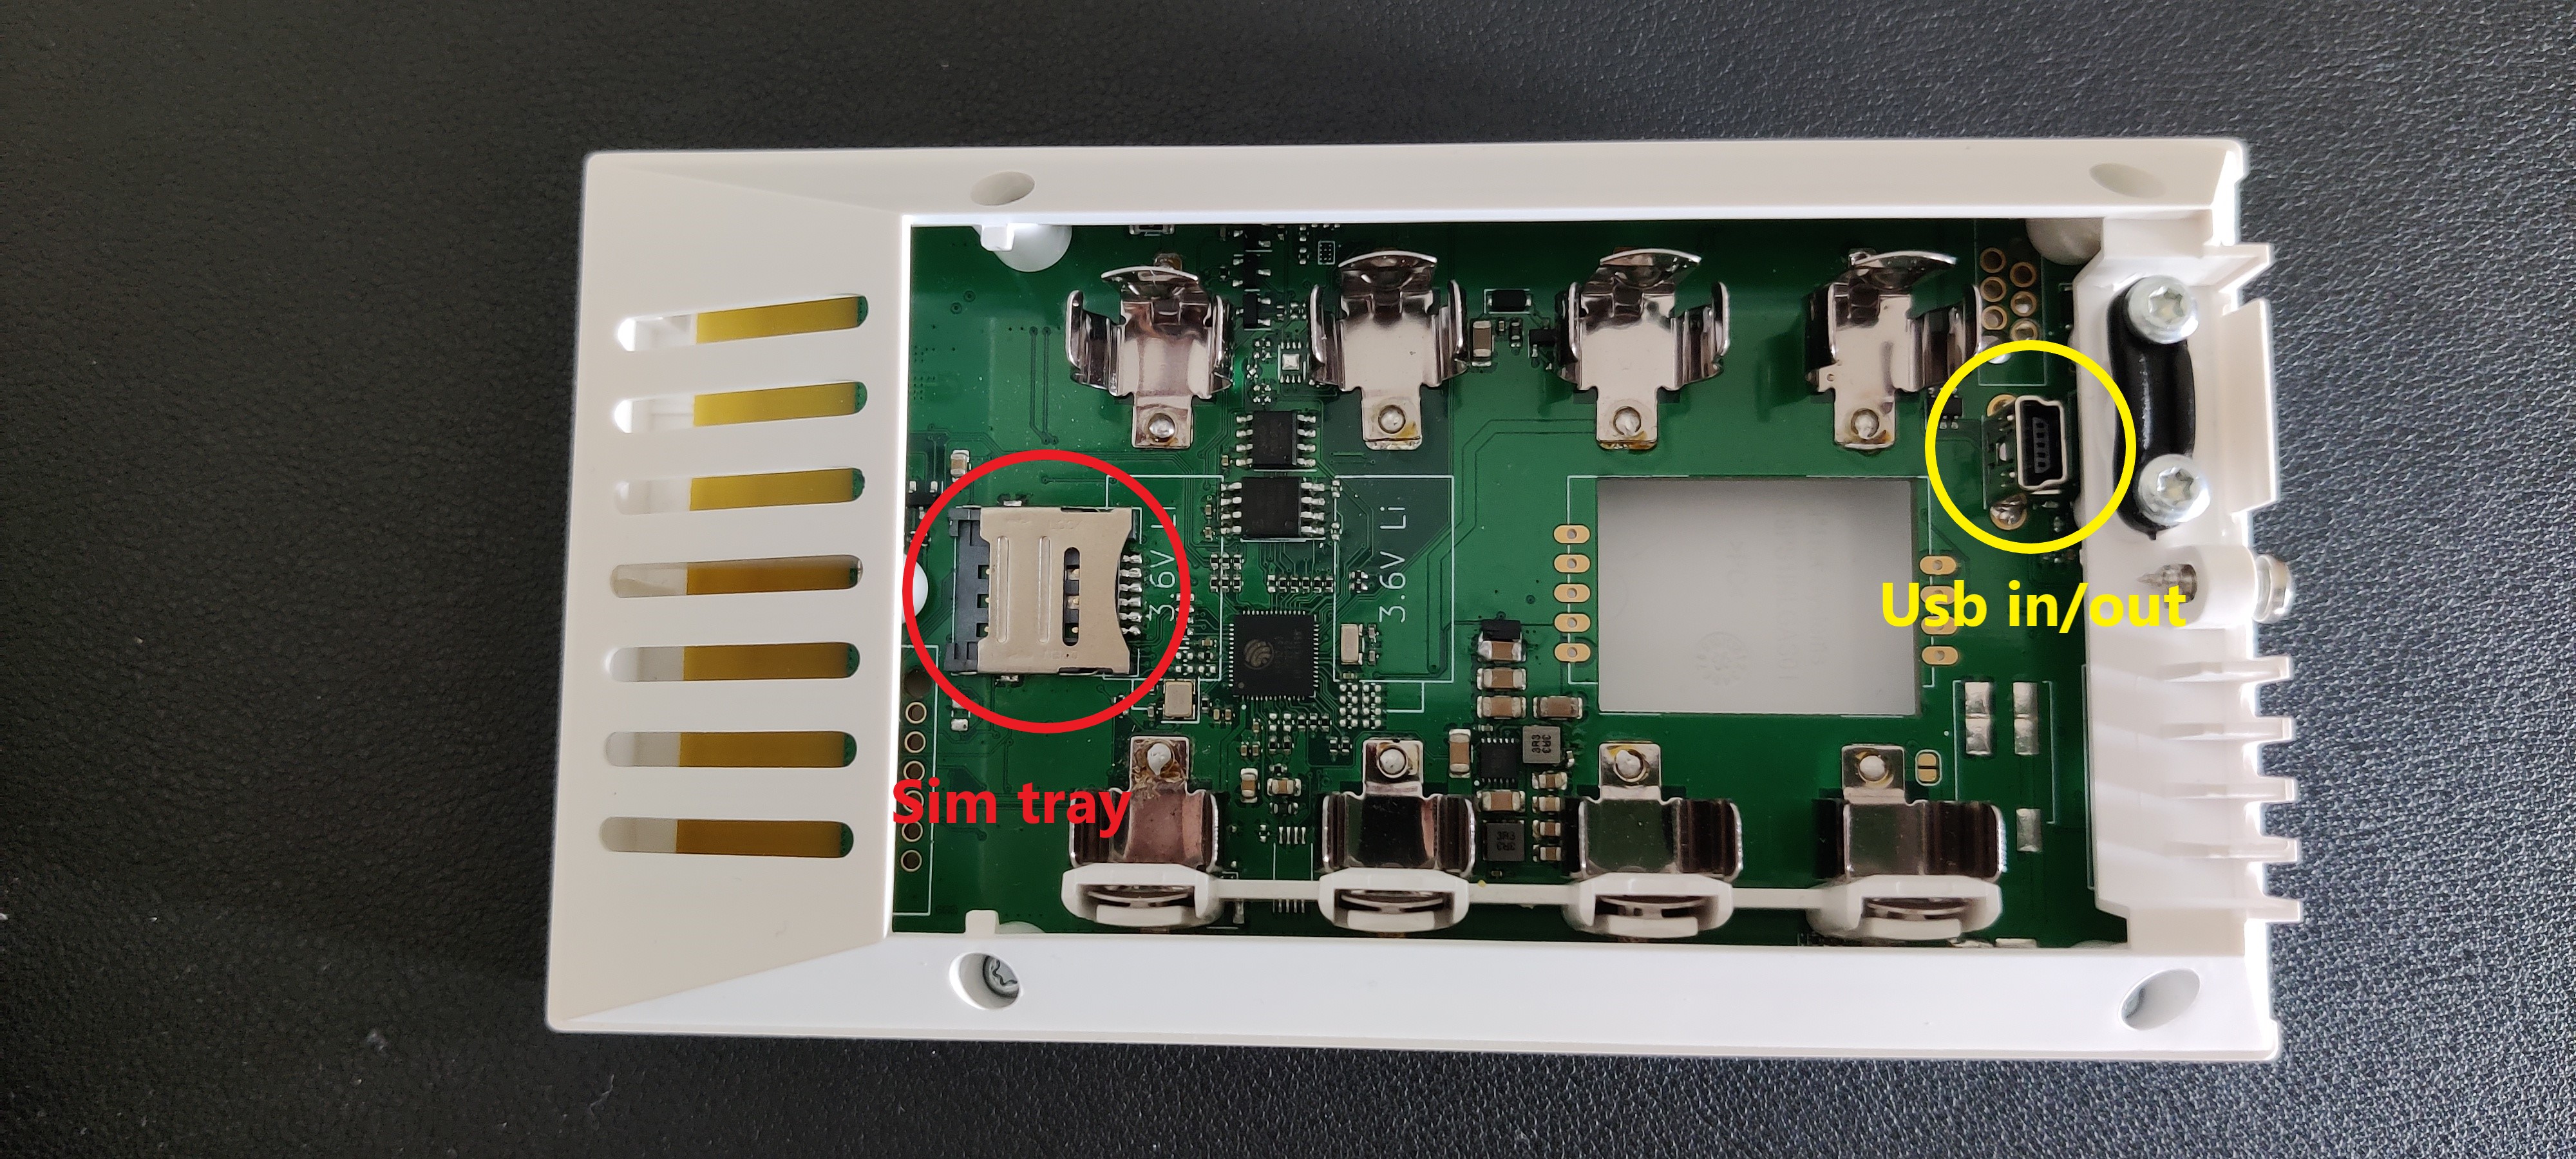
Remove the cover, you will see the device inside with the battery holders and the sim tray.

Connecting the device to a computer
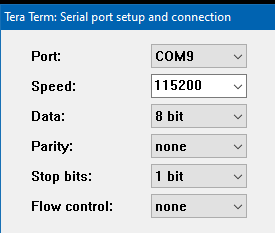
You can then configure the device by attaching a mini-usb cable to the device, start teraterm, with baudrate set to 115200 bps.
Download teraterm
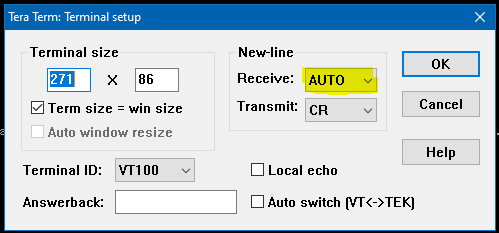
Please set the tera term terminal as shown here for the device:


First startup
The device will automatically boot up though usb connection.
Enter configuration mode
To read the current settings, just input "settings".
Just input
settings
The current settings will be loaded
settings [list|load|store|set|info]
Module    Setting             RO   Value

CORE      BCMP                     1
CORE      CPORT               X    0
CORE      FLOG_MAXF                10
CORE      LOG_LEVEL                0
CORE      MSC                      4
CORE      MSI                      300
CORE      SERIAL              X    PS280-123456
CORE      SHELL_TO                 30
CORE      SHELL_TO_ENA             0
CORE      TRANSPORT                modem
CORE      VERSION             X    0.3.6.2396.5545962.20230608_102108
HUB       LIFETIME                 80
HUB       NTP_IP                   de.pool.ntp.org
HUB       NTP_PORT                 123
HUB       PROTOCOL                 udp
HUB       REMOTE_IP                172.27.130.105
HUB       REMOTE_PORT              5684
HUB       TSYNC                    1440
HUB       TSYNC_WAIT               1
HUB       TYPE                     lwm2m
HUB       T_RETRY                  60
HUB       T_RETRY_MAX              43200
HUB       T_RETRY_MODE             1
LWMM      BS_ENA                   0
LWMM      EP                       <identity>
MODEM     APN                      cdp.iot.t-mobile.nl
MODEM     APN_PW
MODEM     APN_USER
MODEM     BANDS_LTE                [20]
MODEM     BANDS_NB                 [8,20]
MODEM     CAT                      any
MODEM     OP                       22210
MQTT      CLIENT_ID
MQTT      MAX_RETRY                4
MQTT      PW
MQTT      QOS                      1
MQTT      TIMEOUT                  15
MQTT      TOPIC_DOWN               PS-280/down
MQTT      TOPIC_UP                 PS-280/up
MQTT      USER
OTA       PORT                     80
OTA       REMOTE_IP
OTA       SEC_MODE                 0
OTA       UPDATE                   0
OTA       URL
SEC       CA_PATH                  /sec/ca.pem
SEC       CC_PATH                  /sec/cc.pem
SEC       LOG_LEVEL                0
SEC       MODE                     10
SEC       PSK                      <psk_id>
SEC       PSK_ID                   <psk_identity>
SEC       TO_RD                    3
SEC       UK_PATH                  /sec/uk.key
SIG       BOOT_AUR                 1
SIG       BOOT_VIS                 1
SIG       REG_VIS                  1
THRESH    VBAT_VBAT_ENA            0
THRESH    VBAT_VBAT_LO             -1000
THRESH    VBAT_VBAT_HI             1000
THRESH    AHT_HUM_ENA              0
THRESH    AHT_HUM_HI               1000
THRESH    AHT_HUM_LO               -1000
THRESH    AHT_TEM_ENA              0
THRESH    AHT_TEM_HI               1000
THRESH    AHT_TEM_LO               -1000
WIFI      AP_PW                    ****
WIFI      AP_SEC                   wpa2_psk
WIFI      AP_SSID                  teh_internets
WIFI      TX_POWER                 15
Setting network parameters
You will need to configure the usual iotcreators parameters in order to attach the device to the iotcreators, APN, server address and port, LWM2M settings (key, identity).
The device must be configured with pre-shared keys (PSK).
Settings can be set with this syntax:
settings set [module] [ro] value
You can configure the device to connect to the the network and to the lwm2m server with a simple script, that you can copy paste from here:
sendln 'settings set modem apn <apn_here>'
mpause 500
sendln 'settings set hub remote_ip 172.27.130.105'
mpause 500
sendln 'settings set hub remote_port 5684'
mpause 500
sendln 'settings set hub lifetime 80'
mpause 500
sendln 'settings set sec mode 10'
mpause 500
sendln 'settings set sec psk_id <your_imei_here>'
mpause 500
sendln 'settings set sec psk <your_psk_key_in_hex_string_format_here>'
mpause 500
sendln 'settings set hub protocol udp'
mpause 500
sendln 'settings set hub type lwm2m'
mpause 500
sendln 'settings set lwmm bs_ena 0'
mpause 500
sendln 'settings set lwmm ep "<your_imei_here>"'
mpause 500
sendln 'settings set core transport modem'
mpause 500
sendln 'reboot'
mpause 500
If is suggested to manually configure the plnm id of your desired network if you are sure the device will stay stationary, to do so just paste these lines on top of the previous script as so:
sendln 'settings set modem op <plnm_id>'
mpause 500
Just save it with .ttl extension and load it in Tera Term in Menu Control ---> Macro.
See below to configure the right APN:
Check network connection info
Working mode
Device registration
If the connection parameters have been correctly input, the device will initiate the connection and send a registration message, that you will receive on your application endpoint.
{
      "deviceType": "device",
      "serialNumber": "<imei_here>",
      "timestamp": 1686312455181,
      "make": "PIKK-Systems",
      "model": "PS-280",
      "firmwareVersion": "<firmware_version>",
      "groupName": "<group_name>",
      "imsi": "N/A",
      "address": "PS280-<serial_number>",
      "protocol": "LWM2M",
      "tags": "N/A",
      "subscriptionId": "b1b65d65-a10f-4027-9218-ffae1dee72c0",
      "deviceProps": {
        "device/0/firmwareVersion": "<firmware_version>",
        "device/0/availablePowerSources/0": "1",
        "device/0/model": "PS-280",
        "device/0/availablePowerSources/1": "5",
        "device/0/manufacturer": "PIKK-Systems",
        "device/0/hardwareVersion": "<hardware_version>",
        "device/0/softwareVersion": "",
        "device/0/powerSourceVoltage/0": "1000",
        "device/0/endPointClientName": "<imei_here>",
        "device/0/errorCode": "0",
        "device/0/serialNumber": "PS280-<serial_number>",
        "device/0/currentBindingMode": "U",
        "device/0/powerSourceVoltage/1": "0"
      },
      "customAttributes": {
        "name": "pikk-ps280"
      }
    }
Reading data from the sensor
The device will update the connection at predefined times. Every time the device updates, it is ready to receive a read request for 10 seconds. This is because it works in "U" binding.
The device features a humidity and temperature onboard. They can be read as for the official LWM2M registry suggests.
- Temperature: 3303/0/5700
- Humidity: 3304/0/5700
This is an example of what is returned by the sensor when reading the temperature (temperature returned in degrees celsius).
{
  "reports": [],
  "registrations": [],
  "deregistrations": [],
  "updates": [],
  "expirations": [],
  "responses": [
    {
      "serialNumber": "<imei_here>",
      "timestamp": 1686559618023,
      "requestId": "47ea210a-3108-4a29-93a3-2d0703178b9f",
      "resources": [
        {
          "resourcePath": "3303/0/5700",
          "value": "{\"3303/0/5700\":26.25732421875}"
        }
      ],
      "result": {
        "code": 0,
        "subCode": null,
        "reason": "Success"
      },
      "operationType": "read"
    }
  ]
}
This is what you can expect by reading the humidity (humidity as float percentage)
{
  "reports": [],
  "registrations": [],
  "deregistrations": [],
  "updates": [],
  "expirations": [],
  "responses": [
    {
      "serialNumber": "<imei_here>",
      "timestamp": 1686559755624,
      "requestId": "b289b206-6a8b-4c92-a00a-2203718fb801",
      "resources": [
        {
          "resourcePath": "3304/0/5700",
          "value": "{\"3304/0/5700\":54.083919525146484}"
        }
      ],
      "result": {
        "code": 0,
        "subCode": null,
        "reason": "Success"
      },
      "operationType": "read"
    }
  ]
}
Observing
You can also observe a resource (e.g its value will be automatically sent at every device update without the need of an explicit read), see below for the details.
Observe from the device
https://docs.iotcreators.com/docs/quectel-bc66-lwm2m#43-observe-request
Forwarding data to your application endpoint
To forward data to your application endpoint, you can follow the user guide here:
Forwarding data
Updated over 2 years ago
